Get Started
This asset requires Unity's Legacy Input System to function as a fallback. Make sure it's enabled in your project.
To enable it:
1. Go to Edit > Project Settings > Player
2. Under the Other Settings tab, find Active Input Handling
3. Set it to Input Manager (Old) or Both
4. Restart the editor if prompted
After importing the FP Mobile Controller asset into your Unity project, you can test it right away by opening the Demo scene located at:
`Assets/FPMobileControl/Example/Scenes/Demo`
To fully test the mobile controls, you'll need a mobile device. While the scene can technically be tested with a keyboard and mouse, that's not really the intended use.
You have two options to test on a mobile device:
1. Build the game with the demo scene and install it on your device
2. Use Unity Remote, which is quicker and more convenient for testing
If you're not familiar with Unity Remote or how to use it, check out this guide:
Once you have Unity Remote ready you only have to disable the Keyboard and Mouse input, for that simple go to MobileInputSettings located in: FPMobileControl -> Resources -> MobileInputSettings -> Toggle OFF the field called Use Keyboard On Editor and that's, now you can test the scene in your device using Unity Remote, that step is not necessary in builds.
Usage
First select one of the Mobile Control prefabs located in: Assets -> FPMobileControl -> Content -> Prefabs -> Mobile Control [*], then drag the prefab in your scene hierachy.
The asset comes with a example Player prefab that can be use as the main player controller system, but for most of developers want this asset to integrate in their own player system, well, we know that and with that in mind we have tried to make the system the most easily possible to integrate in any project and we think we did a good job.
In order to use the Input Mobile you mostly only will need to replace one line of code:
Normally for your player movement you use the standard AWSD or arrow keys using something like:
Input.GetAxis('Horizontal'); Well instead of that you simple have to use:
bl_MovementJoystick.Instance.Horizontal; Is that simple, I know what you maybe thinking, but how I'll suppose to test the game in the editor if I replace the Mouse and Keyboard input?, and it's a good point, but don't worry we got that cover :)
All the mobile buttons and inputs have a fallback method for keyboard and mouse, what that means? well, that means that using the code from above for example bl_MovementJoystick.Instance.Horizontal; will use Input.GetAxis("Horizontal"); if you are in the Editor, so you will have the same input setup for keyboard and mouse and using the mobile inputs in builds or Unity Remote.
Great isn't?
Check the full conversion methods list (which line use to replace what) see the Conversion section.
Conversion
Here you have the full conversion of the standard inputs, take in mind that these are only the most commons inputs that normally are present in FP games, but you can add more buttons if you want (check the Add Buttons section).
NOTE: all Input methods (GetKey, GetKeyDown, GetKeyUp) have their its similar in bl_MobileInput (GetButton, GetButtonDown, GetButtonUp)
Add Buttons - Step 1
Add new buttons is really simply, first open the scene where the Mobile Control Object is, then inside of that object duplicate one of the default buttons (Aim, Reload, Jump or Crouch) -> rename the duplicated button and positioned it as you desired in the Canvas.

Now in the button-> bl_MobileButton attached to it -> you have the following variables:
I think the rest of the variables are self explanatory.
So once you set up these variables you are ready to use the button as you want, check the next step to see some examples of how to implement.
Joystick
The asset comes with two Joysticks implementations, which one use is all up to you, one is a normal mobile joystick and an Area Joystick, this latter as the name say detect the input in a separated RectTransform area that you can resize in the Canvas, unlike the normal joystick that is static and only detect inputs in the joystick RectTransform, the Area Joystick doesn't have a static position, it'll be centered automatically in runtime wherever the player touch in the RectTransform area and start from there, you can change of the joystick by simple drag the prefab (from Assets -> FPMobileControls -> Content -> Prefabs -> Joystick -> *) inside the Mobile Control Canvas in your scene hierarchy.
Despite which one you decide to use, both joysticks have the same output results, by default joystick is only use to handle the player movement and you can access to the Input axis with:
bl_MovementJoystick.Instance.Horizontal
//And
bl_MovementJoystick.Instance.Vertical
bl_MovementJoystick doesn't handle the joystick logic itself, it's just a wrapper singleton instance of bl_JoystickBase.cs, bl_MovementJoystick also implement a feature that allow you define a magnitude of joystick 'tension' that you can use as detection for running, let me explain more simple, in mobile games is not common use a separate button for 'Run' as in Keyboard (LeftShift for example) instead in mobile is used the 'tension' of the joystick = when the joystick is at certain percentage of his max capacity in a axis direction normally up direction.
You can define that magnitude in Joystick (inside the Mobile Control object in hierarchy) -> bl_MovementJoystick -> RunningOnMagnitudeOf.
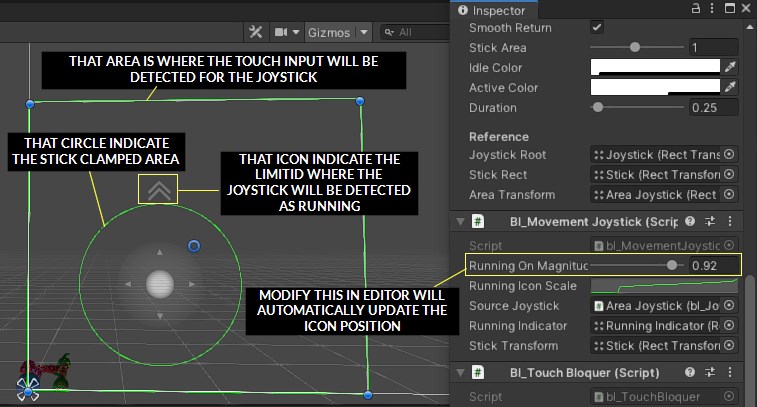
You can detect when is running with:
bl_MovementJoystick.Instance.isRunning TouchPad
The TouchPad is use to move the player camera in game, basically it detect touch input in the device screen and move the camera along with the touch drag direction, now this comes with an inconvenient, since all inputs are detected even when it's not supposed to, for example when open an menu in game and interact with the buttons of the menu, if the player touch the UI buttons the touch pad will detect that event and move the camera, for this we include an easy fix, in all your interactable UI just add the script bl_TouchBlocker.cs and that will handle this problematic.
You can access to the TouchPad axis with:
bl_TouchPad.Vertical
//And
bl_TouchPad.Horizontal
Or optional
Vector2 input = bl_TouchPad.GetInput(); You can modify the sensitivity of touch pad in MobileInputSettings -> TouchPadSensitivity (Located in: Assets -> FPMobileControl -> Resources -> MobileInputSettings).
Or by script with:
bl_MobileInput.TouchPadSensitivity Slot Switcher - Step 1
This is a little bit tricky since every project handle their weapons management differently but we have tried to make this as simple and generic as we can, basically all what the slot switcher do is show the weapon Icon or Name in the HUD and handle the buttons to change the weapons of the main player, now of course the logic to change the weapon in your player has to be handle by you in your player script/scripts, the Mobile Input only cache the touch event to let you know when change it.
So in your weapon management script, you may have a list of the weapons available for the player at the start, the weapons with which the player can swap, these are the ones that we need to show in the slot switcher, we only need 2 data from each of the weapon in the list: the icon and the name can be only one of them or both, as you prefer,
Once we know from where take the info you simply have to something like this on the start of your script:
public Weapon[] startingWeapons;
...
void Start()
{
bl_SlotSwitcher.SlotData[] slotsDatas = new bl_SlotSwitcher.SlotData[startingWeapons.Length];
//loop in all the starting weapons in the list
for (int i = 0; i < startingWeapons.Length; i++)
{
//initializated the slot class
slotsDatas[i] = new bl_SlotSwitcher.SlotData();
//set the weapon info (name and icon)
slotsDatas[i].ItemName = startingWeapons[i]?.gameObject.name;
slotsDatas[i].Icon = startingWeapons[i].weaponIcon;
}
//set the data array to display on the hud
bl_SlotSwitcher.Instance.SetSlotsData(slotsDatas);
}
That's just an example but should work as reference to implement in your own weapon management script, you can inspect this code in the example script WeaponManager.cs.
So with that code we setup the initial weapons the first item of the list will be displayed on the HUD, if you want to modify one of the slots, let's say for example when player pickup a weapon, you have to update the slot data (icon and or name), for do this just call like this:
bl_SlotSwitcher.SlotData slotData = new bl_SlotSwitcher.SlotData();
slotData.ItemName = myWeapon.Name;
slotData.Icon = myWeapon.Icon;
//supposing that the slot changed is the #2
bl_SlotSwitcher.Instance.SetDataForSlot( 2 , slotData);
Check the next step to see how to handle the change slot buttons
Slot Switcher - Step 2
Now in order to handle when the change slots/weapons buttons has been pressed you have to implement a callback in your weapon management script, due there's not direct communication between the bl_SlotSwitcher script and your weapon management script we have to use events.
in your weapon management script add this:
private void OnEnable()
{
//add listener to the change slot event (when press one of the change slot buttons)
//in that listener we have to handle the change of the weapon
bl_SlotSwitcher.onChangeSlotHandler += OnWeaponChange;
}

private void OnDisable()
{
bl_SlotSwitcher.onChangeSlotHandler -= OnWeaponChange;
}

void OnWeaponChange(object sender, bl_SlotSwitcher.SlotChangeEventArgs args)
{
if (args.ChangeForward)
{
//change weapon forward, for example
//ChangeWeapon(m_CurrentWeapon + 1);
}
else
{
//change weapon backward, for example
//ChangeWeapon(m_CurrentWeapon - 1);
}
//we have to let the Mobile slot switcher know if the change has been applied or not
args.ChangeDone = true;
}
Remember validate the args.ChangeDone = ?; since if you don't confirm the icon and text in the HUD will not change
Auto Fire
Another feature is Auto Fire system, a must have feature in now days first person games, the logic is simple detect when an enemy is in-front of the player at certain distance and if's so shoot the weapon automatically after a little delay, since I mention 'detect in-front' of course means fire Raycast, tag comparations each frame = performance impact... but hey, don't worry we got this cover too, our approach still use Raycast since there's not another viable option, but instead of fire each frame you can define a frame rate manually!
To setup the Auto Fire feature you simple have to assign the player camera and define the enemy's tags, where? in the root of Mobile Control in your scene hierarchy -> bl_AutoFire -> assign the player camera and define the tags in the list Detection Tags.
Once you got this set up you only have to integrate one line of code in your weapons scripts, in the same way that you detect when the player press the Fire key or button for example:
if(Input.GetMouseButton(0))
{
Fire();
}
You only have to replace that line with:
if(bl_MobileInput.AutoFireTriggered())
{
Fire();
}