Get Started
To begin, you'll need a map. When we talk about a 'map' in this context, we're referring to a carefully constructed level environment design. This includes all artistic content such as models and prefabs, along with lights, a sky representation, and more. All of these elements should be strategically positioned to create an immersive and realistic battlefield atmosphere.
There are some basic requirements for the map that all Unity users should know that applies for all games, not just MFPS:
-The map models/meshes must have colliders, except for the models that are used only as decoration. All the models/meshes in your scene that the player is not supposed to go through must have a collider.
-Lighting, lighting is a important part of map, but affects the performance of game in a big way. There a tons of tutorials out there on how to build a good scene lighting and bake your scene lightmap, e.g:
https://learn.unity.com/tutorial/introduction-to-lighting-and-rendering#
-Optimized performance over good looking graphics We all love good graphics in a game, but a poorly optimized level could kill your game. MFPS is pretty well optimized in the code-side. but more important than the code, at least in this case, is the graphic optimization. There is a good official Unity post for graphic optimization, check it out:
https://docs.unity3d.com/Manual/OptimizingGraphicsPerformance.html
All right, if you have your map level design ready, let's continue
Set Up Scene - Step 1
As mentioned before you need to have your new map design ready, but not just as a prefab, you need to have it placed in a Unity Scene which contains nothing else but your map environment, if you don't have it, create a new Scene in (top editor menu ➔ File ➔ New Scene) > then in the new empty opened scene place your map environment or design it from scratch in that scene.
Once you have it, save the scene in your Unity Project (File ➔ Save) and then continue below.
Assign your Unity map scene (.scene) in the field below and then click on the Continue button to proceed with the scene validation.
This element is dynamic in the original editor documentation and does not work or render correctly in the static HTML version. It's shown here for reference only — please refer to the built-in editor documentation for full functionality of the doc.
Set Up Scene - Step 2
Now, with the map scene open, let's begin by dragging the necessary objects into the scene to make it compatible with MFPS. Before that, let's first examine the assets already present in the scene. Click the button below for automatic detection.
This element is dynamic in the original editor documentation and does not work or render correctly in the static HTML version. It's shown here for reference only — please refer to the built-in editor documentation for full functionality of the doc.
Set Up Scene - Step 3
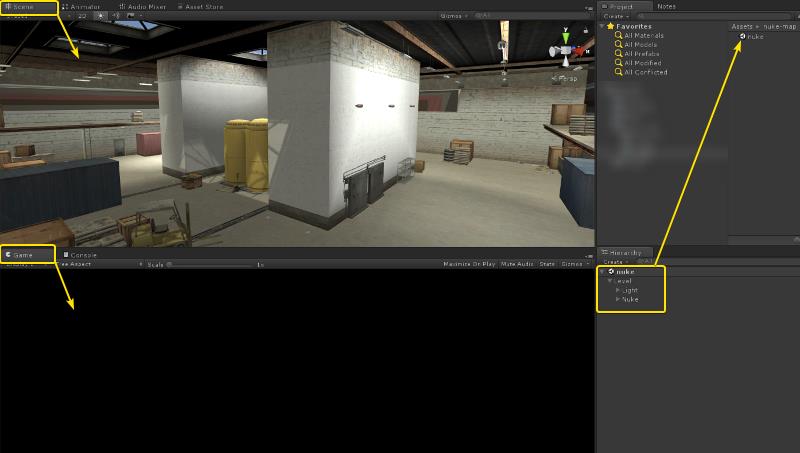
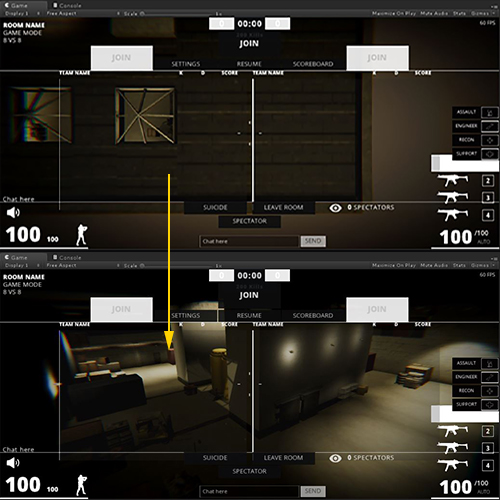
Ok, now after instanced the MFPS objects, you will see in the Game View that there is a camera showing the map from the sky; that's the camera that shows when a player enters the room, so adjust the position of it as you please in a location where the camera has a good view of the map.
The camera is located in (Hierarchy) ┏━━━ Required ➔ GameManager ➔ Room Camera
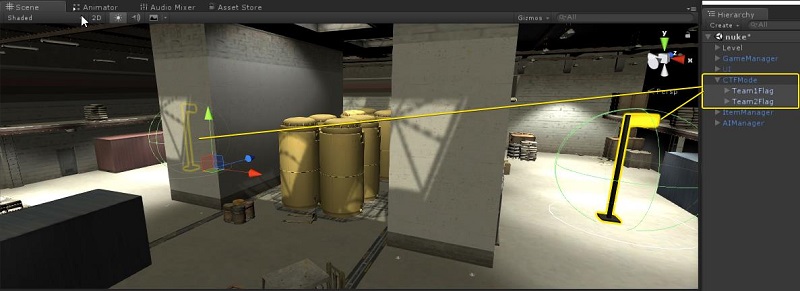
Some objects in your map may need to be repositioned, for exampl, the two flags used in the CTF game mode. You can find them under ┏━━━ Required > GameModes > CaptureOfFlag > Content > * in the hierarchy window. These flags should be placed in strategic locations near each team's spawn area to ensure balanced and competitive gameplay. Select and move them to the desired positions in your map accordingly.
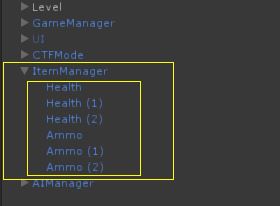
Repeat the process for the objects under ItemManager by positioning them around the map. These items, such as med kits and ammo, can serve as permanent pickups for players during the game. If you prefer not to use them, simply remove them from the scene. These items are optional.
Set Up Scene - Step 4
Now you need create some Spawn Points for each Team (Team 1, Team 2 and For FFA). These spawn points are not specifically a static position, they are a Spherical Area where players can spawn, which means that the player will be instantiated in a random position inside of the radius of the area.
How create spawn points:
Simply create an empty game object in the scene and add the script bl_SpawnPoint.cs to it and assign the area and the team.
But to make it easier for you: Below you will have a button to create a spawn point, simply select the team and click on the button Create Spawn Point. ➔ A spawn point will be created and you can now select it in the scene view for position it on the map.
This element is dynamic in the original editor documentation and does not work or render correctly in the static HTML version. It's shown here for reference only — please refer to the built-in editor documentation for full functionality of the doc.
CREATE SPAWN POINTS
After creating and positioning a spawn point, your setup should look something like this:
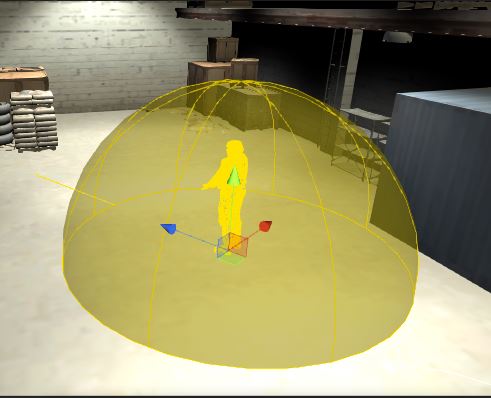
This is the spawn point area. You can preview the spawnable space with the semi-sphere, while the centered gizmo represents the actual player size.
To adjust the spawn area, modify the Spawn Space property in the `bl_Spawnpoint` script attached to the object. You can also rotate the spawn point to define the default rotation (the direction the spawned player will face).
Ensure the player's gizmo feet and the semi-sphere area are aligned with the ground; otherwise, players may fall upon spawning.
Create as many spawn points as needed using the button above. Ensure you have at least one spawn point for each team. Once you're done, you can proceed to the next step.
Set Up Scene - Step 5
Now, in order for AI bots to work on this map, you need to set up and bake the Navmesh Surface, In simple terms, a navmesh surface is the allowed area where AI Agents can move, this area is calculated automatically by Unity when you bake it based in your map geometry, but you have to set up the meshes to bake, for more depth information about Unity's Navmesh and how to manually set up it, check their documentation here:
Create Navmesh DocumentationIf you want to automatically set up the Navmesh, simply click in the button below, keep in mind that this will generated the Navmesh based on all your maps colliders, you can later modify the Navmesh in the AI Navmesh object.
This element is dynamic in the original editor documentation and does not work or render correctly in the static HTML version. It's shown here for reference only — please refer to the built-in editor documentation for full functionality of the doc.
Once you bake your Navmesh you will have something like this:
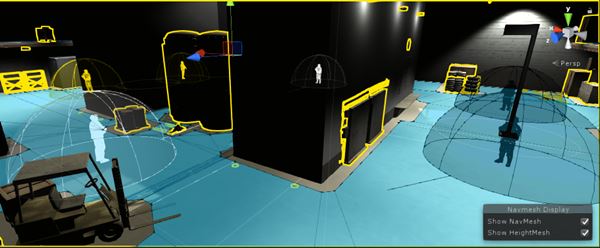
The designated areas where bots can move freely are indicated by blue overlaping mesh. for the optimal functioning of the bots, it's essential to strategically position the AI Cover Points. These cover points are empty game objects attached with a bl_AICoverPoint script. They serve as reference positions for the bots to take cover during gameplay.
To streamline this process, the AIManager object already includes a set of default AI Cover Points. You can easily locate them within the Unity editor by navigating to AIManager ➔ * in the hierarchy window. From there, you have the flexibility to fine-tune the positions or add more cover points to enhance the bots' ability to made tactical decisions while seeking cover.
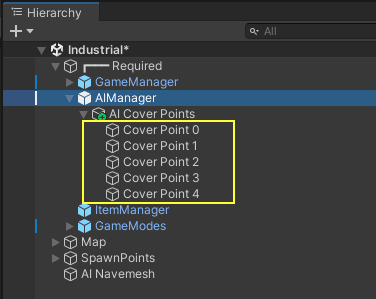
You can use as many as you want, if you don't need that many, simply delete some of them. if you want more, simply duplicate them.
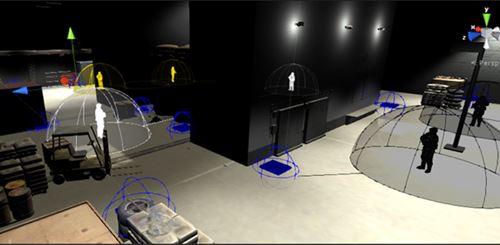
Select each individually and position them in a strategic point on the map; you can preview the area enabling Show Gizmos in AIManager ➔ bl_AICovertPointManager ➔ Show Gizmos
For more information about the AI Cover points check this:
Set Up Scene - Step 6
Now you have your scene set up and ready!
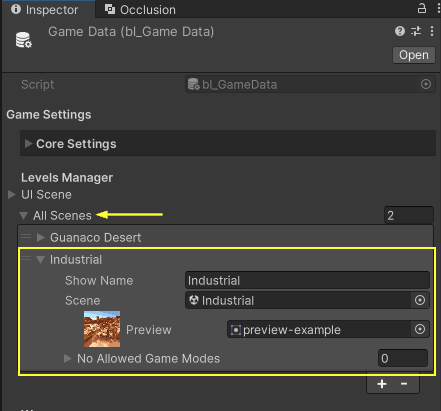
All you have to do now is list it in the available scene list so that players can select your scene when creating a room. You can do it by manually adding a new field in the list AllScenes in GameData: (Resources folder of MFPS) GameData ➔ AllScenes ➔ Add a new field and fill in the required info
or you can do it automatically here, Simply set a name for the map and a sprite preview below:
This element is dynamic in the original editor documentation and does not work or render correctly in the static HTML version. It's shown here for reference only — please refer to the built-in editor documentation for full functionality of the doc.
Spawn Point - Creator
This element is dynamic in the original editor documentation and does not work or render correctly in the static HTML version. It's shown here for reference only — please refer to the built-in editor documentation for full functionality of the doc.
Spawn Point - Modify Spawn Point
each spawn point have some inspector properties that you can customize; select the spawn point object in the hierarchy window and then in the inspector window you will have the following properties:
Tips
Optimization
For smooth performance in multiplayer maps—especially with more than 8 players—you'll need to carefully optimize the visual content of your scene. This includes models, textures, shaders, and any other graphical elements. Unlike single-player games, where the system only handles local data, multiplayer games require each client to process both local rendering and incoming data from other players. That added load makes optimization critical, not optional.
To help with this, here are some recommended resources on optimizing graphics in Unity:
Level Design.
Here you have some resources that you can use to learn or improve your level design skills from AAA or more experienced artists:
Practical Guide on First Person Level Design Multiplayer Map Theory (Gears of War) Level Design GuidelinesMaps Assets
Here you will find a lists of hand-pick assets available in the Asset Store that work for action-shooter games in general that you may find useful in case you are looking to add more maps to MFPS.