Weapon Model
In order to add a new weapon you need of course a Weapon 3D model, now, there are different approaches to add a new weapon, someones just replace the weapon model and use the MFPS default hands model and animations (basically just positioned in the hands the new weapon model), Although this is not prohibited or wrong, it definitely is not the best solution since the hand model and animations of MFPS are placeholders that work as an example only, and the animations will not look right with different weapon models.
Is highly recommended that you use your own models and animations (including the arms model), you can use the default MFPS hands but by doing this you will have to animate them for each weapon that you want to add and if you are not an Animator or you don't have experience animating, that could be a hard time for you since you need at least 4 animations which are: Take In, Take Out, Fire and Reload animations.
Optionally if you want to save time and effort you can get weapons models packages that are compatible with MFPS and comes with the required animations and their own arms models, below I'll leave you an Asset Store collection list of those assets:
Create Info - Step 1
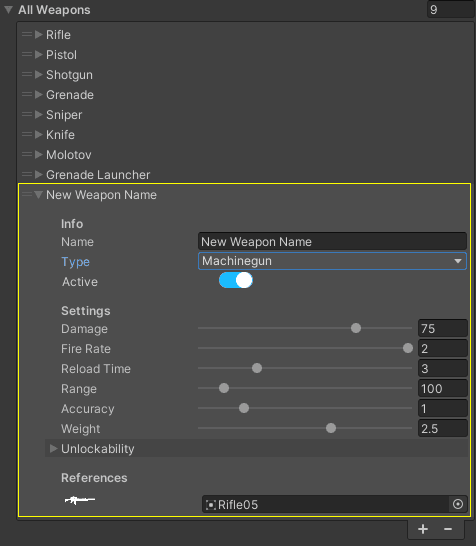
The first step to add a new weapon is to create the weapon basic information,
for it you need go to the GameData and add a new field in
the AllWeapons inspector list.
Create Info - Step 2
The GameData should be focus in the inspector window.
Scroll down in the inspector window to the Weapon section, there you will have the All Weapons list, foldout the list and add a new field to the list
Now adjust the rest of the weapon basic information in the new field
FPV Weapon - Step 1
First Person Weapon Integration
The first model we have to integrate is the FP Weapon, the FPV Weapon (First Person View Weapon) is the weapon model that the local player see, which is the weapon with the first person arm model, we have to integrate it in the View Weapon Container, even if you are developing a 3rd person view only game, by default is required to integrate the first person weapon in order the weapon system to work.
To start, in order to preview the first person view perspective and the already integrated weapons, go to the editor top navigation menu > MFPS > Actions > Preview FP Weapons, or click in the button below.
FPV Weapon - Step 2
Create Weapon Setup
Now, the player first person view placeholder should be instanced in the hierarchy window along with all the integrated FP Weapons, the FP Weapon Root (FP Weapons) should be automatically selected, if you foldout it in the hierarchy window you should see all the integrated FP Weapons
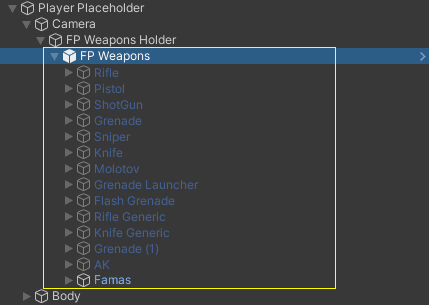
To proceed, duplicate an existing FP Weapon that matches the type you're integrating. For instance, if you're adding a rifle, duplicate an existing rifle weapon. If it's a sniper, duplicate a sniper weapon, and so forth.
You can duplicate the weapons by selecting the weapon in the hierarchy window > Right Mouse Click > (context menu) Duplicate or Ctrl+D.
Then rename the duplicated weapon instance in the hierarchy
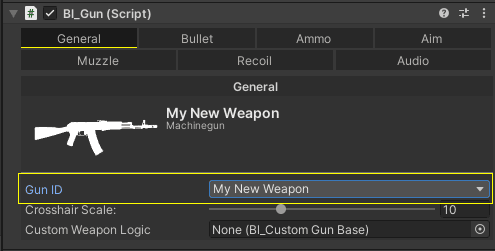
With the duplicate weapon selected in the hierarchy window, navigate to the inspector window > bl_Gun > General > assign the Gun ID of this weapon which is the name of the weapon you define in the GameData All Weapon list early.
Continue with the next step.
FPV Weapon - Step 3
Setup Weapon Model
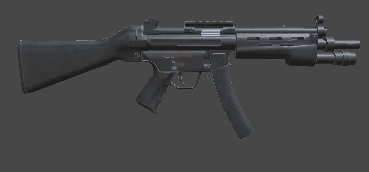
Now is time to add your new FP Weapon model which is the weapon model with the first person arms.
Drag your FP Weapon model inside your new weapon object in the hierarchy, with the new model root selected > change the Layer to the 'Weapons' layer and apply to all the children objects from the dialog window.

Reset the position and rotation of the model instance to (0,0,0), and adjust the position and rotation of the weapon root (where bl_Gun is attached) to the position you want it in the first person view, use the Game View window to see how it looks from the fp perspective.
Transfer the Fire Point from the old model of the duplicated weapon to your new weapon model, for it, in the inspector of bl_Gun > select the Muzzle tab > click in the Fire Point field value (the value not the title), this will ping and select the Fire Point object in the hierarchy window, drag the selected object inside the barrel transform of your new weapon in the hierarchy.
Fine tune the position of the fire point to align it with the end of your weapon barrel or wherever you want the bullet origin to be.
Delete the old weapon model of your duplicate weapon to leave just your new weapon model in the hierarchy.
FPV Weapon - Step 4
Setup Weapon Animations
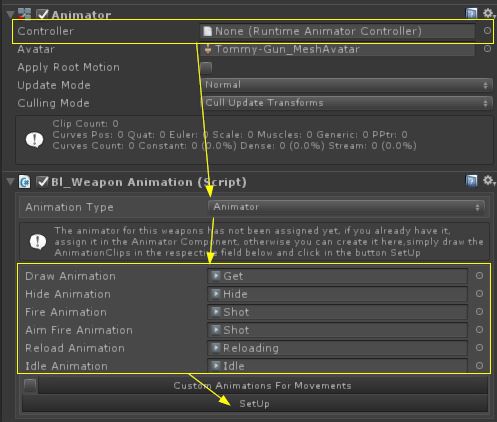
It's time to setup the fp weapon animations, start by attaching the bl_WeaponAnimation script to your weapon model where the Animator or Animation component is attached to, you can attached this script by click on the Add Component button in the inspector > write bl_WeaponAnimation in the search bar > select the bl_WeaponAnimation script on the search result
First, make sure that the attached Animator component doesn't have a Animator Controller assigned yet. If it already has one, remove it.
Now in the inspector of bl_WeaponAnimation ➔ Animation Type, select the option Animator, you will see some empty Animation clip fields. In these, you have to assign the respective animation clips.
Draw = Equip weapon animation clip.
Hide = Unequip weapon animation clip.
Fire = Fire animation clip.
Fire Aim = This can be the same as normal fire animation clip but it is recommended that you use an animation with a low kick back movement.
Reload: Weapon reload animation clip.
Reload Empty: Weapon reload when the magazine is empty, it can be the same as the normal reload clip.
In the case where your weapon have a split reload animation (Start, Insert Bullet and Finish) Simple set the Reload Per dropdown as Bullet in the inspector of bl_Gun > Ammo tab and assign the animations in bl_WeaponAnimation script inspector.
Once you have assigned all required animations, press the button SetUp in the inspector ➔ a Window will open, select a folder in the project to save the Animator Controller.
FPV Weapon - Step 5
Setup Weapon Movement
In MFPS the Walking and Running animations of the FP Weapons are procedurally generated so is not required having these as animation clips, it gives more flexibility and most cases looks even better than baked animations.
All you have to do to setup the movement animations to the new added weapon is to attach the script bl_WeaponMovement in the same object where you attach the bl_WeaponAnimation script early
Now you have to define the run weapon pose, is the base position and rotation that the weapon will have when the player is running.
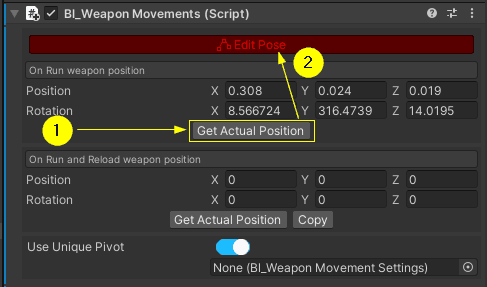
For this, first click in the button 'Edit Pose' in the top of the bl_WeaponMovement script inspector, this will active the edit mode.
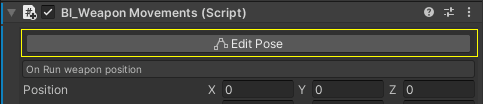
Adjust the position and rotation of weapon as you want the running pose to be, use the Game View window to preview the first person perspective which is as it will look in-game.
Once you have the running pose, navigate to the inspector window of bl_WeaponMovement again > click in the first 'Get Actual Position' button > then click in the red 'Edit Pose' button again.
Now the weapon will be back to it's idle pose and the changes will be saved, so you are done with this part, you can continue with the next step.
In the case where you want to use Animation clips for your weapon walk and running movements instead of the procedural ones:
1. Delete the bl_WeaponMovement script (if you have attached)
2. Unassign the Animator Controller in the Animator component (leave the field empty)
3. Navigate to the inspector of bl_WeaponAnimation and active the Custom Animations For Movement toggle.
4. Assign the animation clips in their respective fields and click in the SetUp button > select the save folder and that's.
FPV Weapon - Step 6
Setup Weapon Properties
Now, you have to setup the weapon properties, the stats, ammo, bullet properties, etc... you do all this in the inspector of the bl_Gun script which attached in the root of your new weapon setup.
Let's start with the weapon Aim Position, which is of course the position of the weapon when the player aims, to set this up, go to the Aim tab in the inspector of bl_Gun > make sure Allow Aiming is on > and click in the yellow button 'Adjust Aim Position'.
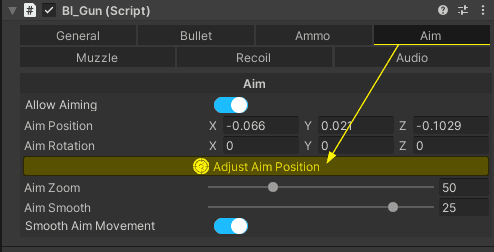
The system will auto-position the weapon to its current aiming stance. You'll need to fine-tune the weapon's position and rotation to ensure the iron sight, scope, or any attachment sight aligns precisely with the screen's center. The Game View window provides guide lines to indicate the exact center of the screen, assisting you in this alignment.
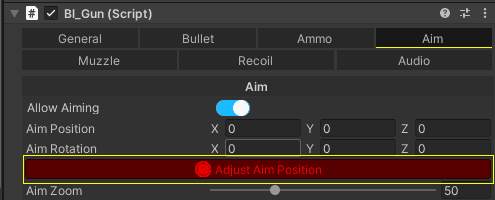
Once you have the aim position, back to the bl_Gun inspector and click in the red 'Finish Adjust Aim Position' button and that's.
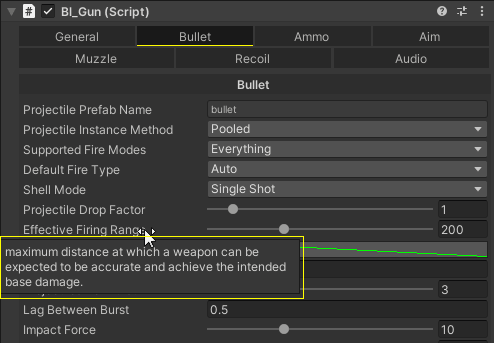
Now tweak the rest of the weapon properties in the inspector of bl_Gun, switch to the different tabs to setup the ammunition, bullet, sounds, recoil, etc... almost all the properties field in the inspector have an tooltip explanation, hover your mouse over a field name that you are not sure what is for and you will see it's description in a tooltip.
If the weapon is a Sniper, attach the script bl_SniperScope.cs, in the list 'OnScopeDisable' add all meshes of the sniper model including hands
FPV Weapon - Step 7
Finish
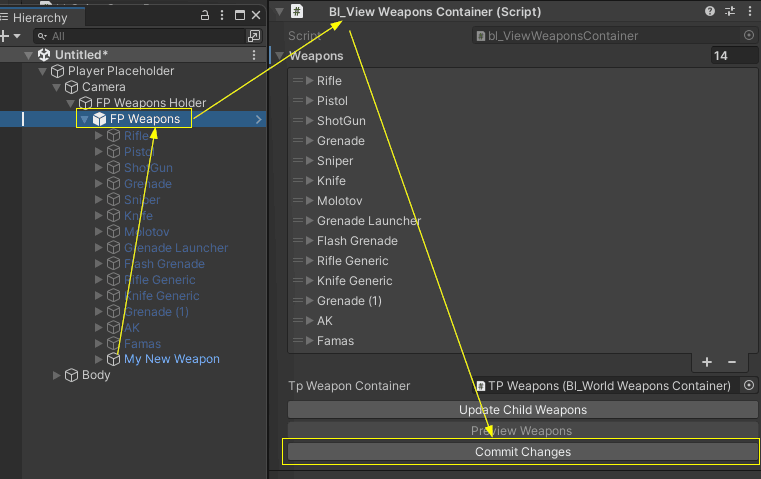
Now the FP Weapon setup is ready, all you have to do now and save the changes to the weapon container prefab, for this simply select the FP Weapons object in the hierarchy window > bl_ViewWeaponsContainer inspector > click on the Commit Changes button > and click yes in the display dialog
That's, you have integrated your new FP Weapon, now if you did the integration in a working scene, delete the Player Placeholder instance from the scene hierarchy, if you need to make changes to the weapon (or any FP Weapon) in the future, simply instance the player placeholder again with the top editor navigation menu MFPS > Actions > Preview FP Weapons, then do the modifications and apply the changes (by clicking in the Commit Changes button)
If you want to assign this new weapon to one of the default player loadouts, open the MFPS Manager window (Ctrl+M) > go to the Loadouts tab on the upper right corner > select the player class loadout (Assault, Recon, Support or Engineer) for the player prefab you want > assign the weapon in the desired slot by clicking in the Change button and selecting the weapon in the list.
If you want to allow the players to change their weapon loadout in-game, you can use the Class Customization addon.
TPV Weapon - Step 1
Third Person Weapon Integration
Each weapon has two different points of view: The First Person View which is what the local player sees and what you integrated early, and the Third Person View which is the weapon that other players see in the player full body, in this part we're going to set up this last one, the Third Person Weapon, for this, what you need is the same weapon model that you use for the FPV weapon but without the hands/arms mesh, just the weapon body mesh, even though is recommended to use a more optimized / less detailed model of the weapon than the first person model.
to proceed, you will need one of the player prefabs, to automatically instance it, go to the editor top navigation menu > MFPS > Actions > Preview TP Weapons, or click in the button below
Instance Player PrefabNow a window with all your player prefab options should shown, simply click in the player prefab icon that you want to use for the integration and this should instance that player prefab in the active scene hierarchy with the Remote Weapon root selected.
Drag your weapon model inside this remote weapon object (TP Weapons)

In the root of the new weapon you just drag, add the script bl_NetworkGun.
In the inspector of this script you will see the FPWeapon dropdown field, select the FP Weapon that you integrated in the previous section (the first person weapon), the weapons are listed by their game object name so pick the correct one from the list and then click in the button Select next to it.
If you see the Muzzleflash field, drag your muzzleflash particle effect and put inside of the weapon object, if you don't have your a custom one, you have the MFPS default one located in: Assets ➔ MFPS ➔ Content ➔ Prefabs ➔ Level ➔ Particles ➔ Prefabs ➔ Misc ➔ MuzzleFlashEffect.
Drag it to the hierarchy and put it inside the weapon and position at the end of the gun barrel.
Then assign in the 'MuzzleFlash' field of the bl_NetworkGun inspector.
TPV Weapon - Step 2
Weapon Position
If you followed the last step plain and simple, your weapon should be in it's default instanced position, what you have to do fine tune it's position and rotation in the player model hands ensuring it looks as though the player is aiming with the weapon.
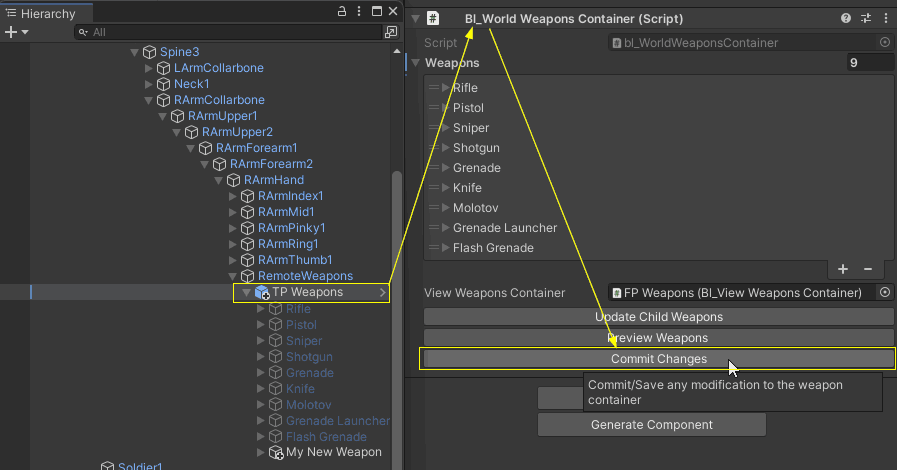
In the Scene View window you should see a dotted yellow line origin from the weapon in direction to the player front, use that line as reference of where the weapon should be looking at with the barrel (in the case where the weapon have a barrel).

Once you have the desired weapon position, you have to set up the left player hand position to simulating the hand grip in the weapon.
For this, navigate to the inspector window of bl_NetworkGun > Click in the Set Up Hand IK button > this will automatically create and select the left hand IK target, do not select anything else and in the Scene View window move and rotate the selected object, you will see how the left arm follows using inverse kinematic, so fine tune the position until you have the desired hand pose, then click in the yellow button 'Done'.
TPV Weapon - Step 3
Finally, save the changes to the weapon container, for this, select the TP Weapon object in the hierarchy window > go to the inspector window of bl_WorldWeaponsContainer > click in the Commit Changes button > click yes in the dialog
Delete the player instance from the scene hierarchy and that's.
If you want to do modifications to this TP Weapon later, simply instance the player prefab using the top navigation menu (MFPS > Actions > Preview TP Weapons) > apply the changes > and save the changes by clicking in the Commit Changes button again.
While the main integration is complete, there's an additional step for any other player prefabs with a different character model than the one used in this integration. You'll need to manually adjust the position of the new Third Person (TP) Weapon to fit in the hands of each player model. Since there's no automatic method, this manual adjustment is crucial. Essentially, it involves repositioning the weapon and clicking a button. Here's how you proceed:
1. Instance the player prefab using the top navigation menu > MFPS > Actions > Preview TP Weapons > select the player prefab (one that you haven't adjust the position of the new weapon).
2. Unfold the TP Weapons object in the hierarchy > select your new weapon > active it if it is disabled so you can see it > fine tune the position and rotation of the weapon to simulate the player is holding it just as you did in the original integration.
3. Adjust the left hand position if necessary, in the inspector of bl_NetworkGun of your weapon > click in the Edit Positions button > fine tune the left hand pose just as you did in the original integration. (Don't forget to click in the DONE yellow button once finish)
4. Select the TP Weapons object in the hierarchy again > go to the inspector of bl_WorldWeaponsContainer > click in the Commit Changes button and that's.
PickUp Prefab - Step 1
The last thing that you need set up is the 'PickUp prefab' of the weapon. This prefab is instanced when players pick up other weapons or when a player dies with the weapon active. So what you need is the weapon model. Just like for setting up the TPWeapon, you only need the weapon model mesh without hands. Again, it is recommended that you use a low poly model for this one.
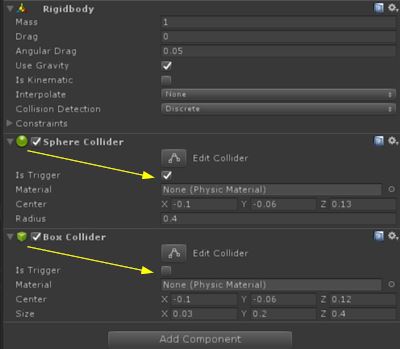
Drag your weapon model into the hierarchy window (You don't need the player prefab for this one). Select it and Add these Components:
-RigidBody
-Sphere Collider: in the sphere collider check 'IsTrigger', this collider is the area where the gun will be detected, when player enter in this, so modify the position and radius if is necessary.
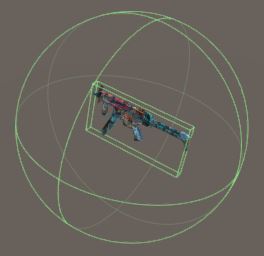
-Box Collider: with 'IsTrigger' unchecked, make the Bounds of this collider fit exactly with the weapon mesh.
So the inspector should look like this:
and the Colliders Bounds should look like this:
PickUp Prefab - Step 2
Now Add the script bl_GunPickUp.cs and set up the variables
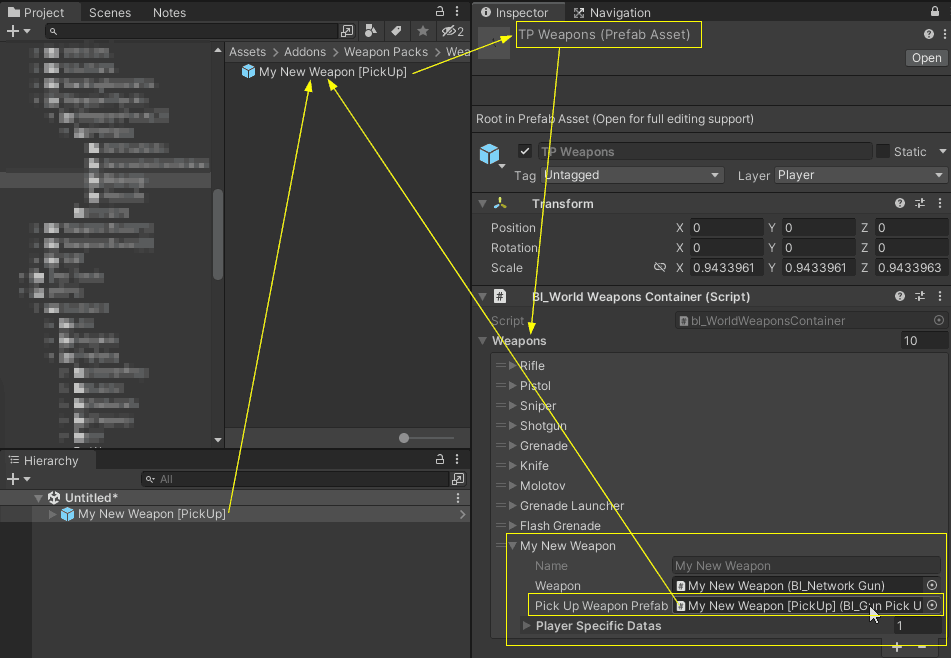
Create a prefab of this weapon pick up by dragging the weapon object from hierarchy window to a folder in the Project Window.
Then select the TP Weapon Container prefab which is located in: Assets ➔ MFPS ➔ Content ➔ Prefabs ➔ Weapons ➔ Containers ➔ TP Weapons (click here to ping).
With the prefab selected, navigate to the inspector of bl_WorldWeaponsContainer > foldout the Weapons list > foldout the field of your weapon target > assign the just created weapon pick up prefab in the Weapon Pick Up Prefab field and that's.
With that you have completely finish the integration of your weapon!
Weapon Animations - FP Custom Animations
A frequently asked question about the weapons is "How to animate the weapons", as is mentioned before, in order to add integrate a new weapon in MFPS for the first-person view, you need:
• The Arms/Hand Model
• The Weapon Model
• 4 Animations (Draw, Hide, Fire, and Reload)
Custom First Person Animations
Now, either way, if you use the MFPS example arms/hand model or a custom arm model if you want your new weapon animations to look good, you will have to create custom animations for that pair (arm + weapon model).
With Custom Animations I refer to animations that are specifically created for one arm + weapon model pair, it's necessary to be created for a specific weapon model since most of the weapons don't have the same shape which causes the animation arm poses to not align correctly with a different weapon model of which the animation was created for.
How to create custom first-person animations?
The animated process is independent of MFPS, and animation is a skill that required a learning curve and a lot of practice to create good animations, if you are not an animator and it's under your capabilities, probably hiring an animator to create the animations could potentially save you time and work.
But if you can or are willing to create the animations yourself, below you will find some useful tutorials on how to animate first-person weapons inside of Unity or with third-party programs like Blender.
INSIDE UNITY
If you want to create animations inside Unity for quick prototyping and fast development the build-in Unity Animation system comes in handy, but for more complex cases like this where there're a lot of bones and you want to use Inverse Kinematics, constrains, etc... Unity animation is not the ideal, instead, you can use an external editor tool available in the Asset Store with a free edition called "UMotion", you can check it out here: UMotion Pro
and it's free edition: UMotion Community
Here a video of how UMotion can be used to animated first person weapons:
ANIMATION SOFTWARE
A more advanced solution and more commonly used by artists for these kinds of animations is to use third-party programs that specialize in modeling and animation, but of course, these require a learning curve more extended, and in order to get to use it will require some practice, here are a list the most popular programs:
Blender (Free)
Maya (Paid or free w student edition)
3D Max (Paid or free w student edition)
Below some useful tutorials for animate first-person weapons:
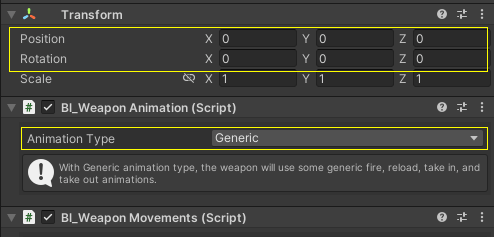
Weapon Animations - FP Generic Animations
Generic First-Person Animations
Since version 1.10, MFPS includes some generic first-person animations that allow you to integrate weapons without the need to create custom first-person animations right away, instead, generic animations will be used.
This is a great solution for fast prototyping, but keep in mind that these generic animations are designed as placeholders, they can be used as the final solution if you want but that is not the intention since these animations do not animate any of the arms or weapon bones, the animations are really simplistic, if you want the animation looks better with your new weapon Custom Animations is the only way.
To use these Generic Animations all you have to do is set the Animation Type in bl_WeaponAnimation inspector to Generic and make sure the Transform position and rotation of where the bl_WeaponAnimation script is attached to is set to (0,0,0)