MFPS Bots
MFPS Bots
Overview
MFPS includes AI bots that provide a basic shooter experience in party matches. These bots are primarily designed for the game's core modes like Team DeathMatch and Free For All, as well as certain addon modes.
AI Behavior and Limitations
The AI of these bots is tailored for specific game modes. However, their behavior is not fully adapted for all game modes available in MFPS. For example, in objective-based modes like Capture the Flag, the bots default to basic actions such as seeking and shooting enemies, without engaging in the mode's specific objectives like flag capturing. To have bots function appropriately in these modes, additional AI programming is necessary.
Bot Prefabs
MFPS provides default bot prefabs for team-based gameplay, with one prefab for each team. In solo modes, the game uses the prefab for Team 1. Post the MFPS 1.10.0 update, the process of integrating player models for these bots has been streamlined. The same player models used for real player prefabs can now be applied to bot prefabs, eliminating the need for separate integration.
Change Bot Model
Tutorial: Changing Bot Character Model
Introduction
From version 1.10.0 onwards, MFPS has streamlined the process of replacing or adding new character models to bot prefabs. This tutorial guides you through the steps to customize your bots with different character models.
Prerequisites
• Player/Character Model Integration: Before proceeding, ensure that your desired player or character model is already integrated into a player prefab. If this step is not yet completed, please refer to the "Add Player" tutorial for guidance.
Step-by-Step Process
1. Integrate the Character Model:
• First, integrate your player or character model into a player prefab if you haven't already.
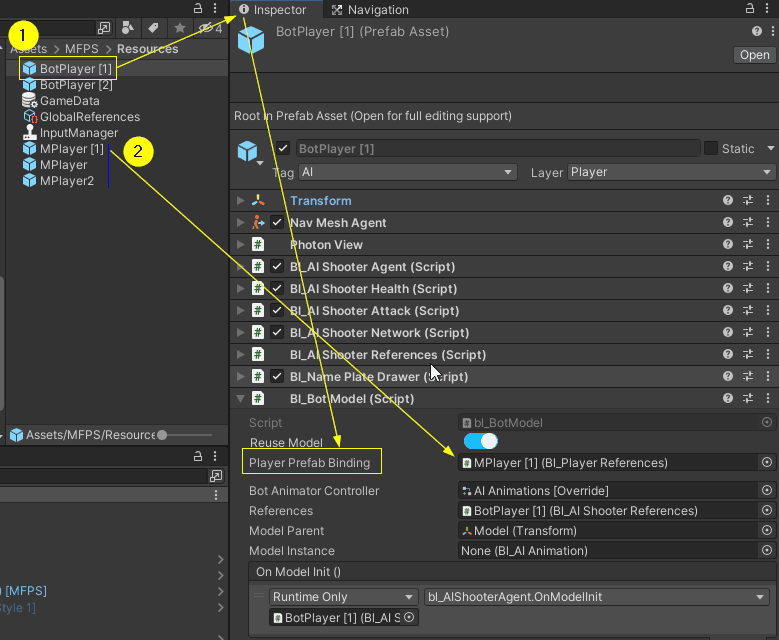
2. Locate the Bot Prefab:
• Navigate to the MFPS's Resources folder to find the bot prefabs. By default, they are named "BotPlayer [1]" and "BotPlayer [2]".
• Select the bot prefab for which you wish to replace the character model.
Note: If your goal is to create a new bot prefab with a different model, rather than replacing an existing one, simply duplicate one of the existing bot prefabs.
3. Assign the Player Prefab:
• With the desired bot prefab selected, go to the inspector window.
• Locate the `bl_BotModel` script.
• In the 'Player Prefab Binding' field, assign the player prefab that contains the character model you want to use for this bot.
• This action links your chosen character model to the selected bot prefab and that's all you have to do.
Bots Weapons
Bot Weapons
Overview
In MFPS 2.0, bots are programmed to select weapons randomly from a predefined set available in their respective prefabs. By default, they can use four types of weapons: Machineguns, Pistols, Shotguns, and Grenades.
Simplified Weapon Integration (Post 1.10.0 Update)
Starting from MFPS 1.10.0, integrating weapons directly into each bot prefab is no longer necessary. Instead, bots use the weapons from the linked player prefab. Your task is to specify which weapons from the player prefab are available for the bot's use.
Setting Up Available Weapons for Bots
The process to define the bot's weapon arsenal is straightforward:
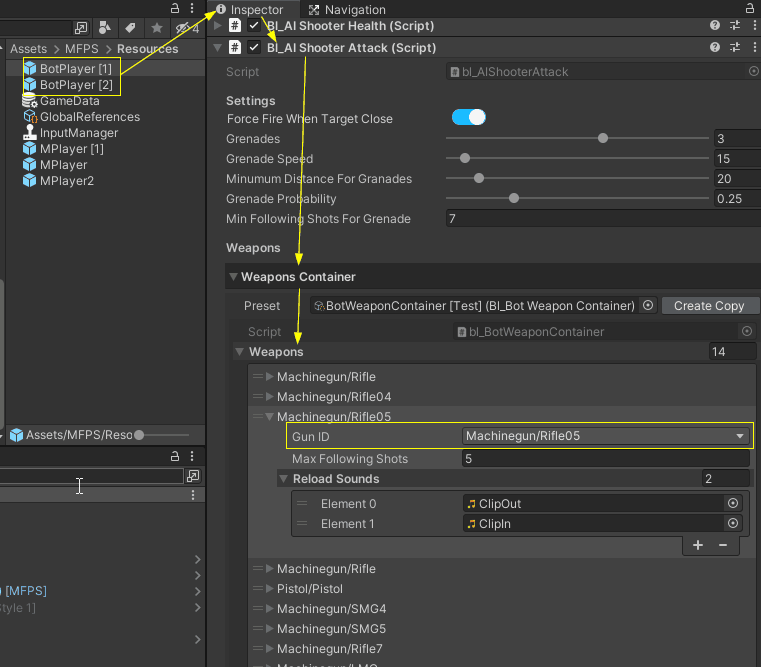
1. Select Bot Prefab:
• Locate and select the bot prefab you wish to modify. By default, these are found in the MFPS's Resources folder.
2. Accessing Weapon Settings:
• With the bot prefab selected, navigate to the inspector and find the `bl_AIShooterAttack` component.
• Look for the 'Weapons Container' section.
3. Assigning Weapons:
• In the 'Weapons Container', you'll find a list where you can add new entries.
• For each new entry, assign the GunID corresponding to the weapon you want to be available for this bot.
Customizing Weapons for Different Bots
If you desire distinct weapon sets for different bots:
• Assign a unique 'weapon container scriptable object' to each bot prefab. This allows you to have a different array of weapons available for each type of bot, providing more diversity in your game's AI.
Bots Difficulty
By default, the bots are designed to provide a challenging but enjoyable gameplay experience.
You can customize various bot settings to adjust their difficulty. For example, you can tweak their shot accuracy, aggressiveness, tactical behavior, and other attributes that influence their actions. These settings are accessible in the inspector of Bot Prefabs, located in the MFPS Resources folder. Specifically, check the inspector for the `bl_AIShooterAgent` and `bl_AIShooterAttack` scripts, where the property names indicate their purposes.
Additionally, the placement of cover points significantly impacts bot behavior and perceived intelligence. Adding cover points in strategic locations on your map can enhance their tactical performance.
Finally, the new AI Areas introduced in MFPS 1.10.0 changes how bots play in team dynamics. When AI Areas are utilized, bots avoid reckless engagements. Instead, they hold positions or find safe spots to shoot from a distance until they can advance. However, there is still some randomness, so occasionally, bots may directly rush the enemy.
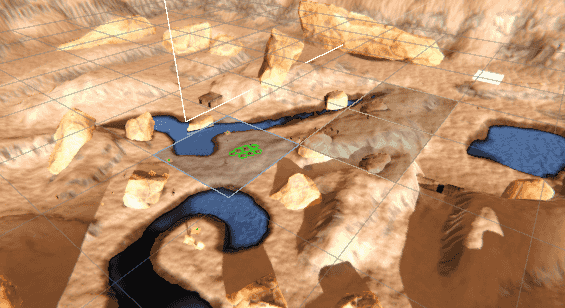
Cover Points
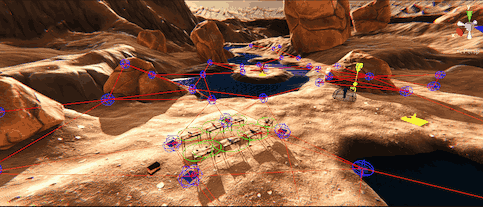
The MFPS AI system comes with support for Cover Points, in essence, are points strategically placed around the map which improves the AI navigation path maker, based on some conditions in the battlefield, bots used these points to add some sort of randomness to their behavior when they are in battle, bots used these points to cover from enemies or as a random navigation target.
The usage of these points is recommended but not obligatory, more Cover Points you add to your map, more randomness, and realistic bot navigation you will get.
ADD A NEW COVER POINT
Add a new Cover Points is simply as duplicate one of the existing ones and manually placed in your map.
In order to easily preview all your Cover Points, you can turn on the gizmos for it in (Your Map scene hierarchy) ➔ AIManager ➔ bl_AICoverPointManager ➔ Show Gizmos.
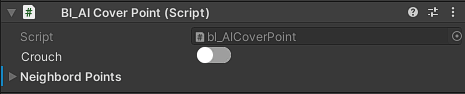
Each Cover Point reference must have attached the script bl_AICoverPoint, otherwise it wont work as a cover point, this scripts have a few public properties in the inspector:
AI Areas - AI Areas
AI Areas
AI Areas are dynamically determined zones on the map where a high concentration of bots (AI-controlled characters) are located. These areas are identified and managed by the AI Manager to enhance gameplay dynamics and strategic decision-making for AI bots. Here’s how AI Areas work:
What are AI Areas?
AI Areas are specific regions on the map where there is a significant presence of bots from one or both teams. These zones are identified based on the density of bots within a defined grid system. The AI Manager tracks the number of bots in each grid cell and designates cells with a high concentration of bots as AI Areas.
How AI Areas are Determined
1. Grid System: The map is divided into a grid with each cell having a defined size (cell size). The grid helps in efficiently managing and tracking the positions of bots.
2. Bot Density Calculation: During each update cycle, the AI Manager counts the number of bots in each grid cell.
3. Hot Area Threshold: A grid cell is marked as an AI Area if it contains a number of bots equal to or greater than a predefined threshold (e.g., 4 bots).
4. Team-specific Zones: AI Areas are further categorized based on team presence. For example, an area dominated by bots from Team 1 will be considered a hot zone for Team 2 and vice versa.
Bot Behavior in AI Areas
When bots approach or detect an AI Area dominated by the enemy team, their behavior is influenced by their `engagementBias` parameter, which determines their tendency to rush into enemy zones or take a more cautious approach:
• engagementBias: This parameter defined in the bot Behavior Settings, ranges from 0 to 1 and indicates the bot's likelihood of rushing enemy areas (1) versus holding strategic positions (0). A higher value makes the bot more aggressive, while a lower value makes it more cautious.
Bot Decision-making
When a bot is moving towards an enemy position and detects an AI Area dominated by the enemy team within a given detection range, it makes a decision based on its `AggressionLevel`:
1. Hold Position: The bot may choose to hold its current position to avoid direct engagement in the hot zone.
2. Find Strategic Position: Alternatively, the bot may move to a random point near the AI Area to take a strategic position, avoiding the direct line of confrontation.
This decision-making process ensures that bots exhibit more realistic and varied behaviors, enhancing the overall gameplay experience.
Visualizing AI Areas
For development and debugging purposes, AI Areas can be visualized in the Unity Editor using gizmos when the bl_AIAreas > Show Debug toggle is on. The script draws wireframe cubes around hot zones with different colors to indicate team dominance.
AI Areas - Setup AI Areas
Setup AI Areas
When you add a new map, the AI Areas are not set up by default. You'll need to configure them manually, but it's a straightforward process:
1. Open the target map scene.
2. Create an empty GameObject.
3. Attach the `bl_AIAreas` script to the GameObject.
4. Configure the inspector properties of the `bl_AIAreas` script as needed.
To help visualize and adjust the AI Areas:
1. Enable the "Show Debug" toggle in the inspector of the `bl_AIAreas` script.
2. Adjust the "Cell Size" value until the grid covers the entire map.
This element is dynamic in the original editor documentation and does not work or render correctly in the static HTML version. It's shown here for reference only — please refer to the built-in editor documentation for full functionality of the doc.
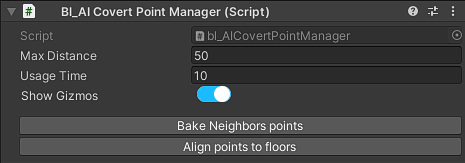
bl_AICoverPointManager
The script bl_AICoverPointManager.cs is attached in each map scene ➔ AIManager ➔ bl_AICoverPointManager, this script handle the logic behind the cover point selection, when a bot request a cover point, this script is responsible for determine which cover point in the scene should be used based on the requester bot conditions.
This script has some public properties in the inspector that you can tweak:
Bots Names
The bots are named randomly from a predefined list of names that you as the developer can easily modify.
First, you can define the prefix that goes before the random name, this by default is BOT, you can change it to whatever you want in GameData ➔ Bots Name Prefix.
To modify the list of the random names, open the script bl_GameTexts.cs ➔ RandomNames, in this list, add, remove or edit any element of the list.
