Resume
MFPS 2.0 Version 1.10.0
Stuck or need more clarity on something not covered in the docs or tutorials? Join our Discord community! Get direct help from us or other community members, connect with fellow creators, and explore a large amount of resources for development, custom mods, and tools to enhance your work with MFPS.
Hot Tutorials
Add Maps Add Weapons Add Players Change BotsCustom Integration Tutorials
Integrate Loading Screen to MFPS Integrate DestroyIt to MFPSTerminology
In this documentation, you might come across some terms or phrases that are unfamiliar to you. Here, you'll find a concise explanation of what each one means.
How to Modify MFPS - How to Modify
This title might suggest there are limitations when modifying MFPS, but that’s not the case at all. If you know what changes you want to make and how to implement them, MFPS gives you complete freedom. It includes the full source code and game content, so you can modify everything to suit your needs.
The purpose of this guide is to provide recommendations for the ideal way to modify MFPS, especially if you want to make it easier to merge updates in the future.
If you’ve been using MFPS for a while, you might already know that merging updates has been one of its most challenging aspects. Each major update typically needs to be imported into a fresh Unity project. Trying to import a new update into a project with an older MFPS version will overwrite your custom changes, potentially breaking the game. As a result, the only way to apply improvements and fixes from new updates to older projects has been through manual merging—checking scripts, comparing prefabs, and so on—a tedious and time-consuming process.
This challenge was partly due to how MFPS was originally designed. The only way to modify the code was by editing the default scripts directly. The tightly coupled code and intricate web of references further compounded the difficulty. Unlike tools or extension assets, game templates are intended for developers to modify the core content, which inherently makes updating to newer versions more complex.
Starting from version 1.9, the game’s backend design has been overhauled to address these issues. The codebase is now designed to be more modular and extensible. Most of the core scripts are inheritable, allowing developers to implement custom changes without directly modifying the default scripts. Instead, you can:
1. Create a new script.
2. Inherit from the relevant base class.
3. Implement your custom changes.
On the next page, you’ll find more details about this updated design and how to effectively work with it.
How to Modify MFPS - Code Modifications
Code Modifications
Starting with MFPS 1.9, most default scripts are built using inheritance to enable a polymorphic design.
Inheritance allows you (or your programmers) to build upon existing game classes to create new implementations while maintaining their core behavior. This approach enables code reuse, simplifies extending functionality, and keeps the original code intact.
Example: Benefits of Code-Inheritance Design
Before MFPS 1.9, if you wanted to modify the weapon pickup system, you would need to edit the default script, `bl_GunPickUp.cs`. However, this approach made it impossible to update that script in the future without losing your custom changes.
With MFPS 1.9 and later versions, the process is much simpler and more update-friendly. To make the same modification:
1. Create a new script that inherits from the base class (`bl_GunPickUpBase`).
2. Copy the relevant code from the default script into your new script.
3. Implement your desired changes.
You don’t need to worry about breaking references because all connections point to the base class. The only additional step is to attach your new script to the GameObject where the default script was originally attached and then remove the default script.
___________________________________________
How to Inherit a Script?
If you are an intermediate or advanced programmer, you may already be familiar with this design pattern. It’s a widely used approach in good software design, as it makes code easier to maintain, scale, and extend. In addition, inheritance provides a polymorphic structure, enabling the implementation of new features or variations with minimal effort.
If you are less experienced or unfamiliar with code inheritance, here’s a simple example to guide you. Suppose you want to modify the weapon pickup logic. After creating a new script, you’ll start with a basic structure like this:
using UnityEngine;

public class bl_GunPickUp2 : MonoBehaviour
{
    ...
}
What you have to do is change the base class (the class name next to your class name), in this case, it's MonoBeheaviour, you have to change to the base class of bl_GunPickUp which is bl_GunPickUpBase, so you will have something like this:
using UnityEngine;

public class bl_GunPickUp2 : bl_GunPickUpBase
{
    ...
} Once you change the base class, you will have to override the base class functions/methods, if you don't know how to do this, simply copy the code of the original class (in this case bl_GunPickUp.cs) and paste it your script,
That is all you need, know you can make the changes that you want in your new script.
As said before, this is not a requirement to make code changes but is the recommended way, although not all code MFPS allow inheritance, as of version 1.9 more than half of the code has been redesigned to work that way but the works are still in progress, the target is that the whole code or at least most of it allows inheritance and be modular in future updates.
How to Modify MFPS - Other Modifications
The same principle outlined in Code Modifications applies to other game assets such as prefabs, menus, scenes, and more.
Ideally, you should avoid modifying default content directly. Instead, create a duplicate and work with the duplicated version.
For example:
• MainMenu Scene: Duplicate the `MainMenu` scene and keep the default scene untouched as a reference for future updates. This way, when a new MFPS update is released, your custom changes won't be overwritten, and you can compare the new version's changes to the default scene.
• Player Prefabs: Instead of directly editing the default player prefabs (`MPlayer` and `MPlayer2`), create duplicates of these prefabs. Assign the duplicates in GameData, and use them for your modifications.
The takeaway is simple: Don’t edit the default content—duplicate it and use the copy instead. This approach not only protects your custom work during updates but also ensures you have a reference point to understand and integrate new changes.
GameData
GameData
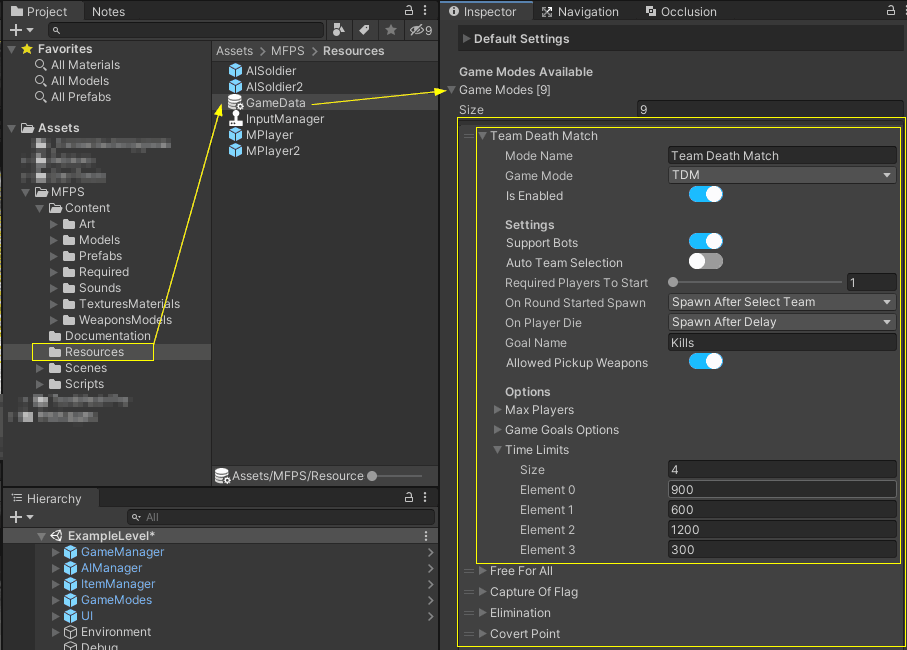
With MFPS you will notice that GameData is mentioned a lot in the documentation, readMe.txt, and many other comments.
If you don't know what GameData is, how it works or where it's located, here is a brief explanation:
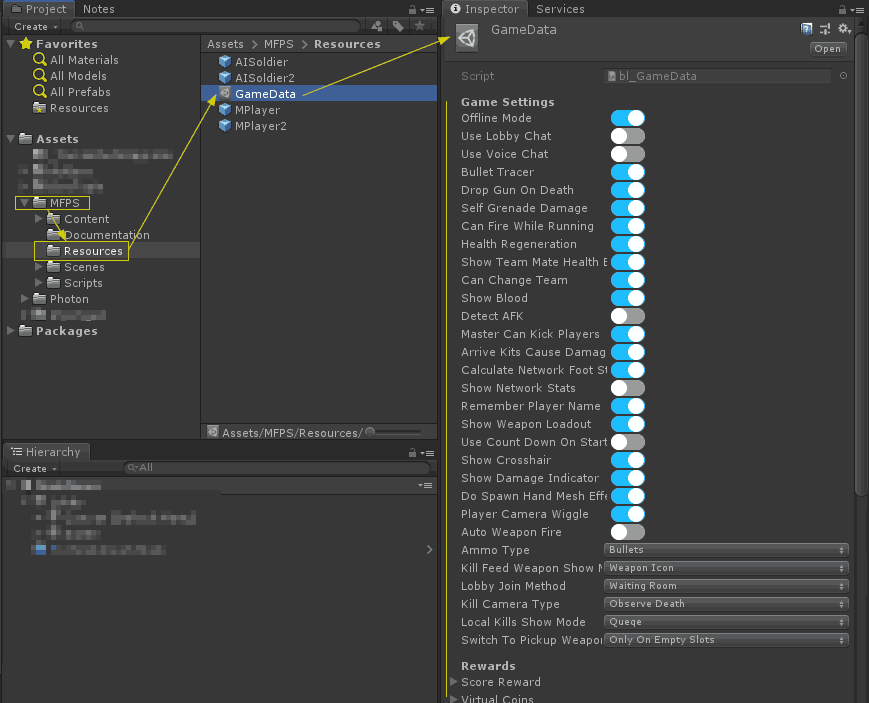
GameData is a ScriptableObject that contain a lot of front-end settings that you can easily tweak to fit your needs and reskin the game, the options go from simple toggles to show or hide blood in the game up to the Weapon and Game Mode information.
GameData is located in the Resources folder of MFPS:
Photon PUN - Photon PUN
Photon Unity Networking (PUN) is the networking solution used by MFPS to manage all network and server-side operations. It's widely regarded as one of the most robust and reliable options available for Unity. PUN is solid, scalable, and reliable, offering multiple server locations worldwide to ensure the lowest possible ping for players.
In Unity, PUN is provided as a third-party plugin that you can download for free from the Unity Asset Store.
Common Questions About PUN
When it comes to server-side solutions, costs are often a concern. With PUN, the Photon team handles all the heavy lifting, including server hosting, maintenance, scaling, and operational services. This means you don’t need to worry about managing servers yourself. However, because these services are provided by Photon, PUN is a paid service.
The good news is that PUN offers a Free Plan that’s perfect for development. You can use this plan during the early stages of your project and then upgrade to a paid plan when you’re ready to release your game
You can see all the available Plans in their website:
Photon Pun Plans
A common question I receive is:
What About Authoritative Servers?
If you have prior experience with networking systems, you might have noticed that Photon uses a Client-Authority model rather than a traditional Authoritative Server model. In this setup, a designated Master Client (one of the players) is responsible for authorizing and managing the game, instead of an independent Master Server.
While this approach simplifies development and reduces server costs, it does introduce potential vulnerabilities. Since the Master Client resides on a player's device, it creates an opportunity for cheaters to manipulate gameplay locally, which can then be mirrored to other clients. Without an independent server to validate and enforce game logic, these exploits can sometimes go unchecked.
Out of the box, Photon PUN doesn't offer a solid solution for fix this problem, instead they offer Photon OnPremise aka Photon Server with which you can host the server side code/sdk and make changes in the serve code and create your own authoritative server by modifying the server-side code but that also require some knowledge in the are, if you are interested in using Photon Server check the next section for more information regarding.
Photon PUN - Photon Server
As explained in the previous section, Photon Server is an alternative to Photon PUN which have some advantages but also some other things to take into consideration, some of the benefits of use Photon Server over Photon PUN are:
- Self-Hosted servers and more control over the server-side code.
- More affordable CCU plan prices with an unlimited plan option.
- Allow hosting a server in a specific region not available in PUN.
- Cheaper overall than using a Photon PUN plans.
But these are things you have to take into consideration when using Photon Server:
- You are in charge of keeping your server running and handling any server crash, shutdown, clean-up, etc...
- Regions availability depends on where you host the server, at difference of Photon PUN which includes the option to easily change over 13 different regions around the globe, with Photon Server it will depend on where you host your server and that will be the unique region available unless you also add a server selection system in your game.
- Scalability will depend on your type of hosting and plan, at the difference of Photon PUN where you can easily upgrade your plan if you require more CCUs, with Photon Server even if you have the unlimited CCU plan, if your hosting server is not prepared for auto-scalability you will have troubles growing your game, because of that is recommended that you use a resizable server hosting plan like EC2 of AWS.
For more detail information about Photon Server, check the website page here:
https://doc.photonengine.com/en-us/server/current/getting-started/photon-server-intro
Use Photon Server with MFPS
Using Photon Server with MFPS instead of Photon PUN doesn't require code changes in MFPS but you have to set up the server SDK manually and that may require some experience or knowledge in the area, fortunately, the official documentation explains the process clearly and step by step to set up and deploy your own server, you can found the guide here:
https://doc.photonengine.com/en-us/server/current/getting-started/photon-server-in-5min
Once you have set up the Photon Server SDK and have it running, there're just a few things to do in your project to start using it:
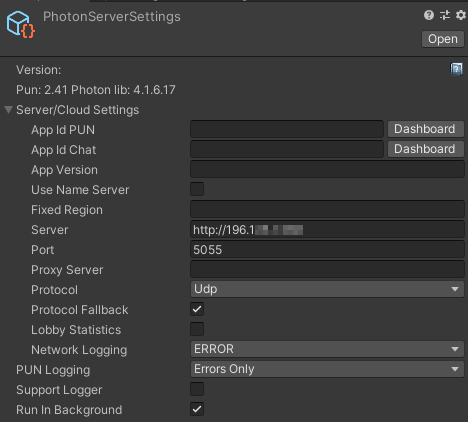
- In your MFPS Unity project, go to the PhotonServerSettings (Click Here) or located by default in Assets ➔ MFPS ➔ Content ➔ Required ➔ Photon ➔ PhotonUnityNetworking ➔ Resources ➔ PhotonServerSettings.
- Foldout the Server/Cloud Settings > uncheck the Use Name Server toggle.
- In the Server text field paste your server (where you setup the Photon Server SDK) public IP or domain name if apply.
- In the Port input field set the port number that you open for your server or if you didn't change it set the default one which is 5055 for UDP or 4530 for TCP.
That's all, if everything was set up correctly you should not be able to play the game and it will be connecting to your server.
Photon PUN - What is CCU?
What is CCU?
CCU stands for Concurrently Connected Users and with Photon and other networking plugins it refers to the limit number of concurrent players that the server or plan allows or supports.
With Photon PUN each plan has a CCU limit and when that limit is reached it will refuse more connections causing new players not able to connect until a slot gets free, the default plan which is for development purposes counts with a 20 CCU limit which means only 20 players can be connected at the same time.
How to know which CCU limit I need?
Since the higher the CCU limit a Photon plan has higher the monthly cost is, it's important to select the right plan, for it you can use the formula based on the average of CCU with respect to the DAU and MAU so based on how many daily or monthly players play your game, you can get an idea of which CCU plan will be enough for you.
CCU to DAU has a factor of 10 to 100 (depending on the game).
DAU to MAU has a factor of 10.
So 100 CCU might work for as many as 100k monthly active users.
These numbers are distorted for new games that get a lot of attention and playtime initially, so it's never really a fixed factor
Photon PUN - Chinese Mainland Region
With Photon PUN by default you would not be able to connect to PUN regions if you are located in Chinese mainland region, this due to China restrictions, in order to be able to use Photon in China you need to request access to the Chinese Mainland region for your Photon application to the Photon Team.
For more details on this, check the Photon official documentation:
https://doc.photonengine.com/realtime/current/connection-and-authentication/regions
Offline
MFPS supports the Photon Offline mode, this allows you to test the map scene without the need to go to the lobby -> create a room -> load the map scene, instead you play the scene directly.
This feature is especially useful when, for example, you make changes to the player's prefab or a weapon and want to test them at runtime, save lot of time and improve the development work-flow.
To enable or disable this feature go to GameData -> Offline Mode
After you enable it, simply open the map scene and Play.
URP - Step 1
By default MFPS use the legacy build-in render pipeline, MFPS will be using URP (Universal Render Pipeline) as the default Render Pipeline in the future when it's more standardized, but for the moment in order to use MFPS with URP or HDRP you have to manually convert the project, in this doc I'll teach you how you can do it:Convert MFPS project to URP:
*This tutorial takes for granted that you have an MFPS project working with the build-in render pipeline in Unity 2018.4 or later*
First of all, you have to remove the Post-Processing package, for this simply go to (Unity Top Menu) MFPS -> Tools -> Delete Post-Processing -> Wait until script compilation finish.
Continue in the next step.
URP - Step 2
Installing URP
1. In Unity, open your Project.
2. In the top navigation bar, select Window > Package Manager to open the Package Manager window.
3. Select the All tab. This tab displays the list of available packages for the version of Unity that you are currently running.
4. Select Universal RP from the list of packages.
5. In the bottom right corner of the Package Manager window, select Install. Unity installs URP directly into your Project.Configuring URP
Before you can start using URP, you need to configure it. To do this, you need to create a Scriptable Render Pipeline Asset and adjust your Graphics settings.
Creating the Universal Render Pipeline Asset
The Universal Render Pipeline Asset controls the global rendering and quality settings of your Project, and creates the rendering pipeline instance. The rendering pipeline instance contains intermediate resources and the render pipeline implementation.To create a Universal Render Pipeline Asset:
1. In the Editor, go to the Project window.
2. Right-click in the Project window, and select Create > Rendering: Universal Render Pipeline: Pipeline Asset. Alternatively, navigate to the menu bar at the top, and select Assets: Create: Rendering: Universal Render Pipeline: Pipeline Asset.
You can either leave the default name for the new Universal Render Pipeline Asset, or type a new one.
Adding the Asset to your Graphics settings
To use URP, you need to add the newly created Universal Render Pipeline Asset to your Graphics settings in Unity. If you don't, Unity still tries to use the Built-in render pipeline.
To add the Universal Render Pipeline Asset to your Graphics settings:
Navigate to Edit > Project Settings... > Graphics.
In the Scriptable Render Pipeline Settings field, add the Universal Render Pipeline Asset you created earlier. When you add the Universal Render Pipeline Asset, the available Graphics settings immediately change. Your Project is now using URP.
Now you will see some (a lot) pink objects, this is because the shaders from the build-in RP doesn't work on URP or HDRP, you have to upgrade the material shaders, in the next step, I'll show you how to convert them.
URP - Step 3
Upgrading your Shaders
If your Project uses shaders from the built-in render pipeline, and you want to switch your Project to use the Universal Render Pipeline instead, you must convert those Shaders to the URP Shaders. This is because built-in Lit shaders are not compatible with URP Shaders. For an overview of the mapping between built-in shaders and URP Shaders, see Shader mappings.
To upgrade built-in Shaders:
1. Open your Project in Unity, and go to Edit > Render Pipeline > Universal Render Pipeline.
2. Select Upgrade Project Materials to URP Materials
Note: These changes cannot be undone. Backup your Project before you upgrade it.
Tip: If the Preview thumbnails in Project View are incorrect after you've upgraded, try right-clicking anywhere in the Project View window and selecting Reimport All.
After this, you still may see some pink objects, those objects were using a custom shader, so in order to fix them simply select them and change their material shader to a Universal RP Shader.

There's one last thing you have to do, see the next step.
URP - Step 4
Finally, there's one last thing that you have to set up.
in URP and HDRP Camera's work different than the build-in RP, in URP/HDRP there's a 'Base' camera and if you want to render any other camera at the same time, you have to set up it as an 'Overlay Camera' and add it on the 'Stack' camera list of the 'Base Camera'
MFPS players use 2 cameras, one that draws only the FP Weapons and the other that draws everything else, so you have to configure the one that draws the FP Weapons as an 'Overlay Camera', you have to do the following for each player prefab that you are using:
1. In the Project Window, select the player prefab (the default MFPS player prefabs are located in the Resources folder of MFPS) ➔ Click on Open Prefab button.
With the player prefab open do the following:
And that's, you can start using MFPS with URP, just remember that this last step has to be done in all the player prefabs that you are using.
HDRP - Step 1
HDRP is one of the new Unity's render pipelines aiming for high-end platforms which allow access to cutting-edge real-time 3D rendering technology designed to deliver high-fidelity graphics and uncompromising GPU performance. By default, MFPS uses the built-in Render Pipeline, but you can manually convert the project to HDRP, in this guide you will learn how to do it.
Convert MFPS to HDRP
This tutorial takes for granted that you have an MFPS project using the built-in render pipeline in Unity 2020.1 or later, some options features mentioned in this tutorial may not be located or called the same in newest versions of the editor, for these cases you can refer to the official Unity guide for your specific Unity version here:
https://docs.unity3d.com/Packages/com.unity.render-pipelines.high-definition@14.0/manual/Upgrading-To-HDRP.html
Before start setting up the render pipeline, is necessary to remove the Post Processing package since this is not supported in HDRP (Which includes their own PP system), to automatically remove the package, go to (Unity Top Menu) MFPS ➔ Tools ➔ Delete Post-Processing ➔ Wait until script compilation finish and then continue with the next step.
HDRP - Step 2
Setting up HDRP
Firstly, to install HDRP, add the High Definition RP package to your Unity Project:
Open your Unity project.
To open the Package Manager window, go to Window > Package Manager.
In the Package Manager window, in the Packages: field, select Unity Registry from the menu.
Select High Definition RP from the list of packages.
In the bottom right corner of the Package Manager window, select Install.
To set up HDRP in your project, use the HDRP Wizard.
To open the HD Render Pipeline Wizard window, go to Window > Rendering > HD Render Pipeline Wizard.
In the Configuration Checking section, go to the HDRP tab and click Fix All. This fixes every HDRP configuration issue with your Project.
You have fixed your Project's HDRP configuration issues, but your Scene doesn't render correctly because GameObjects in the Scene still use Shaders made for the Built-in Render Pipeline. To find out how to upgrade Built-in Shaders to HDRP Shaders, see Upgrading Materials in the next step.
HDRP - Step 3
Upgrading Materials
To upgrade the Materials in your Scene to HDRP-compatible Materials:
1. Go to Edit > Rendering > Materials
2. Choose one of the following options:
■ Convert All Built-in Materials to HDRP: Converts every compatible Material in your Project to an HDRP Material.
■ Convert Selected Built-in Materials to HDRP: Converts every compatible Material currently selected in the Project window to an HDRP Material.
■ Convert Scene Terrains to HDRP Terrains: Replaces the built-in default standard terrain Material in every Terrain in the scene with HDRP default Terrain Material.
Limitations
The automatic upgrade options described above can't upgrade all Materials to HDRP correctly:
You can't automatically upgrade custom Materials or Shaders to HDRP. You must convert custom Materials and Shaders manually, in MFPS the water shader is a custom shader that can't be automatically upgrade so you will have to either replace it with a HDRP water sahder or remove the water from your scene.
Height mapped Materials might look incorrect. This is because HDRP supports more height map displacement techniques and decompression options than the Built-in Render Pipeline. To upgrade a Material that uses a heightmap, modify the Material's Amplitude and Base properties until the result more closely matches the Built-in Render Pipeline version.
You can't upgrade particle shaders. HDRP doesn't support particle shaders, but it does provide Shader Graphs that are compatible with the Built-in Particle System. These Shader Graphs work in a similar way to the built-in particle shaders. To use these Shader Graphs, import the Particle System Shader Samples sample:
1. Open the Package Manager window (menu: Window > Package Manager).
2. Find and click the High Definition RP entry.
3. In the package information for High Definition RP, go to the Samples section and click the Import into Project button next to Particle System Shader Samples.
HDRP - Step 4
Adjusting lighting
HDRP uses physical Light units to control the intensity of Lights. These units don't match the arbitrary units that the Built-in render pipeline uses.
For light intensity units, Directional Lights use Lux and all other Light types can use Lumen, Candela, EV, or simulate Lux at a certain distance.
To set up lighting in your HDRP Project:
1. To add the default sky Volume to your Scene and set up ambient lighting go to GameObject > Volume > Sky and Fog Global Volume.
2. Set the Environment Lighting to use this new sky:
- Open the Lighting window (menu: Window > Rendering > Lighting Settings).
- In the Environment tab, set the Profile property to the same Volume Profile that the Sky and Fog Global Volume uses.
- Set the Static Lighting Sky property to PhysicallyBasedSky.
- Optionally, if you don't want Unity to re-bake the Scene's lighting when you make the rest of the changes in this section, you can disable the Auto Generate checkbox at the bottom of the window.
3. Currently, the shadows are low quality. To increase the shadow quality:
Create a new Global Volume GameObject (menu: GameObject > Volume > Global Volume) and name it Global Settings.
To create a new Volume Profile for this Global Volume:
- Open the Global Volume's Inspector window and go to the Volume component.
- Go to Profile and select New.
- To add a Shadows override:
- Go to Add Override > Shadowing > Shadows.
- Enable Max Distance.
- Set Max Distance to 50.
4.Configure your Sun Light GameObject.
- Select your Light GameObject that represents the Sun in your Scene to view it in the Inspector.
- Go to Emmision and set the Intensity to 100000.
- Set Light Appearance to Color.
- Set Color to white.
- To see the sun in the sky, go to Shape and set Angular Diameter to 3.
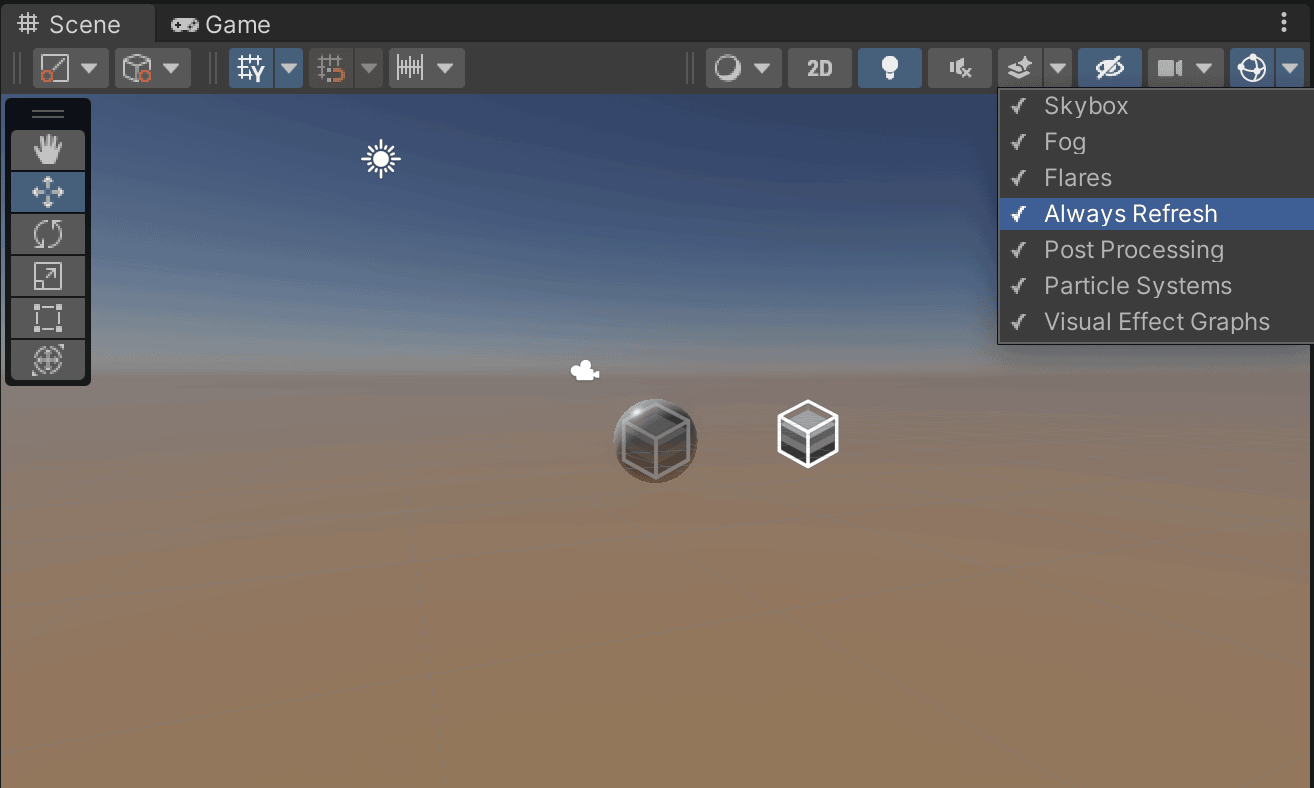
5. The Scene is now over-exposed. To fix this:
- Select the Global Settings GameObject you created in step 3.
- Add an Exposure override to its Volume component (menu: Add Override > Exposure).
- Enable Mode and set it to Automatic.
- To refresh the exposure, go to the Scene view and enable Always Refresh.
HDRP - Step 5
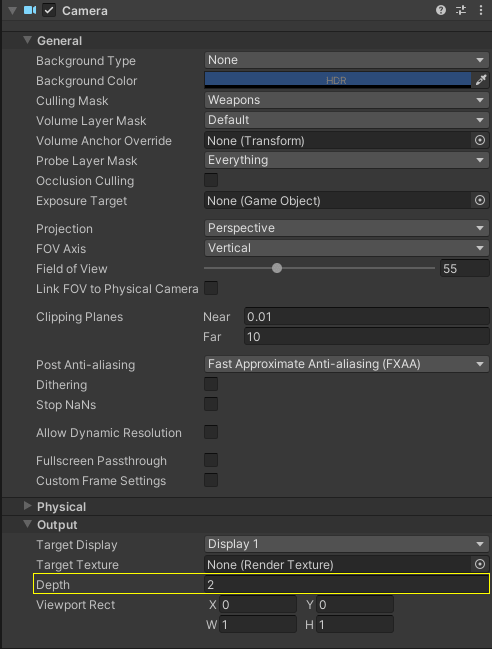
Finally, there's a manual setup you have to do for all the MFPS player prefabs to stack the player cameras:
1. Open the player prefab by opening it in the prefab editor or dragging it into a scene hierarchy.
2. Inside the Player Prefab hierarchy, select the WeaponCamera located in Local > Mouse > Animations > Main Camera > WeaponCamera.
3. In the inspector window of the Camera component > unfold the Output tab and set the Depth value to 2.
Apply/Save the player prefab changes and repeat this process with all the remaining player prefabs in your game; once you finish with this, you have complete the basic project conversion to HDRP.
Player Prefabs
We called Player Prefabs to the unity prefab that contain all the required scripts, objects, and structure that make up the player controller.
The MFPS player prefabs are located in a special Unity folder called 'Resources' (you can find it inside the MFPS folder), if you wanna change anything related to one of the players like, modify a weapon position, animation, a script property, etc... you have to apply the change to these prefabs.
By default, MFPS uses 2 player prefabs which are assigned in the GameData ➔ Player1 and Player2, Player1 is used for Team 1 and Player2 for Team 2, in case the game mode is not a team-based mode like the Free For All game mode, the Player1 is used.
Since version 1.8 you can also override the Player1 and Player2 per scene, which means that you can use different player prefabs for each team in each map, to do that you simply have to attach the script bl_OverridePlayerPrefab.cs in any object of your map scene ➔ then in the inspector of this script you will see the fields to assign the player prefabs and that's all.
In case you are looking for a more advanced solution for the player selection or want to add more player prefabs where the players can select in-game their character, you should take a look at the Player Selector addon.
Player Classes - Player Classes
Player Classes
Overview
MFPS features four distinct player classes, each designed with unique capabilities and roles. These classes are Assault, Support, Recon, and Engineer. A key feature of these classes is their ability to have customized weapon loadouts, aligning with their specialized roles or 'operator specialties'.
Class-Specific Weapon Loadouts
Assault Class: This class can be equipped with a weapon loadout tailored for assault or rush tactics. The loadout typically includes weapons and gear suited for close to mid-range combat.
Support Class: The Support class loadout can be optimized for roles like providing cover fire or team support.
Recon Class: Ideal for sniping or long-range engagements, the Recon class's loadout is designed for distance combat.
Engineer Class: The Engineer's loadout can be tailored for tasks like technical roles on the battlefield.Customization of Class Names
Default Names: By default, the classes are named Assault, Support, Recon, and Engineer.Modifying Class Names:
You can easily change these names to better suit your game's theme or style.
To do this, go to the inspector of GameData and locate the Player Classes Name section.
Here, you can input new names for each class, customizing them as per your game's narrative or design
Player Classes - Loadouts
Weapon Loadouts
Overview
In MFPS, weapon loadouts play a crucial role in defining a player's combat capabilities within a match. A weapon loadout refers to the specific set of weapons a player is equipped with upon spawning.
Configuration of Loadouts
Each Player Class in MFPS can be assigned a distinct weapon loadout, allowing for tailored combat styles and strategies, a loadout includes four weapon slots. Each slot is designated for a different weapon. Additionally, there is an extra slot allocated for a 'drop kit'.
Default Loadouts Location: By default, the four primary loadouts for all player classes are stored in a specific folder within the project (Assets ➔ MFPS ➔ Content ➔ Prefabs ➔ Weapons ➔ Loadouts➔*).Modifying Default Weapons
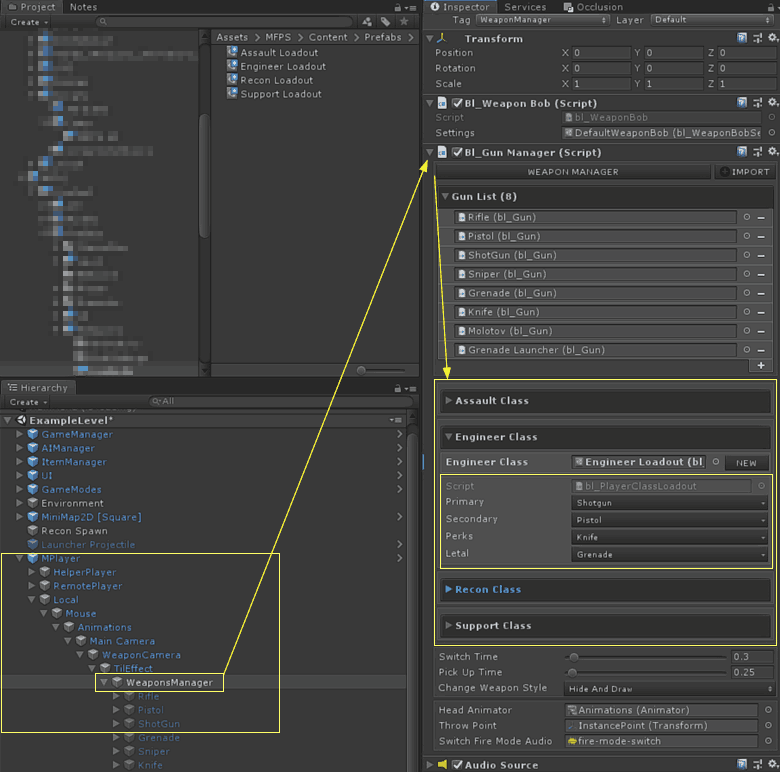
- To change the default weapons in a loadout, begin by opening the relevant player prefab. This is particularly useful if you want each player prefab have a different set of weapon loadouts.
- Navigate to the WeaponManager object within the player prefab.
- In the inspector, locate the bl_GunManager and expand the foldout for the desired class loadout (e.g., Assault Class, Recon Class, etc...), Here, you can modify the weapon slots, allowing you to customize the weapons each class starts with.
(if you want to create a new present before edit, simply click in the New button
Game Audio - Audio Reskin
BACKGROUND AUDIO
By default MFPS only use background audio in the Lobby/MainMenu scene, in order to change that soundtrack or remove it, you can do it by:
■ In the MainMenu scene -> Lobby -> Scene -> AudioController -> (Inspector window) bl_AudioController -> assign/remove the audio clip in the field 'Background Clip'
BULLET HITS
There's a bullet hit sound effects that's played when the bullet hit particle is instanced, by design that sound volume is really low since it can be annoying for some persons, in order to change the audio sound effect or volume of these bullet impacts you have to open the Bullet Impact particle prefab which by default are located in the MFPS folder at Assets -> MFPS -> Content -> Prefabs -> Level -> Particles -> WeaponEffects -> Prefabs->*
Open the prefab of the impact you want to modify -> in the Audio Source component attached in the prefab, assign/replace the Audio Clip and adjust the volume as you please.
PLAYER HIT
Another hit sound that is played is when the local player gets hit, there are two different sounds played, one when is hit by a bullet and the other when is any other kinda injure.
You can change these sounds per player prefab, simply select the Player Prefab where you wanna change the sounds -> bl_PlayerHealthManager -> in the lists:
Hits Sounds: for the bullet hit sound effect
Injure Sounds: for... well, the injured sound effects :D
ROOM GENERAL SOUNDS
There are some general sound clips that are listed in the room Audio Controler, you can easily change these clips in the map scene hierarchy >GameManager > Audio Manager > bl_AudioController > Audio Controler > Audio Bank > *foldout the list items* > Clip
PLAYER FOOTSTEPS
Check the Footstep section for more detail information on this.
Game Audio - Audio Ranges
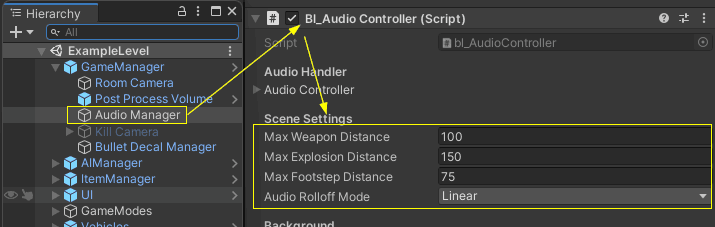
You may encounter a scenario where in your custom map you can hear players/bots shooting, footsteps, explosions, etc... sounds far away as if it were near to you, this is because the default audio ranges are not ideal for your map size, but this can be easily modified.
Adjust Audio Ranges
To adjust the audio ranges in a specific map > open your map scene in the editor > in the hierarchy window go to GameManager > Audio Manager > in the inspector window of this object > bl_AudioController > you will see some slider parameters that you can use to adjust the range of certain sound types, the ranges are defined in meters which means setting up a range to 50 means the audio will be heard only when the player is 50 meter or close to the audio source.
the audio volume will gradually fade out based on the origin and the max distance.
Game Audio - Audio Volumes
MFPS Audio Mixer
To modify the game audio volumes in general for certain categories like Footsteps, First Person Weapon, Third Person Weapons, Bullet Hits, and UI you can use the Audio Mixer window to adjust the MFPS default Audio Mixer setup.
For this, go to the MFPS Audio Mixer located in Assets ➔ MFPS ➔ Content ➔ Sounds ➔ Mixer ➔ MFPS Audio Mix (click here to ping), then double click it to open the Audio Mixer window, there you will see the Audio Mixer Groups where you can adjust the volumes and audio blend or even apply custom sound effects.
For more information in the Unity Audio Mixer, refer to this:
https://docs.unity3d.com/Manual/AudioMixer.html
Game Audio - Audio Assets
In case you are looking for sounds to replace the default ones in the game or maybe you need new sounds for your weapon or players, below you will find a hand-picked collection of assets that you can acquire from the Asset Store
Game Texts - Coded Text
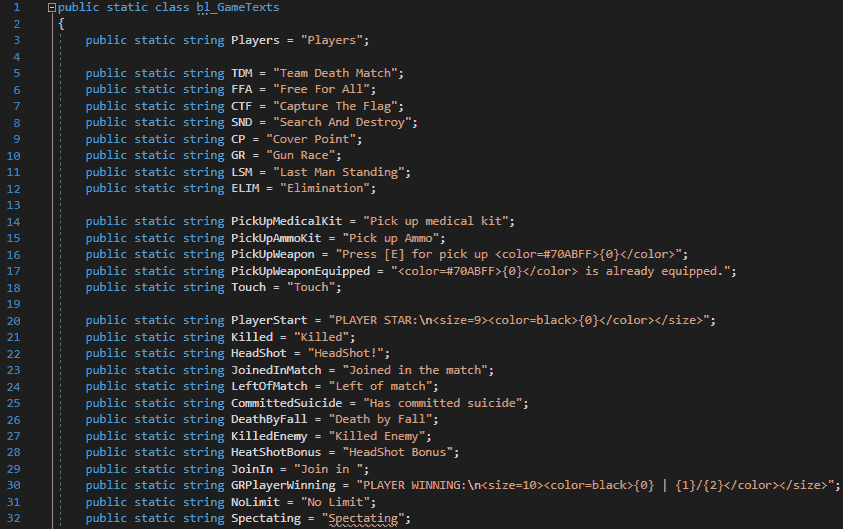
If you want to change some text in the game or maybe just change the text grammar, most part of the text is directly assigned in the UI Text's components which are located inside the canvas objects in each scene of the game, but also, there is some text that is set/modified in runtime by code, to make easy for you to find all this text we have placed all those in a single script which is bl_GameTexts.cs
in this script you will find all the text that assigned by code in runtime, you can modify them from that script, this facilitates the work of for example adding your own localization system.
Game Texts - Profanity Filter
Since version 1.10.0, MFPS include a profanity word filter, which allow to filter user generated content like in chat or nick name.
By default this feature is enabled but you can disable it in GameData > Filter Profanity Words.
Modify profanity words
By default, the profanity word database included in MFPS contains more than 2800 common profanity words, you can remove or add more words as please.
For this, you simply have to open and edit the bad-words.txt file located in: Assets ➔ MFPS ➔ Scripts ➔ Internal ➔ Data ➔ Text ➔ bad-words.txt, to add new words, follow the same Json syntax.
Game Input - Game Input
A critical aspect of shooter games (or all games in general)
is the user control, but this is kinda special in action games since players usually have their own way to set up the inputs with which they feel comfortable playing, MFPS by default have the "standard" input set up which is set in the most fps games.
Since version 1.9, MFPS comes with a custom Input Manager that allows rebinding the input keys in runtime through a menu in the settings window, you can define the default inputs in the "Input Mapped" and let the players decide if they wanna change in-game.
Alternatively, if you want to use a third-party Input Manager system, MFPS also facilitates this, all the in-game used inputs are defined in the script bl_GameInput.cs, you can change the code of the functions to point to your custom input system.
You can identify which input is for what game action by the function name (Fire, Reload, Jump, etc...)
Game Input - Default Mapped
If you want change the default input mapped of the keyboard or gamepad you simple have to modify the mapped object.
Selected the input mapped scriptable object, if you are using one of the default ones, they are located at: Assets ➔ MFPS ➔ Content ➔ Prefabs ➔ Presents ➔ Input Mappeds➔*, select it and in the inspector you will have the list of all the setup inputs, fold out the input that you want to modify and edit the info (keycode, axis name, description, etc..)
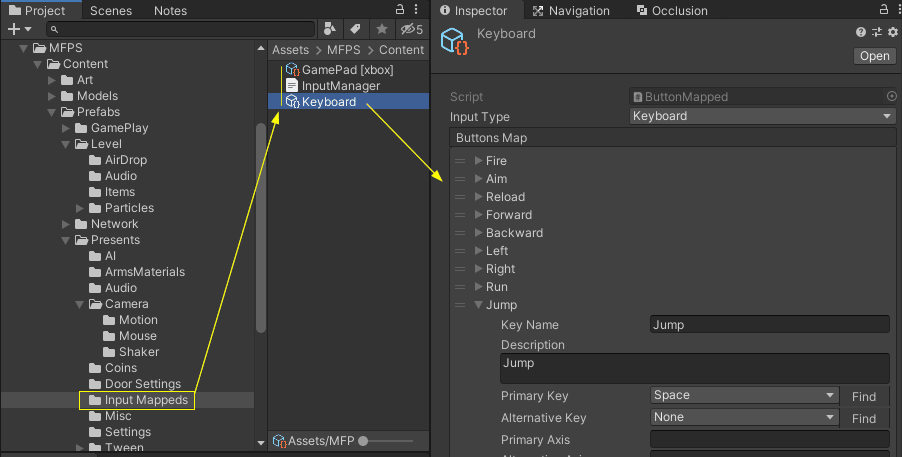
Also you can reorder the input order, the same order in this list is the order that will be displayed in game.
Game Input - Add Input
Add a new input is really simple, basically you only have to add a new field in the input mapped and set the keycode of the input.
1 - Select the Input Mapped in which you want to add the input, by default there're only 2: Keyboard and Xbox Controller, so select the one that you want edit, these mappeds are located at: Assets ➔ MFPS ➔ Content ➔ Prefabs ➔ Presents ➔ Input Mappeds➔*
2 - In the inspector of the mapped you will see the list called Button Map with all the current inputs, add a new field in this list and fill the info of it:
Once you have configured the key, now you can use it in your code, the usage is pretty similar to the default Unity Input, instead of:
Input.GetKeyDown('keyName'){...} You have to use:
bl_Input.isButtonDown('keyName'){...} or
bl_Input.isButton('keyName'){...}
bl_Input.isButtonUp('keyName'){...}
Where the 'keyName' value is the KeyName of your setup input in the Input Mapped.
Game Input - GampePad
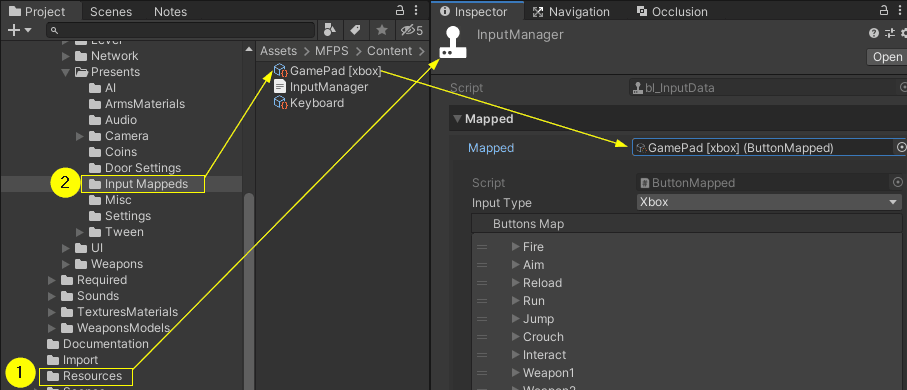
In order to use a GamePad/Controler with MFPS and Input Manager you have to do some extra steps.
- First, if you did not override the Input Settings when install MFPS (using the installer window) you have to modify the Unity Input Settings to add the required control axis, Input Manager comes with a prepared Input Settings.asset with all this already set up, so you only have to click the button below.
This element is dynamic in the original editor documentation and does not work or render correctly in the static HTML version. It's shown here for reference only — please refer to the built-in editor documentation for full functionality of the doc.
Now in the InputManager in the field Mapped set the input mapped for your controller, by default the addon comes with the InputManager mapped for xbox controller, drag this or your created one in the Mapped field
Game Input - Add Mapped
To create a new input Mapped simply go to the folder where you want to create it (in the Project View window) -> Right Mouse Click -> Create -> MFPS -> Input -> Input Mapped, now you will see the new created object, select it and setup all the inputs of your controller keyboard.
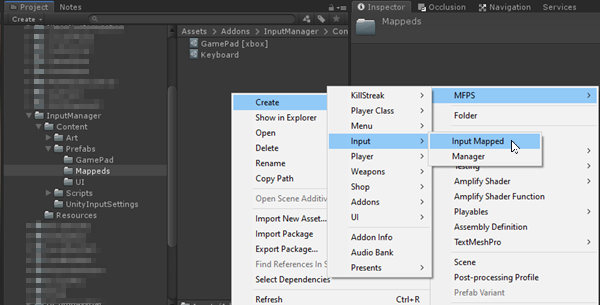
Optionally you can just duplicate one of default mappeds and edit the inputs.
Game UI - UI Reskin
An important modification and most of the time skipped or not much time invested in is the redesign of the user interface, it's extremely important that you modify the default UI and not just the color but the actual layout and if possible the sprites and the overall design since it not only will make your game seem more unique but also will make your game not just another quick copycat game and avoid bad reviews of players because of this.
There are no special steps in MFPS to modify the UI, you can modify it as you would do in any other Unity project that uses UGUI, all the UI is structured and designed inside the canvas in each scene, there you can change the images, text, font, sprites, layout, etc... if you are not familiar with the Unity UI system, check this tutorial first:
https://learn.unity.com/tutorial/ui-components#
If you are already familiar with Unity's UI system then you can modify pretty much anything of the default UI, you simply have to make sure to not delete components that are referenced/required by a script, if you aren't sure if you can delete a UI object and you want to hide it then you can simply disable it instead.
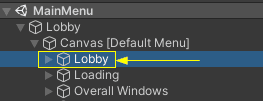
Lobby UI
All the lobby UI can be found in the MainMenu scene hierarchy Canvas, a common question I receive is:
Where to change the background image?
You can change the lobby background image in the inspector of this image component attached to this object in the hierarchy:
Maps UI
When you make a modification to the UI of a map scene, you don't have to do it again for your other map scenes you just have to apply the changes to the UI prefab and it will be synced in all the other scenes.
Game UI - UI Assets
In case you are looking for UI kits to replace the default UI of the game, below you will find a hand-picked collection of assets that you can acquire from the Asset Store
Teams
On MFPS there are various game modes that use Team systems like CTF (Capture the Flag) or TDM (Team Death Match), for default these teams are named as "Delta" and "Recon", you can modify these team names and representative color, and team icon, for it go to Game Data > scroll down to the "Team" section:
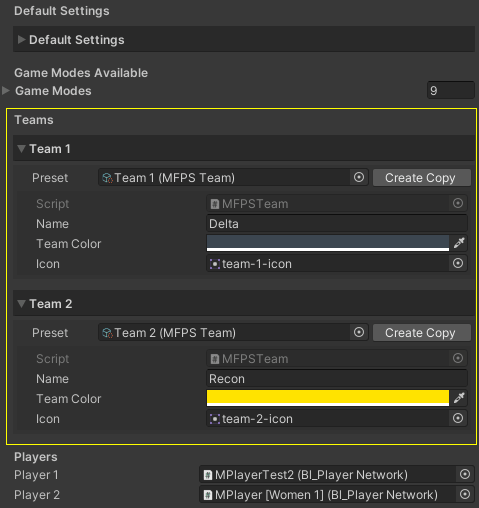
A common question about the team system is whether it's possible to have more than two teams. Unfortunately, this isn't supported by default at the moment. Implementing it would require significant changes to the core scripts.
To access specific team information through code, you can use:
string team1Name = MFPSTeam.Get(Team.Team1).Name;
Sprite team1Icon = MFPSTeam.Get(Team.Team1).Icon;
Coins - Properties
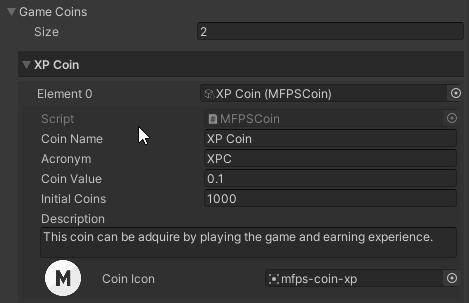
MFPS Integrate a virtual coin/currency system with two different coins, one that can be earned by playing the game (with XP) and another that should only be acquired by purchasing it with real money (using the Shop addon or your custom IAP) .
You can customize many aspects of these coins without touching any code, like the names of the coins, color, icon, and value.
To modify these properties, go to GameData ➔ Game Coins ➔ unfold the coin you want to modify, most of the properties names are self-describing, but here is the explanation of the ones that could confuse you:
How to use the coins?
By default (in the core packages) MFPS does not use the coins for anything, is up to you for what you wanna use them, either to buy game items like weapons, special skins, operators, etc... or implement a lootbox system or anything you can imagine.
There are some addons if you want to implement a shop system and allow players to buy weapons and coins packs:
Shop System Addon.
And there are addons to integrate a payment system to allow purchases with real money/currencies:
Unity IAP Addon.
Paypal Addon.
Coins - Operations
If you want to do basic coin operations like add or deduct a specific amount of coins to the player wallet you can do so with a single line of code:
ADD COINS
bl_MFPS.Coins.GetCoinData(0).Add(100); where 0 = the index of the coin in GameData ➔ GameCoins list,
by default 0 = XP Coin, 1 = Gold Coin.
DEDUCT COINS
bl_MFPS.Coins.GetCoinData(0).Deduct(100); If you are using ULogin Pro addon the coin operation will be executed in the server and saved in the database, if you are not using it, the coins will be stored locally using PlayerPrefs which is not secured, that is why is recommended to save the coins externally in a dedicated database as ULogin Pro does.
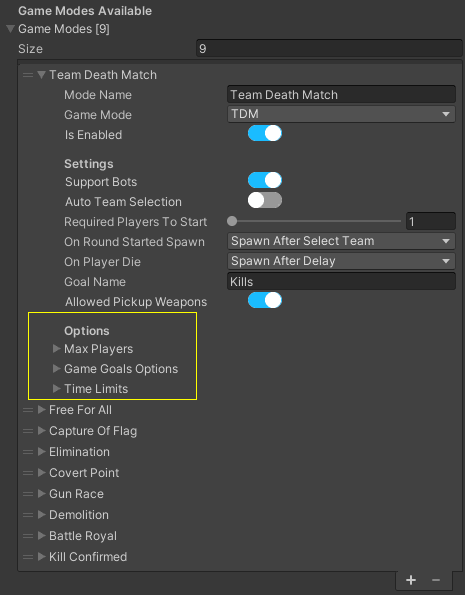
Game Modes - Game Modes
MFPS comes with 3 different game modes: Team Deathmatch, Capture Of Flag, and Free For All, each of these modes has its respective logic in separate scripts which can be found at: Assets ➔ MFPS ➔ Scripts ➔ GamePlay ➔ GameModes➔*
Each game mode has some common properties that you can customize in the inspector in GameData ➔ Game Modes ➔ *,
if you foldout one of the modes, you will find all the customizable properties
Here what they are for:
Game Modes - Custom Mode
Besides the 3 modes included in MFPS, there are more of the popular game modes available for MFPS as add-ons that you can acquire, like Demolition/Bomb Defuse, Domination/Cover Point, Gun Race/Gun Play, Elimination, and Kill Confirm, all those are available in our Shop.
But let's say you want to create a custom game mode, where to start?
Well, that is a difficult question since each game mode has its unique requirements, different logic, gameplay, etc... because of that, each approach is different, so I can't tell you how to create your game mode per se, what I can do, is tell you how to integrate it to MFPS.
The first thing is to create an enum identifier for your game mode, which will be used to identify the game mode in the code, for that simply add a pseudonym of the game mode name in the script GameMode.cs, e.g:
public enum GameMode
{
    TDM,
    FFA,
    CTF,
    SND,
    CP,
    GR,
    BR,
    ELIM,
    DM,
    KC,
    MyCustomMode,
}
In the above example I added the "MyCustomMode" as example, but you can use anything you want, even just the initial as the others mode.
The next thing is to define the script which will handle the integration of MFPS with your game mode, for that MFPS uses the abstract class bl_GameModeBase to define the functions that your game mode main script must implement, so what you have to do is inherit that base class in your main game mode script ➔ override the required functions of the abstract class in your script, to make easier, you can use the default game modes scripts (bl_TeamDeathMatch.cs, bl_FreeForAll.cs, etc...) as a reference and learn from its implementation
Once you define the bl_GameModeBase base class and its functions, there's a must-have code that you have to implement, in the Initialize() function you have to register this mode with its enum identifier, like this:
if(IsThisModeActive(GameMode.MyCustomMode))
        {
            // Active your game mode
            // Active all the game objects, props, UI, etc... that are for this specific mode
            // Register to game events needed for this mode
        }
        else
        {
            // Disable any object/UI that are for this specific mode
        }
Below you will find a complete script will the default skeleton of the above explained, you can use it as the base and start to modify it with your custom requirements for your mode:
using UnityEngine;

public class MyCustomModeScript : bl_GameModeBase
{

    #region Interface Overrides
    public override void Initialize()
    {
        if (IsThisModeActive(GameMode.MyCustomMode))// replace the identifier with your game mode
        {
            // if this game mode is active in this room
            // active all the objects that should be active for this game mode only
            // like UI, map objects, etc
        }
        else
        {
            // if this game mode is not active in this room
            // deactive all the objects that should be active for this game mode only
        }
    }

    public override bool IsLocalPlayerWinner()
    {
        // Determine if the local player is the winner
        // Based in your custom game mode logic
        return true;
    }

    public override void OnLocalPlayerDeath()
    {
        // if something should happens when the local player die
        // in your game mode, put it here
    }

    public override void OnLocalPlayerKill(KillInfo info)
    {
        // if something should happens when the local player kill
        // in your game mode, put it here
    }

    public override void OnLocalPlayerSpawn()
    {
        // if something should happens when the local player spawn
        // in your game mode, put it here
    }

    public override MatchResult GetMatchResult()
    {
        // Determine the match result based in your game mode logic FOR THE LOCAL PLAYER
        return MatchResult.Victory;
    }
    #endregion
}
For guidance and reference, consider examining the scripts of the default game modes. Further, inspect all the functions within the bl_GameModeBase.cs script to gain a comprehensive understanding of all the override and utility functions available for use in your game mode.
Game Modes - Per Map Modes
If you want to define which game modes will be allowed and which don't in certain maps of your game, you can do it by setting the games that are NOT allowed in the map info No Allowed Game Modes list, which is located in each map scene info in GameData ➔ All Scenes ➔ *Scene info* ➔ No Allowed Game Modes.
The modes that you add to that list will not be available for that map, and all the rest will be available.

Player Animations - Basic
MFPS 2.0 uses Mecanim system to handle the tp player animations, so change animations clips is simple as drag and drop the animation clip in the motion state in the Animator window, you only need a humanoid animation clip and override it in the Animator Override Controller.
CHANGE PLAYER ANIMATION
In order to change a specific animation clip:
- Open the player prefab that you wanna change the animation for (Player prefabs are located in the Resources folder).
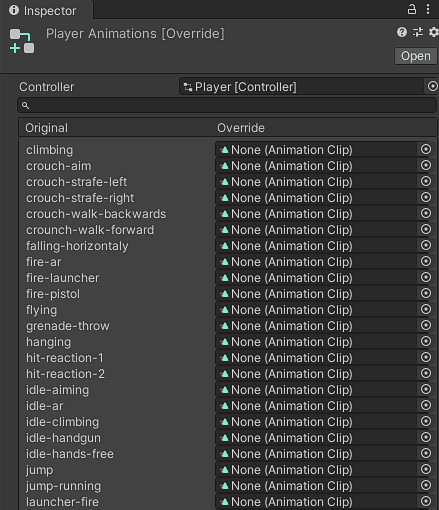
- In the Animator component of your soldier model of the player prefab double click on the Controller field:
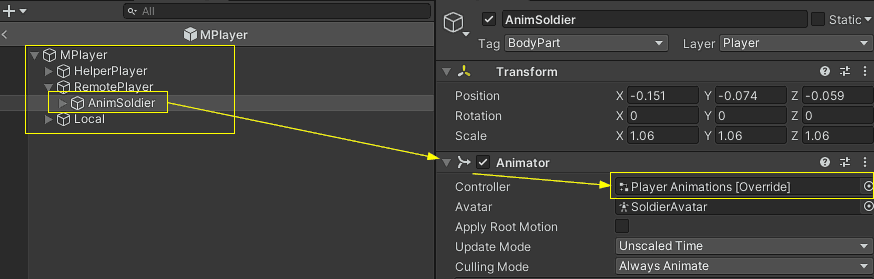
- Now in the Inspector window, you will see the list of the animations clips used in the player animator controller, next to the default animation clips names you can see a field to assign and override/replace the default animation with your custom animation clips.
So, you simply have to assign your custom animations in the corresponding box, based on the default animation names you can figure out which animation is for what player motion.
Now, if you want to use differents animations for an specific player prefab, e.g each player prefab have a different soldier mode with custom movement animations for each model, the solution is pretty easy.
You simply have to create or duplicate the Player Animations [Override] controller and assign it in the Animator component of your soldier model in the player prefab:
Player Animations - Advance
CHANGE ANIMATIONS ADVANCE
- Change the animations from the Animator Override Control (from the Basic section) have a limitation, and it's that you can only replace the animation clips, the problem is that by default some animations are used in multiple states of the Animator StateMachine, e.g the 'reload-ar' which is the weapon reload animation is used for the Rifle, Pistol and Sniper weapons, if you want to use a different animation for each type of weapon you will have to modify the Base Animator Controller.
1. Duplicate the default Player Animator Controller asset (Player [Controller]) ➔ Select the asset in the Project window ➔ Ctrl + D or Command + D on MAC.
2. Assign the duplicated Animator Controller in the Animator component of the soldier model of the player prefab that you want to modify the animation for.
3. Open the duplicated Animator Controller in the Animator window
(double click on the Animator Controller)
➔ Find the animation state that you want to change the animation clip, on the Animator view you need figure out for what part of player body is this animations Bottom or Upper body (Legs or Arms), e.g the Rifle Reload motion is for the Arms, so it is for the Upper Body, so go to Layers - and select the Upper layer, there you will see various state machine with the name of the weapon types to which it belongs ➔ open the weapon state machine: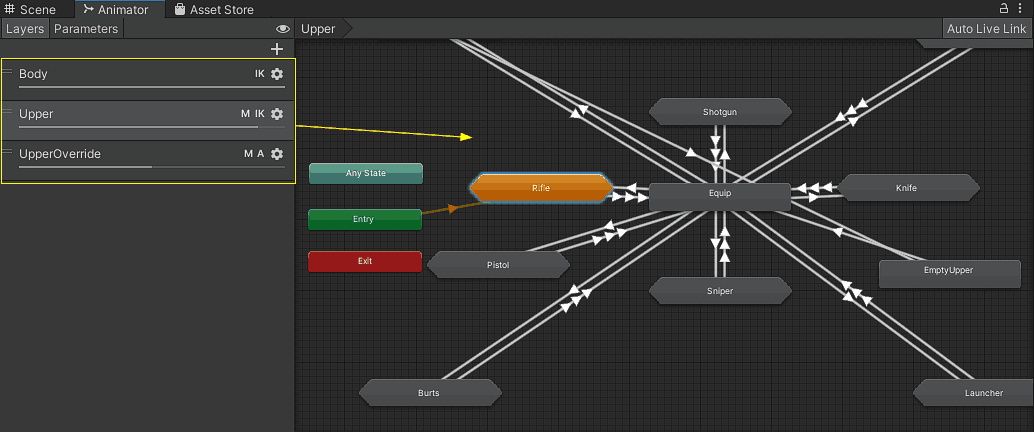
Now you will see others animation states, those represent the weapon motion clips, in this example we are looking for the "Reload" state, so, select the Reload state ➔ in the inspector view you will see the settings of this state, what we are interested in is the Motion field, in that field you to need to assign the animation clip with which you want to replace the default one.
Once you do that, you are ready to go, you can replace all other animation clips if you want.

Player Animations - Weapon Animations
As you may already know in MFPS the first person and third person animations are different, the same applies to the weapon animations, you can't use the use FPWeapon animations for the TPWeapons, instead, humanoid animations are needed for the TPWeapons.
By default, MFPS uses different weapon animations for each weapon type (Machinegun, Pistol, Sniper, Grenade, etc...) a set of animations for all the weapons of the same type which means you have multiple Sniper weapons, all of them will play the same set of sniper TP animations.
Could be the case in where you want to use a custom animation set for a specific TPWeapon, this will require creating a new SubStateMachine in the player Animator Controller and creating the necessary transitions, below you will find an automated guide in how to set up the SubStateMachine in order to use custom animations for a TPWeapon.
ADD CUSTOM WEAPON ANIMATIONS
The first thing we need is to know in which Animator Controller we want to add SubMachineState for the animation set, by default, the default Animator Controller which is used for all the MFPS player prefabs is located in: Assets ➔ MFPS ➔ Content ➔ Art ➔ Animations ➔ Player ➔ Controllers ➔ Player [Controller] (Click here to ping it)
If you haven't changed the Animator Controller in any player prefab simply drag the default Animator Controller (from the above path) in the field below, otherwise drag the Animator Controller that you are using.
This element is dynamic in the original editor documentation and does not work or render correctly in the static HTML version. It's shown here for reference only — please refer to the built-in editor documentation for full functionality of the doc.
Player Animations - Animation Assets
In case you are looking for player animations to replace the default ones in the game, below you will find a hand-picked collection of assets that you can acquire from the Asset Store
Name Plates
Name Plates = Above Head Player Name, is the GUI Text that appears on teammates players in-game,
it's a pretty basic feature in all multiplayer games, in MFPS this GUI is rendering using the Unity legacy OnGUI system for its simplicity for the required purpose.
Customize the design of this GUI is quite simply:
In each player prefab you will found the script bl_NamePlateDrawer.cs attached to it, now in order to make easier to modify the look of the name plate UI you can preview it in the editor (in edit mode) by instance the player prefab in a scene ➔ select the player prefab instance ➔ bl_NamePlaterDrawer ➔ Click on the button Simulate [OFF].
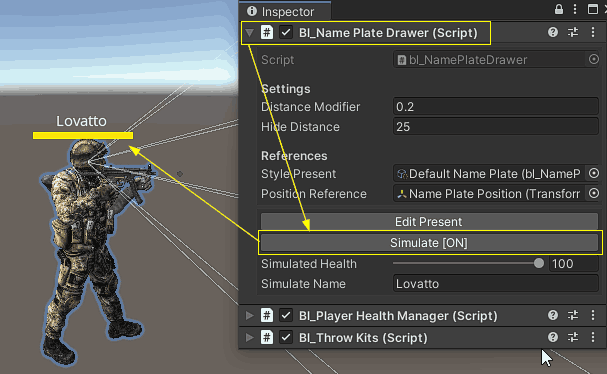
Now with the preview On, you can edit the design with the frontend properties, for it on the inspector window of bl_NamePlateDrawer ➔ click on the button Edit Present ➔ this will open the GUI style properties of the name plate.
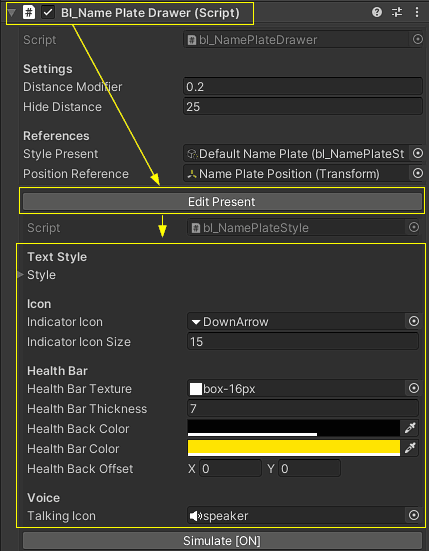
Customize the properties as you desire and preview the change in realtime in the Scene View window ➔ Once you're done, turn off the Simulation by clicking again in the Simulation [On] button ➔ Apply the changes to the player prefab.
Hide Health Bar
If you want to hide the health bar from the name plate of teammates and only show the player name, you can do it by turn off the toggle Show Teammates Health Bar in GameData.
Bullets - Bullet Prefab
in MFPS bullets are pooled and like all other pooled objects in MFPS they are listed in bl_ObjectPooling script, which is attached in the GameManager on each map scene.
in bl_Gun you assign only the "Pooled Name".
You may want to add a new bullet for a specific weapon, let's say you want add a different Trail Render, well for do it you can do this:
Duplicated a bullet prefab:
Select one of the existing prefab located at MFPS ➔ Content ➔ Prefabs ➔ Weapon ➔ Projectiles ➔ *, select the prefab and Ctrl + D to Duplicated, or Command + D on Mac.
Then make the changes that you want to this duplicated prefab and after this, add a new field in bl_ObjectPooling (it is attached in GameManager object in room scenes), in the new field drag the bullet prefab and change the pooled name:
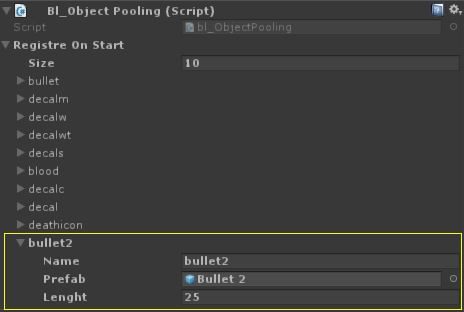
then open a player prefab and select the FPWeapon that you want assign the bullet, in the bl_Gun script of that weapon, write the pooled name of the bullet in the field "Bullet".
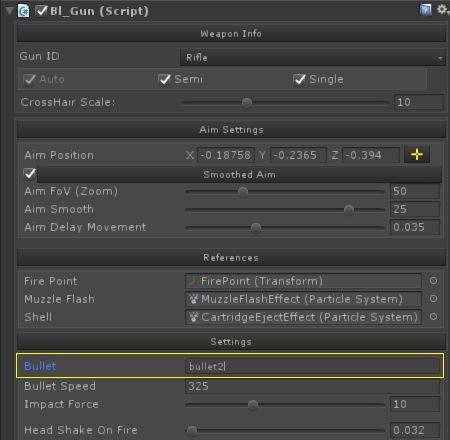
Apply changes to the player prefab and ready.
Bullets - Bullet Decals
The bullet decals are pooled and automatically placed when a bullet hits a collider, the decal material will be selected based on the collider tag, you can define as many decals as you want.
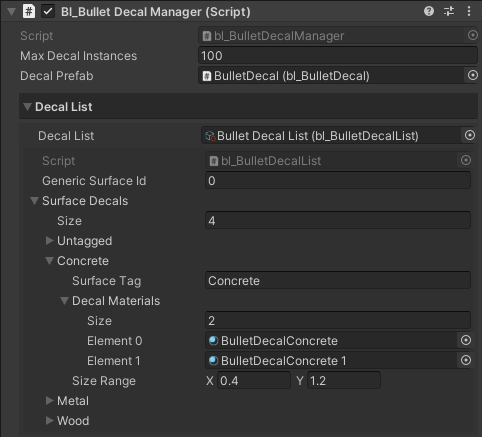
The Bullet Decal Manager is located under the GameManager object in each map scene, GameManager ➔ Bullet Decal Manager ➔ bl_BulletDecalManager.
In order to modify, add or remove a decal:
Create a new material with a simple alpha shader
Assign the decal texture to this material.
In theBullet Decal Manager ➔ Decal List ➔ Surface Decals, add a new tag field if the decal is for a new Tag, or if it is for an existing one, simply unfold the field.
Add the Decal material to the Decal Materials list.
That's.
Bullets - Custom Bullet
If you need to create a different type of bullet, not just a trail renderer change but a different ballistic or a different hit detection, this is possible to do without breaking changes.
The bullet or projectiles can be extended and/or a custom class can be used, you should not modify the default bullets/projectiles scripts,
instead, create a new class and inherit it from the bl_ProjectileBase class, override the required functions and use the default scripts as reference only and code the logic of your bullet/projectile as needed.
Attach your custom script to a game object and create a prefab of it, then add this prefab in the pooled list and you are ready to go.
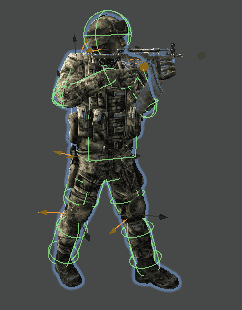
Player Hitbox - Colliders
A hitbox is a basic shape collider that detects when something collides with the player, those colliders essentially are simple shapes like boxes, spheres, or capsules, in MFPS they can be found in each of the standard humanoids bones of the player models in player prefabs.
These hitboxes are automatically set up when you create a new player with 'Add Player Tutorial' but there may be the case that these colliders don't shape well to the player model bones, the collider may be too big, too small, or off position, for these cases, a manually retouch is needed, you will have to manually adjust the collider bounds to the bone, you can do this by simply selecting the bone transform that contains the Collider component and adjusts the center and size properties from the inspector.
The goal is that each hitbox collider fits as much as possible to the model.
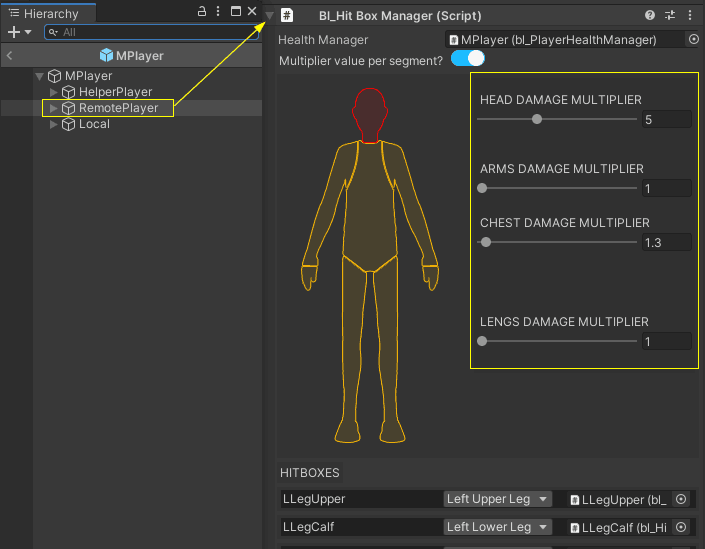
Player Hitbox - Damage
The main purpose of the player hitboxes is to detect when a bullet hit the player, in MFPS you can have a different damage base for each hitbox in order to cause more or less damage depending on which part of the body the bullet hit.
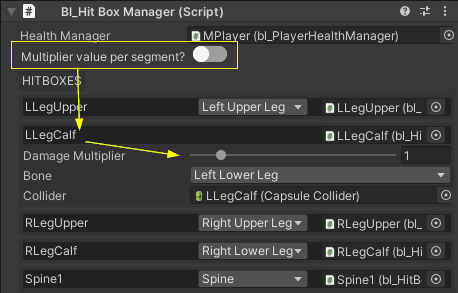
For this, you can use the bl_HitboxManager script which is attached in each player prefab and bots prefabs, in the player prefabs you can find attached the 'Remote' child, when you select this child, in the inspector window of the bl_HitboxManager script, you will have different damage multipliers which you can modify to cause more or less damage in certain body parts, by default these multiplier values are applied per segment (Head, Chest, Arms, and Legs):
Optionally, if you want to assign a damage multiplier per hitbox instead of per segment, simply turn off the 'Multiply value per segment?' toggle in the inspector ➔ foldout the hitbox by clicking in its name ➔ set the damage multiplier.
Deal Damage - Player Damage
Players by default can receive damage from weapons, fall damage, and vehicle collisions, this damage is received by the player hitboxes or in the bl_PlayerHealthManagerBase script.
If you want to deal damage to a player here is how you can do it:
Deal damage to a local player
- Dealing damage to a local player can be done by calling the DoDamage(...) function of the bl_PlayerHealthManagerBase script which is attached at the root of the player instance
That function expects DamageData parameter which contains all the information regarding the damage that is given.
What you need is a reference to the player that you want to apply the damage, how you get that player reference depends on how your damage is executed, e.g let's say you do it with a Raycast, then if your Raycast detects a local player > you get the bl_PlayerHealthManagerBase reference from that player > call the DoDamage(...)and pass the DamageData, e.g:
void DealDamageFunction()
    {
        if(Physics.Raycast(transform.position, transform.forward, out RaycastHit raycast, 10))
        {
            if (raycast.collider.isLocalPlayerCollider())
            {
                var playerReferences = raycast.transform.GetComponent<bl_PlayerReferences>();

                DamageData damageData = new DamageData()
                {
                    Damage = 20, // base damage to apply
                    Direction = transform.position,
                    Cause = DamageCause.Player,
                    MFPSActor = bl_MFPS.LocalPlayer.MFPSActor, // MFPS actor that cause this damage
                    // Check the other DamageData properties
                };

                playerReferences.playerHealthManager.DoDamage(damageData);
            }
        }
    }
And that will do it, the example above will deal 20 damage to the target player.
If you just want to instantly kill the local player then you can just call the Suicide() function in bl_MFPS.LocalPlayer like this:
bl_MFPS.LocalPlayer.Suicide(); Now, the above will only work for the local player, if you want to deal damage to a remote player (a player not controlled by the local client) this is how you can do itDeal damage to a remote player
You can only deal damage to a remote player through a hitbox reference of the player, these hitboxes are the colliders that wrap the player model, these have attached the bl_HitBoxBase inherited script which contains the function ReceiveDamage(...) which is what you have to call to give damage.
What you need is a reference to the hitbox of the remote player that you want to apply the damage, how you get that reference depends on how you want to apply the damage, let's say you what to apply the damage by an explosion for which you detect the colliders in a certain radius of the explosion origin, this is how you can implement the damage function:
void DealDamageFunction()
    {
        Collider[] hittedColliders = Physics.OverlapSphere(transform.position, 10);
        foreach (Collider collider in hittedColliders)
        {
            // if you want to apply the damage only to players
            // if (!collider.CompareTag(bl_MFPS.HITBOX_TAG)) continue;

            var damageable = collider.GetComponent<IMFPSDamageable>();
            if (damageable == null) continue;

            DamageData damageData = new DamageData()
            {
                Damage = 50,
                Direction = transform.position,
                MFPSActor = bl_MFPS.LocalPlayer.MFPSActor,
                Cause = DamageCause.Explosion
                // see the other DamageData properties that you can use.
            };

            // send the damage to the hit box.
            damageable.ReceiveDamage(damageData);
        }
    }
Deal Damage - Object Damage
Applying Damage to Objects
To apply damage to a game object that isn't a player or bot, you simply need to implement the `IMFPSDamageable` interface in your custom script.
Example Scenario: Damaging a Barrel
Suppose you have a barrel that should take damage when hit by a bullet. You don't need to modify any of the MFPS Core scripts. Instead, follow these steps:
1. Create a Custom Script: • Implement the `IMFPSDamageable` interface in your new script.
2. Override the `ReceiveDamage` Function: • Within your custom script, override the `ReceiveDamage(...)` method to define how the barrel should handle damage.
Sample Script: (Not interface implemented yet)
public class bl_Test : MonoBehaviour
{
    public int Health = 100;

    public void ReduceHealth(int damage)
    {
        Health -= damage;

        if(Health <= 0)
        {
            // Destroy or wherever happens when run out of health
        }
    }
}
You have to implement the IMFPSDamageable interface and override the interface function ReceiveDamage() like this:
public class bl_Test : MonoBehaviour, IMFPSDamageable
{

    public int Health = 100;

    void IMFPSDamageable.ReceiveDamage(DamageData damageData)
    {
        ReduceHealth(damageData.Damage);
    }

    public void ReduceHealth(int damage)
    {
        Health -= damage;

        if(Health <= 0)
        {
            // Destroy or wherever happens when run out of health
        }
    }
}
And that will do it, keep in mind that your object must have a collider in order to be hit by the bullets.
Kill Zones
may be the case that there are limits in your map that you want to the players don't go any further, a solution that MFPS have for these cases is the Kill Zones where if the player enter, a warning will appear with a count down timer, if the player not leave this zone before the timer reach 0, he will automatically killed by the game and returning to a spawnpoint.
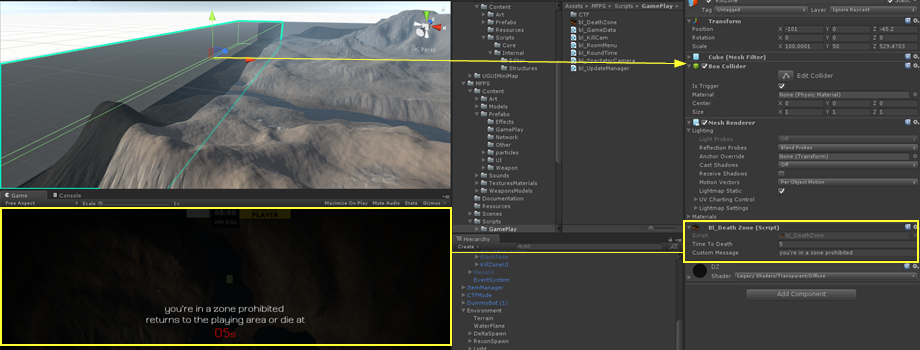
to add a kill zone simple add a object with a Box Collider (the Box Collider represent the zone), then add the script bl_DeathZone.cs script, setup the time that the player have to leave this zone and the string message that will appear in screen while player is in kill zone.
Room Properties
There're some properties that are different per room/match besides the game mode, that you can tweak, e.g: the max players options, max rounds time limits, game goals, etc... these properties options can be different per game mode and you can modify them in the game mode info like this:
► Go to GameData ➔ Game Modes ➔ *Open a game mode* ➔ there you will see the list and
options to modify these properties.
Game Settings
MFPS allows players to modify some game settings of the game in-runtime like graphics quality and control settings, you as the developer are in charge to set the default values for these settings, the value that the player will have the first time that they play the game.
To set the default values go to GameData ➔ Default Settings ➔ Setting Values ➔ *
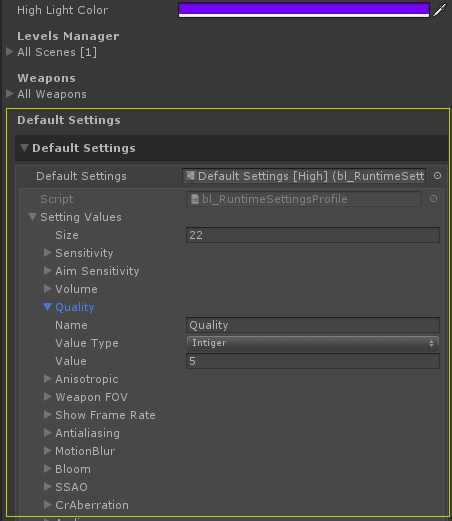
In this list, you will have all the available values, simply unfold the setting that you want to modify and set the desired value.
Add a new setting
Add a new setting is really simple, in the same list (Setting Values) add a new field, set a unique name to the to identify the setting ➔ set the type of setting (float, integer, bool, or string) then set the default value.
Now to use this value in-game you can load it with:
var val = bl_MFPS.Settings.GetSettingOf('THE_SETTING_NAME'); once the setting is added in the list, it will automatically be saved when the player applies the settings in-game (click on the Save button), but if you want to save the setting with your own rules you can do it with:
bl_MFPS.Settings.SetSettingOf('THE_SETTING_NAME', THE_SETTING_VALUE); As a reference of how you can use it in-game you can inspect the script bl_SingleSettingsBinding.cs
Mouse Look
The Mouse Look/Camera controller is a key feature in shooter games or any fast-paced action game.
In MFPS a few techniques are used to improve the accuracy and smoothness of the look movement like Frame Smoothing and Movement Smoothness.
If you want to personalize the movement, there're some properties that you can modify in the inspector:
For the general setup, you can find the properties in GameData -> Mouse Look Settings.
PER PLAYER PROPERTIES
There're some properties that you can modify per player, you can find them in the Player prefabs ➔ bl_FirstPersonController ➔ Mouse Look ➔ *,
SENSITIVITY
Players can change the mouse/pad sensitivity in-game, but you can set up the default sensitivity in GameData ➔ Default Settings ➔ Settings Values ➔ Sensitivity and Aim Sensitivity.
Object Pooling
What is Object Pooling?
Instantiate() and Destroy() are useful and necessary methods during gameplay. Each generally requires minimal CPU time.
However, for objects created during gameplay that have a short lifespan and get destroyed in vast numbers per second like Bullets per example, the CPU needs to allocate considerably more time.
There is when Object Pooling is enter, Object pooling is where you pre-instantiate all the objects you’ll need at any specific moment before gameplay, in MFPS bullets, decals and hit particles are pooled.
The bl_ObjectPooling.cs class is really easy to use, all what you have to do to add a new object to pooled is to listed the prefab in the Prefab Pool Container, by default the container is located in Assets ➔ MFPS ➔ Content ➔ Prefabs ➔ Presets ➔ Containers ➔ Default Prefab Pool (Click here to ping), once selected, in the inspector window you will have the list Prefabs, add new item to the list > assign the prefab, key name and how many instances of this prefab pre-instantiate and that's.
Now for instance this prefab from a script, before you normally will use something like:
GameObject ob = Instantiate(MyPrefab, position, rotation); with bl_ObjectPooling script you simply has to replace that with:
GameObject ob = bl_ObjectPooling.Instance.Instantiate("PrefabKey", position, rotation); Add New Menu
If you want add a new menu/window in the Lobby UI, follow this:
1 - Create the menu/window UI: make the design of UI with what you need, but make all the design as child of a parent under canvas, example "MyNewWindow" (this is a empty game object under canvas) put all the buttons, text, images, etc.. of your new menu/window under this object.
2 - Add a new field in the Windows list in Lobby -> Canvas [Default Menu] -> bl_LobbyUI -> Windows, in the new field in this list and add the "MyNewWindow" object in the field and assign an unique name.
3 - Create a menu button: add a new button that will open the new menu/window, all the other buttons are in: Lobby -> Canvas -> Lobby -> Content -> Top Menu -> Buttons -> *, so you can duplicate one of these buttons and change the title text.
in this new button add as listener the function of bl_Lobby -> ChangeWindow(string) -> and set the name of new window in the list "Windows".That's.
Player Arms IK
The Third-person/Remote player upper-body poses are defined by the animations clips in the Animator Controller, but some bones of the model rig are override controlled by Inverse Kinematic aka IK, this to achieve multiple things, one of them is so that you don't have to have a custom player animation for each one of the weapons since normally the left arm goes in different parts depending on the weapon.
So MFPS solves this using IK in these specific bones that you can easily modify per weapon.
In order to edit the left arm position/pose of one of the TPWeapons do the following:
1. In the Editor (in edit mode) drag one of the player prefabs in a scene (preferable a clean scene so you can focus).
2. Go to the Remote Weapons which are located under the right hand of your player model in the hierarchy -> select the TPWeapon to edit the pose and active it.
3. With the weapon selected -> In the inspector window you will see a button called "Edit Positions" -> click it and move/rotate the IK target in the scene view until you get the desired position.
Crosshair
The Crosshair or reticle is a basic feature in most shooter games, in MFPS you can easily change the shape, color, and size of the crosshair, also you can use different crosshair for each type of weapon.
Modify crosshair
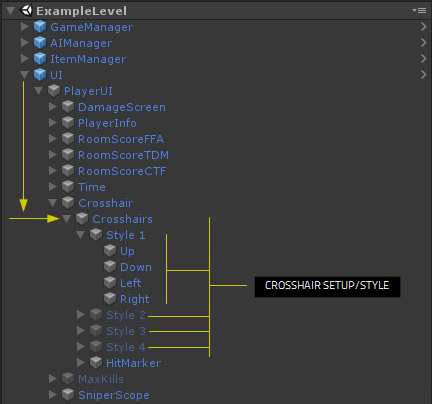
Open one of your map scenes ➔ go to (in the Hierarchy window) UI ➔ No Interactable ➔ Crosshair ➔ Crosshairs ➔ *, there you will see all the available crosshairs setups, by default each one of them is used for different kind of weapons (machineguns, shotguns, knife, etc...).
So what you have to do here is Open one of the crosshair setup/styles and apply any kind of modification that you want, you can remove or add any UI component that you want, just make sure everything is under the crosshair style root object.
Hit Marker
The hit marker is a small cross that shows up when the local player hit an enemy.
You can customize the design of this on UI ➔ PlayerUI ➔ Crosshair ➔ Crosshairs ➔ Hitmarker.
The hit marker appears with simple scale-up animation, you can define the final size of the animation in bl_UCrosshair ➔ Increase Amount.
Mobile
If you are build targeting to a mobile platforms e.g: Android or iOS, keep in mind that although MFPS does work on mobile platforms, there are some things that you have to do before to build, since by default MFPS 2.0 is setup with high quality graphics for high-end devices for demonstration purposes, so by default it's not optimized for mobile platforms, also the main core package doesn't include any mobile control/input.
So first thing you need is to integrate a mobile input control, for this, there a in-house addon solution specifically for MFPS 2.0 which is: Mobile Control, which contains all the necessary buttons/inputs to work in mobile/touch devices and the integration is automatically, but alternatively you can integrate your preferred third-party system if you want.
Secondly, you have to made some manual optimization work, the same that you would do in any other mobile project, starting by removing the Post-Process effects (you can do this by removing the Post Processing Stack package from the Unity Package Manager)
, Change the Standard Shaders to mobile friendly ones, reducing the textures quality and resolution, and of course your new levels/maps/models have to be mobile friendly, etc... You don't have to do any code change, MFPS code is mobile ready and optimized for low-end platforms.
So basically, to build for mobile what you have to do is some graphic optimization, below I will leave you some useful links to tutorials that will help you with graphic optimization and things to keep in consideration:
https://docs.unity3d.com/2020.1/Documentation/Manual/MobileOptimizationPracticalGuide.html https://learn.unity.com/search/?k=%5B%22tag%3A5816095d0909150016dc7b17%22%2C%22lang%3Aen%22%2C%22q%3Aoptimization%22%5D https://cgcookie.com/articles/maximizing-your-unity-games-performance http://www.theappguruz.com/blog/graphics-optimization-in-unityIf you are just starting with mobile development and want to save some time, there's also an MFPS Mobile asset which is ready to use for mobile platforms, it comes with the Mobile Input Controller already integrated and the game optimization is already done, if you are interested, check it out here: MFPS Mobile
Particles & Decals - Particles & Decals
PARTICLES
One important part of making a good looking game are the particle effects, although MFPS use them just in few events, they show frequently, so use good looking particles is not enough, they have to be optimized, the default particles in MFPS are very much just placeholders, and even tho its not necessary is recommended to replace with better ones.
In order to replace/modify a specific particle you simply have to modify their prefab, MFPS use Particle System for the following game effects:
• Muzzleflash
• Explosions
• Bullet hit
• Blood
• Fire
Aside from the Muzzleflash particle which is located inside each FPWeapon, all the other particles can be found in or under the MFPS folder at Assets -> MFPS -> Content -> Prefabs -> Level -> Particles->*
DECALS
MFPS doesn't use a custom decal system, since they are only used for the bullets marks, and since these are instanced too frequently it just adds a non-needed performance cost to the game, due to that, MFPS uses a simple Quad mesh with a simple transparent shader as decals.
The only decals that MFPS uses are the Bullet Marks, these are instanced when a bullet hit a collider, the mark that will appear depending on the hit collider tag, by default MFPS use 5 different bullet marks that simulate the impact in different surfaces (metal, wood, sand, concrete and a generic one), you can change these marks textures by modifying the bullet impacts prefab material, these prefabs are located in Assets -> MFPS -> Content -> Prefabs -> Level -> Particles -> WeaponEffects -> Prefabs->*
Add new surface decal / particle hit
If you want to add a new surface tag to show custom decals and particle hit effect when the bullets hit colliders with that tag:
- Select the Bullet Decal List container object.
- With the object select > go to the inspector window > you will see the Surface Decals list > add a new field to the list and fill the required properties.
Particles & Decals - FX Assets
In case you are looking for particles or decals to replace the default ones in the game, below you will find a hand-picked collection of assets that you can acquire from the Asset Store
Post Processing - Post Processing
By default MFPS use the Unity Post-Processing stack v2, which is a collection of effects and image filters that apply to the cameras to improve the visual of the game.
Although the image effects really improve the visual aspect of the game, that also carries a cost in the performance of the game, that is why you should use this only for high-end platforms like PC or Consoles, you definitely should NOT use for Mobile Platforms, if you are targeting for a mobile platform you should delete this package.
This system is automatically imported from the Unity Package Manager (UPM) when you import MFPS for the first time in the project, if you want to DELETE it, you can do it clicking on this context menu:
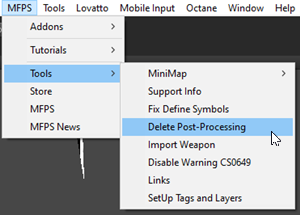
You can find the Post-Processing Stack official documentation here:
https://docs.unity3d.com/Packages/com.unity.postprocessing@2.3/manual/index.htmlPost Processing - Custom Profile
Since version 1.9, you can easily define custom Post Processing Profiles per map scene,
Post Process Profile is the configuration file where you define the image effects that will be rendering in the Post Process Volume, if you need more details or you don't know how to create or use them, check the official documentation for it here: Post-Process Quick Start
DEFINE PROFILE IN MAP SCENE
To use a custom PP Profile in a specific map scene: open the map scene in the Editor ➔ in the Hierarchy window, go to: GameManager ➔ Post Process Volume ➔ in the inspector window of bl_PostProcessEffects ➔ Assign your custom Post Process Profile in the "Process Profile" field and you are all set.
Post Processing - Error Handling
There are some common problems related to the Post Processing package, that cause errors in the console due to the Post Processing package missing, here is how to handle them:
DON'T WANT TO USE:
If you don't intend to use the Post Processing package but you still receive errors due to missing references to the package, you have to remove the package script definition symbols, for it, go to Unity Player Settings ➔ Other Settings ➔ Script Define Symbols ➔ find and remove this part from the input field UNITY_POST_PROCESSING_STACK_V2; ➔ hit enter and wait for the compilation.
WANT TO USE:
If you want to use the Post Processing features, but receive errors due to missing references to the package, it means that the package hasn't been imported yet.
To import the package, go to Window ➔ Package Manager ➔ in the left panel find the Post Processing package ➔ Click in the Import button on the bottom right corner of the window.
Friend List
Photon have a Friend List feature which allow players to check the status of other users connected in the same server, you only have to send the UserIDs of the players that you wanna check the status, the system is pretty limited since you only can know when a player is "Online" or not, and only allows you join to the player room if this is in one.
MFPS comes with this Photon feature added, in the Main Menu scene you can add friends and save it locally (or in database if you are using ULogin Pro), once you added you'll be able to see when this player is online and also you will be able to join to the same room when the player is in one room.
Added a friend doesn't require confirmation of the other player, you simple set the exact player name and ready.
In order to add a friend simply click in the top right button (in the lobby) with the person icon:
The friend list have a limit number of friends that can be added (by default is 25) this only make sense if you are saving the friends in a database (using ULogin Pro for example) since the more friends they add per player more will be the size of the player data in the database.
You can change this limit in GameData -> MaxFriendsAdded.
InGame Chat
A way of user-to-user communication in-game of course is the text chat, for sure MFPS implements that.
In-game, when players are on a map, they can open the text chat input field to start writing with the Enter/Submit key input, and with the same key or the button next to the input field can send the message which will appear (by default) on the bottom left corner of the screen, pretty basic, but that isn't all, the chat support team only chat so players can communicate only with teammates, for that they simply have to open the chate with a custom key by default T key and that is it.
For some or other reason you may not want to allow user-to-user communication in-game, if that the case you can simply disable the text chat by deleting or just disabling the Chat UI which is located in the Map scenes UI canvas at UI -> Interactable -> Chat.
If you want to show a custom text in the chat panel for all the players in the room by code, you can do so like this:
bl_ChatRoom.Instance.SetChat('YOU TEXT HERE'); FootStep
The footstep sound in MFPS is driven by the surface Tag, there're some predefined tags like Metal, Concrete, Dirt, Wood, and Water, when a player moves a footstep sound will play depending on the surface where the player is over, of course, you can change these sounds or add more surface tags, also you can change the sounds per player prefab so you can have different sounds for different player models.
Change Sounds
In order to change the default, MFPS footstep sounds you can simply replace the AudioClips in the default FootStepLibrary, unfold the Groups list ➔ unfold the tag group field ➔ replace the AudioClips in the list.
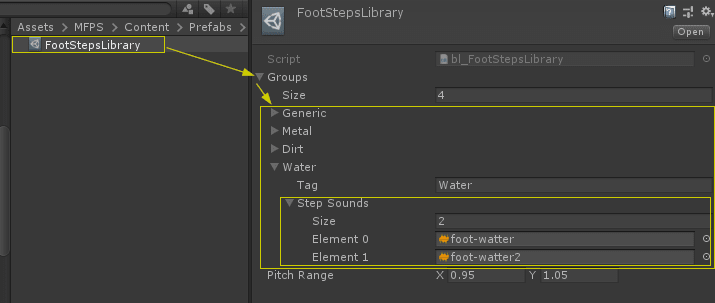
Add Surfaces
If you wanna add a new surface (identified by a different tag) and you wanna play a specific footstep sound for it, you can do it by simply add a new field in the Groups list of the FootStepLibrary, in that new field, in the propertie Tag set the tag identifier for that surface.
Terrain Surfaces
Since the footstep system is driven by Tags you can only set a tag per object/mesh, this comes with a problem for the Unity Terrain system, since the terrain is a single object/mesh, you can set only one tag for it, that is inconvenient because terrains usually have various layers with different textures that simulate different surfaces, so in order to make the footstep system work correctly with the Unity Terrain system (play different sounds depending on the terrain layer) you need to set up your terrain layers as follow.
• First, select the Terrain object in your scene hierarchy and add the script bl_TerrainSurfaces.cs
• Once you add the script you will notice in the inspector of the script that the list TerrainSurfaces have various fields, each of these fields represent one of the layers (textures) in the Terrain, what you have to do is set the Tag name to each layer, if you fold out one of the fields you will see the texture of the layer, so depending on the texture you can set which tag should be assigned in the property Tag.
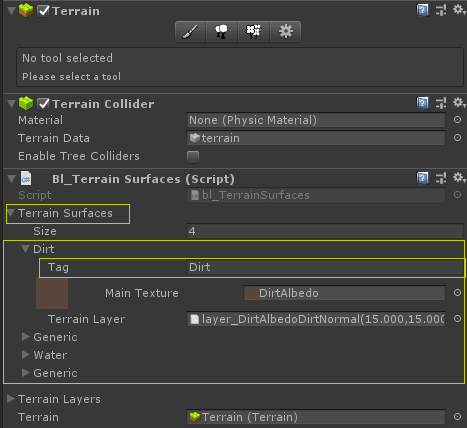
Head Bob
Head Bob is the camera movement that simulates the reaction of the player head when walk or run, in MFPS this movement is procedurally generated by code and you can adjust the value to obtain the desired result.
In order to obtain a more realistic result in MFPS we have sync the weapon bob and the head bob movement, so the settings will apply to both movements.
You can modify the values in the bl_WeaponBob.cs (Attached in WeaponsManager object inside the players prefabs'), you can edit in runtime to preview the movement as you edit it.
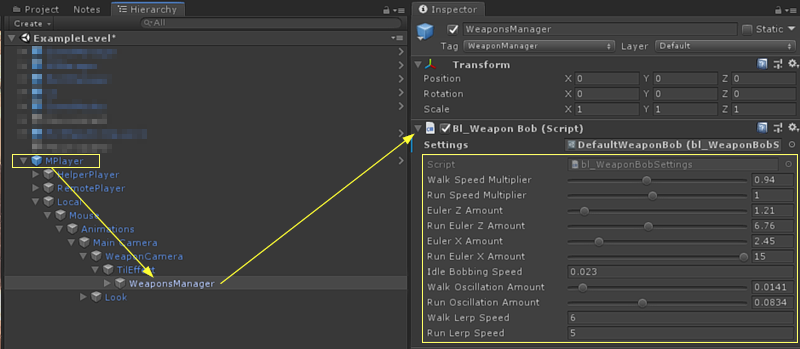
If you want to use different movements per player or just want to have a backup of the current movement settings you can create a new "Present" of the settings and assing it in the script instead of the current one.
For create a new present simple select the folder where you wanna create it (In Project View) -> Right Click -> MFPS -> Weapons -> Bob -> Settings -> Drag the created profile in the bl_WeaponBob -> Settings -> Them make the changes that you want.
Kill Feed - Step 1
KILL FEED
Kill Feed or Who Kill Who is the UI text notification panel where displays events of the match like player's kills and other in-game eliminations, showing to the players who get eliminated and who eliminated him.
Normally, this panel is placed in a corner of the screen to not interfere with the gameplay but easily visible.
Here I'll show you a few options that you have to customize this system without requiring to touch the code and how you can display your own events on it.
• MFPS comes with two modes to display kills events on the kill feed, in a kill event there are 3 parts of event information to display: the name of the player who was eliminated, the name of the player who did the elimination, and the weapon or cause of the elimination.
You have two ways of shows the cause of the eliminations:
Weapon Name:
Weapon Icon:

By default Weapon Icon is the default option, you can change that in GameData -> KillFeedWeaponShowMode.
Another option to customize is the color to highlight the local player name when this appear in the kill feed, for the context player names in kill feed are represented by the color of his Team but in order to the local player easily knows when an event that include him appear in the kill feed, his name should be highlight with a different color, to choose that color go to GameData -> HighLightColor.
Okay, that are the front-end customize options, if you want to customize the way that the UI looks you have to do the in the UI prefab which is located in: Assets -> MFPS -> Content -> Prefabs -> UI -> Instances -> KillFeed, drag this prefab inside the kill feed panel in canvas which is located by default in:
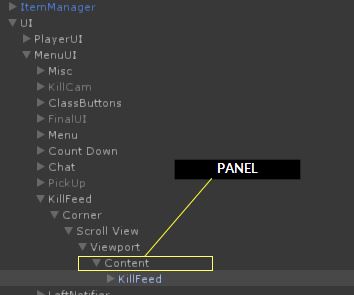
Right, these are all customize options that you have in front end, if you wanna create your own events to display, check the next step.
Kill Feed - Step 2
CREATE KILLFEED EVENTS
The kill feed system various type of events to display, use the one that fits your event:
Kill Event:
• This is should use when of course a kill event happen, but a kill that include two actors the killer and the killed, to show that you have to call this:
bl_KillFeed.Instance.SendKillMessageEvent(string killer, string killed, int gunID, Team killerTeam, bool byHeadshot); Message:
• If you want to show a simple text of an event in concrete that doesn't include a player in specific, use:
bl_KillFeed.Instance.SendMessageEvent(string message); Team Highlight:
• If you want to show a text of an event in concrete that as subject have a team in specific and you wanna highlight a part of the text with the tam color, use:
bl_KillFeed.Instance.SendTeamHighlightMessage(string teamHighlightMessage, string normalMessage, Team playerTeam); Doors
MFPS includes an optimized door system that can be used to add dynamism to your maps.
The system is designed to perform well with a high amount of doors per map, of course, synchronized over the network, and really simple to use.
HOW TO ADD DOORS?
- In order to add a door to your map, you only need 2 steps:
1. Place the door on your map: Drag and drop the door prefab in your scene hierarchy and placed it in your map design, you can find the default door prefab located in: Assets ➔ MFPS ➔ Content ➔ Prefabs ➔ Level ➔ Items ➔ Door
2. Register the new door: In the map scene hierarchy, go to ItemManager ➔ bl_DoorManager ➔ click on the button 'Collect all active doors in scene' ➔ that's.

HOW TO CREATE A NEW DOOR?
- If you want to create a door with your custom door model, you simply have to use the default MFPS door prefab and replace its model.
1. Instance the default MFPS door prefab in any scene and Unpack the prefab instance (right-click on the door instance ➔ Unpack Prefab Completely)
2. Drag your custom door model on the door instance under Door ➔ Door Model ➔ *, and manually place the new door model in the same position, rotation, and scale as the default model.
3. Select the root of the door instance ➔ bl_BasicDoor ➔ in the Door Pivot field, drag the transform of your new door model that will be the point where the door will rotate around (pivot point).
4. Delete the default model (Door ➔ Door Model ➔ Default Door Model) and save the door as a new prefab by dragging it in any folder of the project view.
If your door model rotation is not right, simply create a new Door Settings (Project View ➔ Right Click ➔ MFPS ➔ Level ➔ Door Settings) ➔ assign it to the door prefab ➔ bl_BasicDoor ➔ Door Settings and assign your new door model pivot rotation values.
Item Drop - Item Drop
MFPS incorporates an in-match item drop system, inspired by the Call of Duty games, that allows players to request items during gameplay.
The operation of this feature is straightforward. Players can call for an item drop by pressing the drop button (default key: H), which throws an indicator onto the map. This indicator marks the location where the item will be dropped. After a brief delay, the requested item arrives at the designated spot, ready for the player to collect.
MFPS, by default, offers two types of items for drop requests: Ammunition and Health kits. The specific item that gets requested is determined by the player's class. However, if you're using the Class Customization add-on, the item drop will depend on the item you've equipped in your loadout.
Item Drop - Replace Item Models
Change the model of the kits
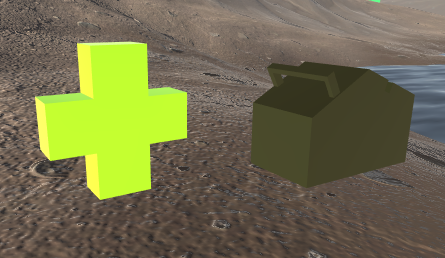
• You can find the kits prefabs in: Assets -> MFPS -> Content -> Prefabs -> Level -> Items->*
• Select the kit that you want to change the model (Health or Ammunition) and drag to the scene hierarchy.
• Replace the mesh with you new model, apply the changes and save the prefab.
Change the model of Kit deploy indicator
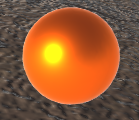
You can find the prefab in Assets -> MFPS -> Content -> Prefabs -> Level -> AirDrop->*
Item Drop - Add new item
To add a new drop item prefab, follow the steps below:
1. Create a Prefab: Begin by creating a prefab of the item you want to be dropped. This prefab should include the item mesh, a Trigger collider, and the script that manages its pickup. You can use the default items (Health and Ammunition kit) prefabs as a reference.
2. List the Prefab in the Item Drop Container: Once your prefab is ready, it needs to be added to the Item Drop Container list. By default, the container is located in *. To do this, select this object and proceed to the inspector of bl_ItemDropContainer.
3. Add a New Field in the Items List: In the inspector of bl_ItemDropContainer, add a new field in the Items list.
4. Assign the Item Prefab: Assign the item prefab in the Prefab field and fill in all the other required properties.
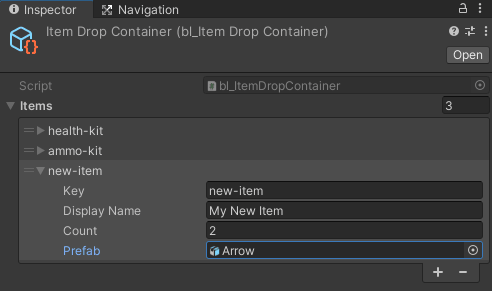
5. Assign this kit to one of the player classes: Now you have to define which player class or classes will equipped this item, for it, select the a player prefab > go to the bl_GunManager of the player prefab > foldout the player class you want > and in the DropKit field > assign the Index of your new item prefab from the Item Container list.

That's, now you will be able to request your new item drop when use the player classes where you assigned it.
Map Camera - Map Camera
Map Camera
Overview
The Map Camera, often termed as the "Room Camera" is a specialized camera used within game to render the map scenes. It is particularly active when the player first joins the game and when the local player character is not instantiated.
Location and Access
By default, the Map Camera is positioned under the "GameManager" object in the scene's hierarchy. It is specifically named "Room Camera" in this hierarchy.
When the "Room Camera" object is selected in the hierarchy, you will be able to view and modify various properties of the camera in the inspector. The camera's functionalities and settings are accessible through the attached script, labeled as bl_RoomCamera.Programmatic Access
To interact with the Map Camera through code, you can reference its functions as follows:
bl_RoomCameraBase.Instance.FUNCTION_NAME();
or
bl_RoomCamera.Instance.FUNCTION_NAME(); 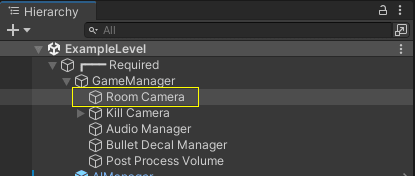
Map Camera - Initial POV
Initial Camera Point of View (POV) in Map Scenes
The "Initial Camera Point of View" refers to the default position and orientation of the camera at the beginning of a map scene. This default POV is set when the player first enters a room. In the editor mode, the camera's initial position is determined by the placement and rotation you specify for the map camera. To adjust this, position and rotate the map camera as desired in the editor mode.
By default, the initial camera POV includes an automatic rotation feature. This is designed to add dynamic movement to the scene, particularly useful in scenarios where there is minimal action, preventing the scene from appearing overly static. If needed, you can modify this feature through the bl_RoomCamera script's inspector. Options include changing the direction of the rotation or disabling the movement entirely.
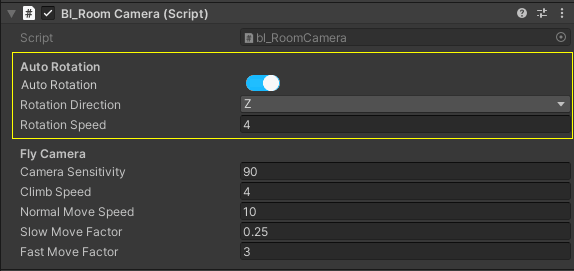
Map Camera - Match Camera Positions
Match Camera Positions
In addition to the initial camera position, you can configure the Map Camera to display different points of view (POVs) for various match events. These events include the conclusion of a match, entering spectator mode, and other significant in-game occurrences.
In the MFPS example scene, different camera POVs for these match events positions are pre-configured by default.
New Map Scenes Integration: When integrating new map scenes, the camera position for all events will default to the initial POV. This may be suitable if uniformity across all events is your desired outcome, but if you want to set up the camera position for these different match events, this is how you do it:Setting Up Different POVs
Create an Empty GameObject:
In your map scene, create a new empty GameObject.
Attach the Script:
Add the bl_RoomCameraPositions script to this GameObject.
Configure Positions in Inspector:
Access the inspector of the bl_RoomCameraPositions script.
Add new entries to the positions list. Each entry represents a different POV for a specific match event.
Customize these positions by specifying their fields, such as position coordinates, rotation, and other relevant parameters as follow:
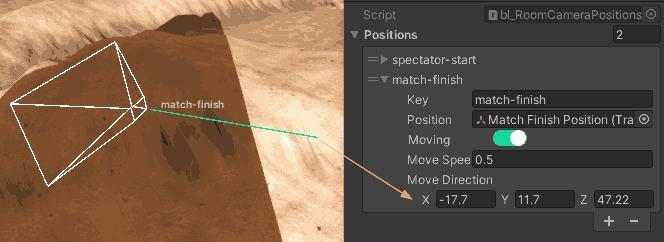
To Manually trigger/set the map camera to one of the defined positions, you can use:
bl_RoomCameraPositions.Instance.SetRoomCameraToPosition("YOUR_POSITION_KEY"); Map Camera - Spectator
MFPS Spectator Mode
MFPS includes a Spectator Mode feature, allowing players to join a match solely as observers. This mode is designed for players who wish to view the game without actively participating in the match.
Accessing Spectator Mode
Players can access Spectator Mode from the Waiting Room menu.
To enter Spectator Mode, players should click on the "Enter As Spectator" button located in this menu.Spectator Mode Features
The Spectator Mode currently offers only one type of Point of View (POV) - the external flying camera. This camera provides an aerial view of the match, allowing spectators to freely navigate around the game scene.
As of now, Spectator Mode does not include a first-person perspective option. The view is strictly limited to the external flying camera.Customizing Controls
The controls for the spectator flying camera can be customized to suit user preferences.
These adjustments are made in the inspector of the bl_RoomCamera script.
Within the inspector, you can modify various settings related to camera movement, speed, and responsiveness, tailoring the flying camera's control scheme to your needs.
Server Regions
Photon PUN offers multiple server regions to connect, MFPS implements all the available servers, and let decide the players if they what to connect to a specific region.
By default, Photon PUN selects the Best Region to connect from the player connection, which drives to a problem for games with not a lot of concurrent players that is that players are divided into different regions making it even harder to find games, so MFPS define a Fixed Region, which is the region where all players will connect by default and then if they want to, they can connect to a specific server manually in-game.
Define the Fixed Region
Go to the MainMenu scene -> Lobby -> Lobby -> (Inspector window) Default Server -> select the region code that will be the fixed/default region to connect.
Change Server Region in Runtime
Players can change the server region in-game with the bottom right dropdown in the lobby menu.
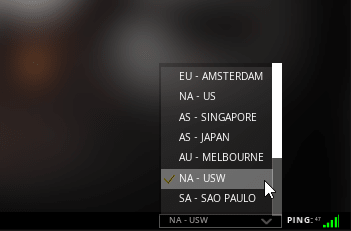
Define the available regions
If you use PUN and for some reason you don't want to allow to connect to some of the PUN server regions, you can define which server regions will be available in your game easily.
For it go to GameData > Pun Regions > Remove the regions that you don't want from the list.
Local Notifications
There are some in-game local notification in MFPS that appear after a certain event happens in game e.g: after a kill, pick up an item, etc... these notifications are the Who-Kill-Who on the top right corner, the local kills notification on the center of the screen and the left side notifications for "non-important" notifications.
For the Who-Kill-Who or Killfeed notifications, you can check their respective section in this tutorial for more details about it.
LOCAL KILL NOTIFICATIONS
- Is the notification that appears in the center of the screen after the local player terminates an enemy in-game, MFPS comes with two options for how to display these notifications:
1. QUEQE: show one kill at the time, in case multiple kills happens in a row, one will show ➔ wait for the animation and a delay time ➔ hide ➔ show the next kill until no more kills to show.
2. LIST: Show all the kills on demand, showing in a list, a new kill will be added and showed in the screen as it happens.
By default the QUEQE mode is used but you can change this in the GameData ➔ Local Kills Show Mode.
This system is modular and event based hence you can use your own system and stop using this by simply remove/disactive the Center Local Notifier object from the UI ➔ Interactable ➔ Local Notifications ➔ Center Local Notifier.
LEFT SIDE NOTIFICATIONS
- Normally used for non-important events e.g after pick up ammo, pick up a weapon, change weapon fire type, etc...
This notification system is also modular so you can remove or replace with you own system by simpling removing the Left Local Notifier from UI ➔ MenuUI ➔ Local Notifications ➔ Left Local Notifier
You can invoke your own notifications with this code:
using MFPS.Runtime.UI;
            ...
            void ShowNotificationSample()
            {
                new MFPSLocalNotification("MY NOTIFICATION TEXT HERE");
            }
Kick Vote
KICK VOTATION
In order to give an option to players to get rip of toxic, hackers, non-rules players in a democratic way where a player put the option on the table and the majority of the players in room decide to kick out or cancel the petition, MFPS include a voting system.
To start a vote in game, players have to open the menu -> in the scoreboard click / touch over the player that they want to request the vote -> in the PopUp menu that will appear -> Click on Request Kick button.
By default the keys to vote are F1 for Yes and F2 for No, you can change these keys in bl_KickVotation.cs which is attached in GameManager in maps scenes.
If you want to implement your own way to start a voting request, you can do it by calling:
bl_KickVotation.Instance.RequestKick(Photon.Realtime.Player playerToKick); Network Stats
MFPS network framework can broadcast application and lobby network statistics to clients. You can make use of this data to debug your game network. You can also brag about these statistics in your game to show how popular it is. :]
There are two types of network data that you can see on MFPS:
NETWORK TRANSPORT STATS
This can be used to display some basic but useful information about the current network outgoing and incoming network packages along with the local player ping, the information is displayed in the top left corner of the screen.
This feature is turned off by default but you can easily enable it from the GameData -> Show Network Stats
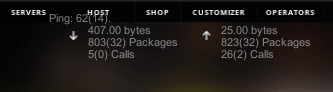
LOBBY STATS
Lobby statistics can be useful if you want to show the activity of your game. Lobby statistics are per region so you will only see the stats from the server region where you are connected.
You can get information about:
Number of live rooms
Total number of players joined to the lobby or joined to the lobby's rooms
This feature is enabled by default but you can turn it off in the MainMenu scene -> Lobby -> bl_Lobby -> Show Photon Statistics.

Weapon Recoil
The recoil is a mechanic used to simulate the backward momentum a firearm has when it is discharged. When you fire multiple shots in quick succession, the kickback of the weapon cause the camera view to move upwards and sideways, simulating the increased difficulty of controlling the gun due to recoil.
In MFPS you can define the weapon recoil per weapon, and you have 3 different weapon recoil system that you can define:
Setup weapon recoil
You can setup a different recoil setup for each weapon, for it, you have to create a preset recoil setting object and then assign it in the inspector of bl_Gun > Recoil Setting:
1. Create a weapon recoil preset, for this you can simply duplicate one of the existing presets located in the folder: Assets ➔ MFPS ➔ Content ➔ Prefabs ➔ Weapons ➔ Recoils➔*, > rename it > modify the values as required.
2. In the FPWeapon you want to add this recoil setup > bl_Gun inspector > assign the recoil preset in the property Recoil Settings.
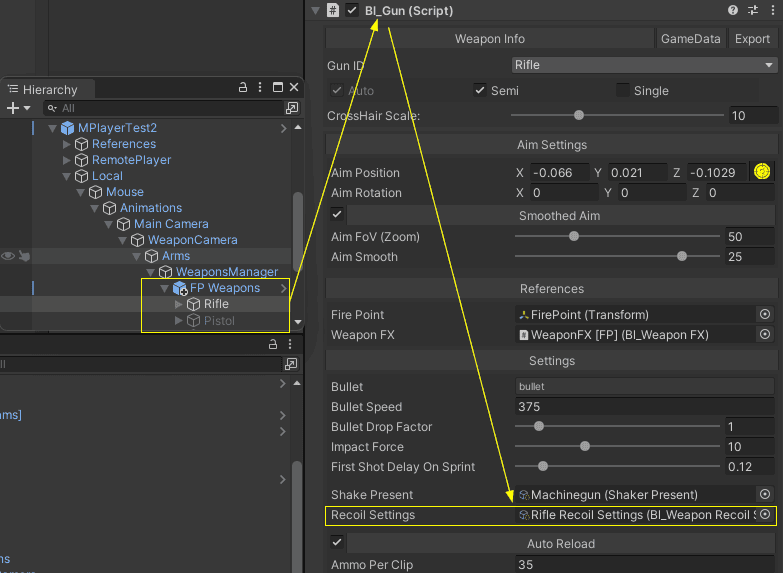
Recoil Properties
The recoil properties are pretty self explanatory by its name, however, one aspect that might cause some confusion is the Recoil Pattern.
When you activate the Recoil Pattern Mode in the recoil preset, an AnimationCurve property will become visible. This is the tool you use to shape your custom recoil pattern or path.
The AnimationCurve editor allows you to easily design a unique recoil trajectory. To better visualize this, imagine the recoil pattern you want for your weapon, but then rotate that pattern 90 degrees to the right. In this scenario, what you perceive as vertical recoil in the game (upward kick of the weapon) is represented horizontally in the editor, and what is the horizontal recoil (sideways movement) in the game is plotted vertically in the editor.

Ladder
The package includes a drag and drops ladder system that you can use to add more dynamic navigation to your maps.
All you have to do to add a new ladder to your map is drag the ladder prefab by default located in Assets ➔ MFPS ➔ Content ➔ Prefabs ➔ Level ➔ Items ➔ Ladder > drop in your map scene hierarchy > positioned it where you want and that's.
Replace the Ladder model
If you want to replace or add a new ladder model, all you have to do is use the default ladder prefab > delete the default model and replace it with your own.
1. Drag the default ladder prefab locate at Assets ➔ MFPS ➔ Content ➔ Prefabs ➔ Level ➔ Items ➔ Ladder in any scene hierarchy.
2. Drag your new ladder model inside the prefab instance and positioned it in the same position as the default ladder model in Ladder > Model > *.
3. Delete the model inside the prefab instanced.
4. Save the new prefab so you can use it in your map scenes.
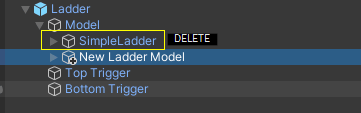
Events
There're some special events that you can use if you wanna implement a custom feature or modification in your own scripts, e.g: when the local player spawn, when the local player dies, when receiving damage, etc...
Use these events are really simple, all you have to do is subscribe a function from your script that will listen to the callback of these events when they are dispatched in runtime.
You subscribe to these events on OnEnable() and unsubscribe on OnDisable() functions:
void OnEnable()
{
bl_EventHandler.onLocalPlayerSpawn += OnLocalPlayerSpawn;
}

private void OnDisable()
{
bl_EventHandler.onLocalPlayerSpawn -= OnLocalPlayerSpawn;
}

void OnLocalPlayerSpawn()
{
//execute your code
}
Below you will have the list of all the available events with a short description
bl_EventHandler.onLocalPlayerDeath Event called when the LOCAL player die in game
bl_EventHandler.onLocalPlayerSpawn Event called when the LOCAL player spawn
bl_EventHandler.onPickUpGun Event called when the local player pick up a weapon
bl_EventHandler.onChangeWeapon Event Called when the LOCAL player change of weapon
bl_EventHandler.onLocalAimChanged Event Called when the local player change their Aim state
bl_EventHandler.onMatchStart Event Called when the room match start
bl_EventHandler.onFall Event Called when the LOCAL player fall/land in a surface
bl_EventHandler.onPickUpHealth Event called when the LOCAL player pick up a health in game
bl_EventHandler.onAirKit Event called when the LOCAL player call an air drop
bl_EventHandler.onAmmoPickUp Event called when the LOCAL player pick up ammo in game
bl_EventHandler.onLocalKill Event called when the Local player get a kill or get killed in game.
bl_EventHandler.OnRoundEnd Event called when a game round finish
bl_EventHandler.onPlayerLand Event called when the LOCAL player land a surface after falling
bl_EventHandler.onRemoteActorChange Event called when a player that is not the local player spawn or die
bl_EventHandler.onGameSettingsChange Event called when the local player change an in-game setting/option
bl_EventHandler.onEffectChange Event called when the local player change one or more post-process effect option in game.
bl_EventHandler.onGameSettingsChange Event called when the LOCAL player change their game settings from the settings in-game menu.
bl_EventHandler.onGamePause Event called when the LOCAL player pause or resume the game.
Hooks - Hook System
Overview
This hook system lets customize MFPS without modifying core code. It supports two main types of hooks:
• Actions: Trigger custom code when an event occurs.
• Filters: Process and modify data before it’s used.
Both hooks support a priority (default is 10), meaning lower numbers run first. You can also remove hooks or check if any are registered. Additionally, a multi-parameter filter lets you process multiple values at once.
Actions
Purpose:Use actions to notify your system when something happens (for example, a player dying). Actions execute callbacks without returning a value.
How to Use:
1. Register an Action:
bl_Hook.AddAction("OnPlayerPickAmmo", args => {
    int ammoCount = (int)args[0];
    Debug.Log($"{ammoCount} ammo pick up.");
});
This registers an action for the `"OnPlayerPickAmmo"` event.
Trigger the Action:
bl_Hook.DoAction("OnPlayerPickAmmo", 30); Filters
Purpose:
Filters modify a value by passing it through one or more callbacks. Each filter receives a value, can change it, and passes it along. If no filters are defined, the original value is returned.
How to Use:
1. Register a Filter:
bl_Hook.AddFilter("ModifyScore", input => {
    int score = (int)input;
    return score * 2; // Double the score.
});
This filter is registered to "ModifyScore".
Apply the Filter:
int originalScore = 10;
int finalScore = (int)bl_Hook.ApplyFilters("ModifyScore", originalScore);
// finalScore becomes 20.
1. The original score (10) is passed through the filter, ending up doubled.
Tip:
If you need the filter chain to stop as soon as one filter returns a non-null value, use:
object result = bl_Hook.ApplyFiltersUntilNonNull("ModifyScore", 10); Hooks - Defaul Hooks
Here are the MFPS Core default defined hook actions and filters that you can listen to
object[3] 1:prefab 2:team 3:skinIdobject[] dataobject[] 1:string prefabName 2:TeamVector3 positionint protectionTimefloat countdownTimebool useCountdownfloat timefloat jumpForcefloat maxStaminastring message, string senderNameobject[] dataint timeInSecondsint scoreToAddint coinsToAddint scoreToAddint scoreToAddint scoreList list bl_KillCamBase.KillCamInfoHashTableGameObject weapon, HashTable dataHashTable propsGameObject weapon, HashTable dataTeam selectedTeamHashtable props(ScriptableObject) bl_PlayerClassLoadoutbl_GunManagerbl_GunManagerfloat healthAddons - MFPS Addons
MFPS 2.0 is designed with a robust set of core functionalities, yet you might notice it doesn't include certain standard features commonly found in FPS games, such as Mini Map, Login System, Level System, Vehicles, Shop, etc... This isn't an oversight; MFPS indeed offers many of those features, but as extensions/add-ons, allowing you to select the system to your specific needs.
You might wonder why these aren't part of the default setup. Let's rationale:
The decision to separate these features as optional add-ons is twofold, benefiting both us (the MFPS devs) and you the end game developer. Primarily, it's about affordability and flexibility. Including every possible feature in the core package would unavoidably inflate its price, potentially pushing it beyond an accessible range for many — we're talking about a jump to at least $500 or more. By offering a lean core package, we keep the entry price low, ensuring accessibility for a wider range of developers, from hobbyists to professionals.
Secondly, this modular approach respects the unique needs and constraints of different projects. Not every game requires a complex Account Systems, Vehicles, or Kill Streaks support. By allowing developers to select and integrate only the features they need, we ensure that you don't pay for, or wade through, unnecessary functionalities. This not only makes MFPS more customizable but also more efficient and lighter to work with.
It's important to note that the core package is entirely functional on its own, and the add-ons are optional.
Despite being optional, these add-ons are meticulously crafted to blend seamlessly with the core system. Most feature automatic integration, meaning you're spared the technical hassle of manual coding or configuration. Simply choose what you need, and the system integrates it smoothly into your project.
To make your development journey smoother and to explore the range of functionalities you can incorporate, check out the 'Addon Manager' window. You can access it in MFPS by navigating to MFPS ➔ Addons ➔ Addons Manager. Here, you'll find a suite of add-ons designed to elevate your game vision, all while maintaining the balance between complexity, performance, and budget.
Addons - Addons Manager
Addons Manager
The Addons Manager is a custom Unity editor window designed to provide a unified dashboard for managing all MFPS addons. With it, you can view a full list of available addons, see which addons are already in your project, check the latest versions, find available updates for your installed addons, and access detailed information about each one. Think of it like Unity’s Package Manager, but specifically for MFPS Addons.
Due to Unity Asset Store guidelines, this window isn’t enabled by default after importing MFPS. You will need to manually activate it.
To enable the Addons Manager, simply delete the "_ASCOMPLIANCE_" prefab from your project. You can find this prefab in: `Assets/MFPS/Scripts/Internal/Editor/MFPS/Resources/*`.
Once enabled, you can access the Addons Manager window from the top navigation menu in Unity: MFPS > Addons > Addons Manager.
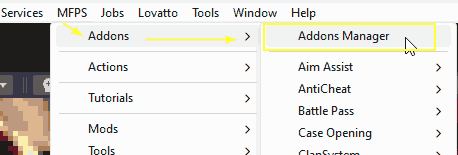
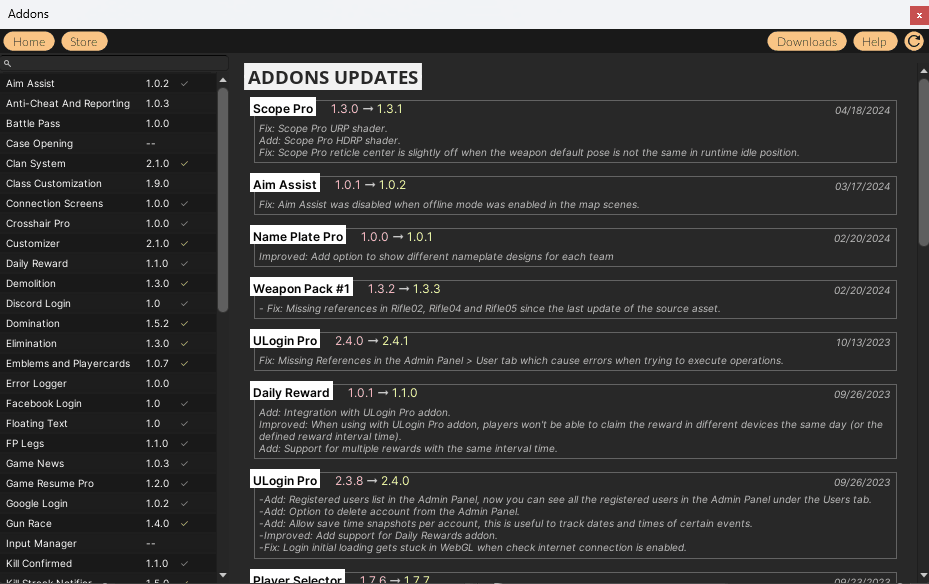
In the Addons Manager window, the full list of available addons is displayed in the left panel. Clicking on an addon will show detailed information about it. If an addon is already imported into your project and an update is available, an "update" icon will appear next to the addon name in the left panel.
If you purchased addons from lovattostudio.com, you can download them directly from this window by clicking the "Downloads" button in the top right corner. This will open a form where you can log in with the email and password of your lovattostudio.com account. After logging in, all the addons you own will be listed, along with a button to download them.
Addons - How to Integrate
How Integrate Addons?
All addons comes with a ReadMe.txt on the root folder of the addon with the instructions, but pretty much all Addons comes with an Automatically integration, you only have to enable and click on the Integrate MenuItem:
Editor Menus - Menu Options
MFPS comes with a series of uniqueness Editor windows that you can found in the Unity Editor top menu under the MFPS root menu:
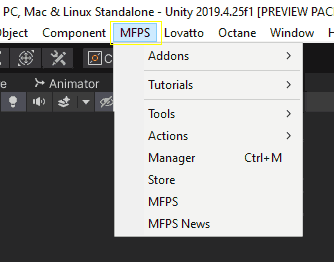
Here is a brief explaination of what each one of them is for:
MFPS ➔ Addons ➔ *
- In the submenu of this, you will find all the quick actions for all the addons in your project, listed by the addon name you will find the button for quick actions like enable or disable the addon, run the auto-integration and the documentation link.
MFPS ➔ Addons ➔ Addons Manager
- This will open the Addons Manager window, with which you can see the register of all the MFPS 2.0 available add-ons,
with information as the latest update of each addon, the changelogs, last versions, addons description, enable/disable addons, addons links, and in-project addons status.
MFPS ➔ Tutorials
- In the submenu of this, you will find listed all the build-in editor documentation and tutorials for MFPS and all the addons in your project, being the Tutorials ➔ Documentation the main or general documentation of MFPS.
MFPS ➔ Tools
- In the submenu of this, you will find various actions and helpers windows that provide useful automated operations for MFPS and or specific addons.
MFPS ➔ Manager
- This will open the MFPS Manager window with which you can find the front-end settings of MFPS and all the addons in your project, also, in this window you have a range of utility windows with you can manage some of the MFPS main settings as the default player weapons load-outs, weapons information, levels, etc...
MFPS ➔ Store
- This will open the MFPS Store window, in this window you can find listed all the available MFPS addons with their respective informations, preview images and links to acquire them.
MFPS ➔ MFPS
- This will open the MFPS window, which is the same window that appears automatically when you import MFPS for the first time, this window contains useful information about your current MFPS project as the MFPS version you are using, the changelog of the version, addons information, links for tutorials and contact information.
MFPS ➔ MFPS News
- This will open the MFPS News window, in which as the name says, you will find news about MFPS and the add-ons,
latest add-ons updates, third-party assets from the Asset Store that you may find interesting for shooter projects.
This information of this window is fetched from our server so you may want to check it regularly so you don't miss anything about MFPS.MFPS ➔ Updates
- The window displays available patch updates for your current MFPS version, but only after your purchase is verified. If your purchase hasn't been verified yet, you'll be prompted to complete the verification form.
Editor Menus - Overlay Toolbar
Starting from version 1.10.0, MFPS introduces a new editor tool, streamlining the execution of common tasks such as previewing and modifying first-person (FP) or third-person (TP) weapons, or loading map scenes. This enhancement is particularly beneficial in MFPS 1.10.0 and later versions, where FP and TP weapons are no longer part of the player prefabs, making the tool even more essential.
Upon importing MFPS, the overlay tool automatically appears in the scene editor view for immediate access. The interface is displayed as follows:
If the overlay window doesn't appear or if you've closed it and wish to reopen it, you can easily access it again. Simply navigate to the scene view window, click the options button in the top right corner, and select Overlays > MFPS Toolbar.
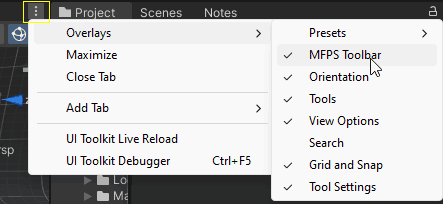
You can attach the overlay anywhere in the editor. The buttons in the toolbar perform the following actions:
Update MFPS - Upgrade Version
MFPS typically receives major version updates every 3-4 months. These updates bring new features, fixes, and enhancements. If you're already using MFPS, you'll likely want to incorporate these improvements into your ongoing project. However, due to the nature of the asset, you can't simply import the new update package over your existing project with the older version. Doing so would overwrite all your modifications, resulting in the loss of your work and progress up to that point.
The effort required to update an older MFPS project to a new MFPS version depends on several factors. These include the extent of your modifications, the version gap between your project and the new MFPS version, and the number of changes in the new update, among others.
In the following sections, we'll provide methods for updating your MFPS version under various scenarios:
Front-end changes
If your modifications to MFPS have been limited to frontend changes such as replacing player models, tweaking properties, adding maps, weapons, or altering the UI, and you haven't made any backend (code) changes, then updating is relatively straightforward. You can import the new MFPS package into your project, but you'll need to deselect certain assets to avoid overwriting your changes.
Here's how to proceed:
Import the MFPS Update Package: You can do this from the Asset Store or from your local disk.
Select Assets in the Unity Package Import Window: In this window, you can choose which assets to import. By default, all assets are selected. To preserve your changes, you need to deselect the following:
The Resources folder (which includes all the prefabs and GameData)
The MainMenu scene (only if you've made changes to the UI)
Any prefab that you've modified.
Import the ExampleLevel Scene: It's recommended to import the ExampleLevel scene as it likely contains updates. You can use this as a reference for your other map scenes.
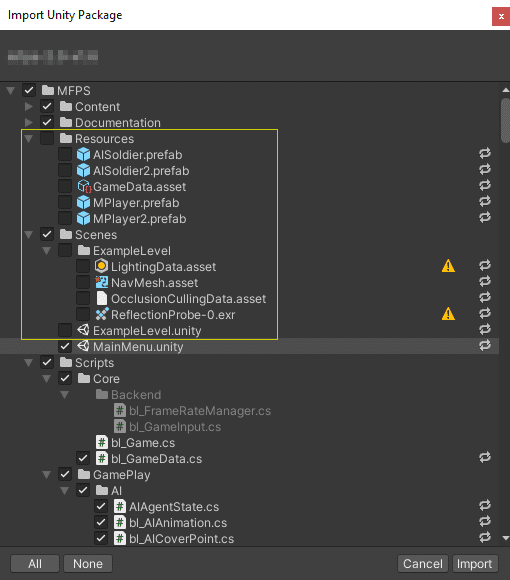
Back-end changes
If you have made code changes to the MFPS to core scripts or modifications to the main prefabs like GameManager, GameModes, Lobby, etc... the update process is more complicated.
For start, it is not possible to import the new version on your current project since this would revert all your changes losing all the work done by you, to apply the changes of the new version you must merge the changes manually, checking the scripts and prefabricated modifications of the new version and comparing them with those of your project.
This process may take some time to be done and there're high chances that a wrong merger cause errors in your game, so I will give you a method that will facilitate and reduce the work to do in this case:
• First, create a new clean Unity project, in it, import the new MFPS version package as you will normally do (importing Photon PUN as well), you will use this project as reference to see the frontend changes in scenes, prefabs, properties, etc...
• Then, you will simulate import the new MFPS version package in your started project (the project with the old version of MFPS that you have modified), note that I said simulate because you won't import it, you only need that the Unity Package Import Windows show up so you can check the changed files, this window shows all the assets that the package contains and will be imported but also if one of the files already exist in the project, it shows if the file from the package is different with respect at the file in the project, you can differentiate hthose modify files with a "Refresh" icon at the right side of the file name:
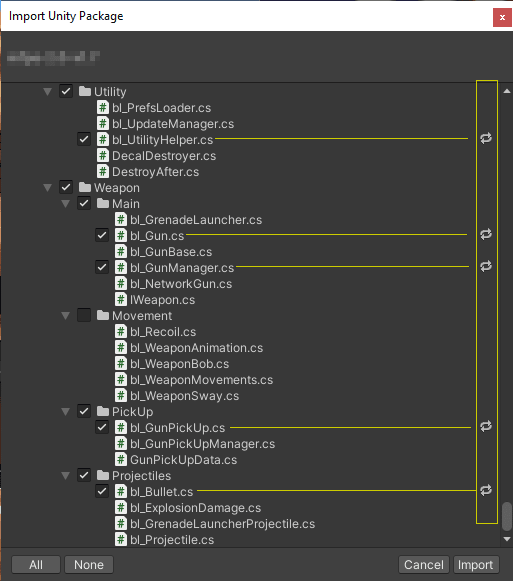
Now what you have to do is take note of the modified files, write their name in a simple text file so you can find later by their name as explained below.
Once you have all the changed file names collected, is time merge those files, unfortunatelly there's not a automated way to do this, you have to manually do this, check the changes on scripts, prefabs, etc... but don't worry you don't have to check line by line, you can use some tools to automatically detect the changes in two files.
For check changes on scripts you can use these tools:
Standalone program: Diffmerge
Online System: Diffchecker
Both systems are really straight forward to use, you have two boxes, in one you assign the script and or code of the old file/script and in the other you assing the new file, then the program will analyze and highlight you the changed lines:
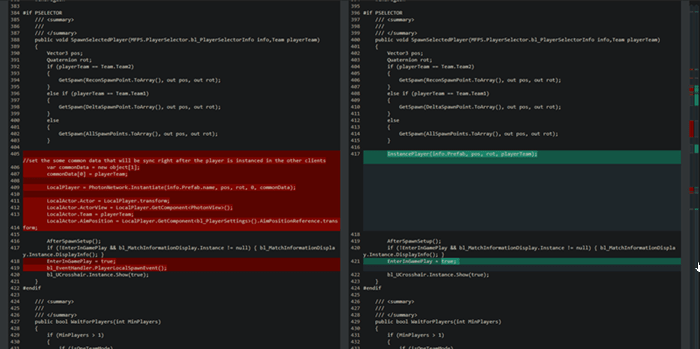
You will assign the original file (the one from your project) in the left side and the file from the new MFPS version (from the project that you create before) in the right side.
Now with the changes highlighted in the program you simple have to merge the changes in your project file (the file of the old MFPS version)
With the standalone program Diffmerge you can compare the whole MFPS folder and analyze all the files, by simple selecting the option: File -> Open Folder Diff... -> Set the path to the old version MFPS folder in the first box and set the path to the new version MFPS folder in the second box.
Now that method works efficiently for text files like scripts, but for check the differences between prefabs and scenes you will have to do it differently, for check the difference between prefabs and scenes you will have to compare both projects, Fortunately, Unity allows you to open more than one instance of the editor, so you can open the old version project and the new MFPS version project in different editor windows and inspect the differences between the prefabs and or scenes in both projects.
Update MFPS - Patch Update
Patch Update
Starting with version 1.10.0, MFPS includes a Patch Updater tool within the editor. This tool allows you to download and apply quick fixes or modifications to your current version of MFPS.
To access the Patch Updater, go to the editor’s top navigation menu, select MFPS > Updates. In the window that appears, you’ll find a list of available patch updates. Before you can download and apply these patches, you must verify your MFPS purchase. This is a one-time process achieved by clicking the Verify button in the same window.
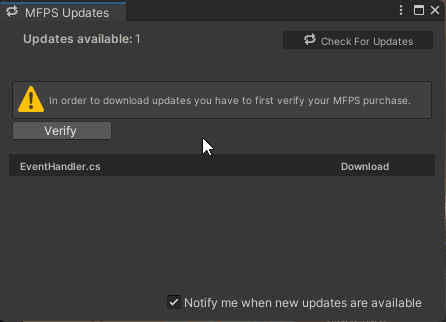
Once your purchase is verified, you can download and apply any available patches. However, if you have made custom modifications to the MFPS core scripts, be cautious. Applying a patch could overwrite your changes. Always check the patch description to see what files are affected and, during the import process, review the files included in the patch to avoid conflicts.
If you need to apply a patch but have custom modifications in the files it affects, you should manually merge these changes. To do this, import the patch into a temporary MFPS project and compare the modified files using the same method in the previous section (Upgrade Version).
Anti-Cheat
Hacking is one of the obstacles that soon or later you will face as a game developer, but especially in competitive multiplayer games, you will have to deal with those modders/hackers trying to exploit your game to get some advantage over regular players, because that, you have to take some measures since the beginning of your project to protect your game.
By default, MFPS doesn't include any Anti-Cheat system because these are big and complex systems that by they selves worth more than the MFPS core price, but since version 1.9.2, MFPS comes with the basic integration of a third-party anti-cheat asset that solves most of the common hacking methods used nowadays, this asset is the
Anti-Cheat Toolkit (ACTk)
from the Asset Store, with it you can prevent the players to be able to cheat in your game e.g modifying the player health, ammo, drops, coins, etc...
By default, the MFPS core just includes the basic integration that allows prevents the players to modify these values, but there's an addon that extends the features allowing automatically banning players that use Speed hacks, memory injection, code injection, or walk hacks, it is the MFPS Anti Cheat addon.
Although this will drive away most of the wanna-be hackers, this would not be enough for more experienced/hardened modders, actually, nothing is unhackable, you can only make it harder so they give up trying, with that in mind here you have other implementations and changes that you can do to make your game more secure in any platform:
1. Use IL2CPP
Unity supports 2 scripting backend at the moment: Mono and IL2CPP where this last one is newer and more secure, IL2CPP does produce raw binary code with metadata instead of Mono’s IL bytecode making all IL reversing tools useless and making it much, much harder to get good decompilation of your game code.
This is built-in Unity and you simply have to change the scripting backend option in the Project Settings > Player > Scripting Backend.
2. Code Obfuscation
Code obfuscation is the process of randomly generating names for your script parameters, functions, properties, etc... in the build process in order to make it pretty much unreadable for anyone that decompiles your binaries, the code will become a mess of useless names making reconstructed IL assembly very hard to reverse-engineer and analyze a complete nightmare.
Unfortunately, Unity doesn't come with such a feature included, and third-party systems are required, the most popular and easy to use obfuscator for Unity is available on the Asset Store:
Obfuscator
Enable Anti-Cheat
In order to enable the anti-cheat integration, if you are using the addon for the advance integration > follow the addon documentation, if you are not using the addon but you have installed the Anti-Cheat Toolking assets and want to enable the basic integration included in the core package > go to the editor top navigation menu > Tools > Code Stage > Anti-Cheat Toolking > Settings... > Conditional Compilation Symbols > check the ACTK_IS_HERE check box and that's.
FP Arms Material
Normally you will use the same hand model for all of your weapons model, using a different material and textures for each team, so you may encounter with the inconvenient of change the hand texture for each weapon in the player prefabs is a little bit annoying, well MFPS handle this.
You don't have two manually change the arms, sleeves, gloves, etc.. materials, you onlyhave to create a prefab and list all the arms materials along with the different textures per team.
Let's start by creating a new "Arms Material" asset, in the Project Window select a folder where save the asset and do Right Mouse Click -> MFPS -> Player -> Arm Material
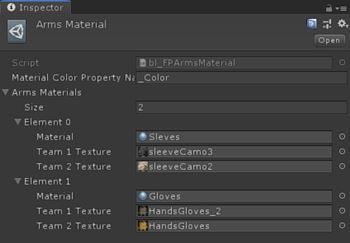
Then select the created material and in the Inspector window you'll see a List, in this list you have to add all the materials your Arms model that change of texture depending of the player team, for example the default MFPS arms model have 3 materials: Sleeve, Skin and Gloves, but only the Sleeves and Gloves material change of texture, the skin is the same, so only those two materials are include in the list.
Probably you only have to add the Gloves Material, so add a new field on the list and assign the material and add the different Textures depending of the Team.
With that the materials will automatically change of textures in runtime depending on which team the player spawm.

AFK
AFK
AFK is an abbreviation for away from keyboard, players are called AFK when they have not interact with the game in a extended period of time. in multi player games AFK players could be a problem,like for example in MFPS where players play in teams, an AFK player represent free points for the enemy team, or in different context AFK player are used to leveling up, so that is way some games count with a system to detect these AFK players and kick out of the server/room after a certain period of time begin AFK. MFPS include this system but is disable by default.
In order to enable AFK detection, go to GameData -> turn on Detect AFK, -> set the seconds before kick out players after detected as AFK in AFK Time Limit
Lobby Chat
MFPS 2.0 include a lobby chat system, for players by able to communicate between meanwhile search or wait for join to a match, this chat use Photon Chat plugin, for use it you need to have a Photon Chat AppID (it's not the same that Photon PUN AppID), you can get this appid from your photon dashboard:
Get your AppId from the Chat Dashboard:
when you have your Chat AppID, paste it on the PhotonServerSettings:
Common Q/A
If you don't know what Navmesh is or how to bake it, check this: https://docs.unity3d.com/Manual/nav-BuildingNavMesh.html
How to bake it, check this:
https://docs.unity3d.com/Manual/occlusion-culling-getting-started.html
The number of players before the game start experimenting this performance issue depend on various factors like the runtime platform, device specs, network connection, etc...
We have done our own tests with the default MFPS (1.5) to have some benchmarks, these are the result:
For PC with these specs:
Intel i7 3.70GHz
16Gb Ram
Nvidia GTX 1070
18 players in the same room
Medium graphic quality
Run with a average of 60-80 FPS
For Mobile:
using a Samsung S8 Plus
12 Players in the same room
With MFPS optimized for mobile (not the default scenes)
Run with a average of 60-75 FPS
You can use these statistics as a reference but keep in mind that there are many factors which can influence the result, so it is recommended that you do your own tests.
But by default this is not possible from a front-end option (like a toggle to switch between libraries),
integration other network library will require a lot of code changes to switch from the Photon syntax to your network sdk syntax, and there is the possibility that some methods or features of Photon do not exist or are done differently in your network library.
Info: Photon Server Information
In the MainMenu/Lobby scene, in the bottom right corner you will see a drop-down with a region name, you can use it to select and change of server, so make sure you and your testers are connected to the same server region.
Known Issues
On this page, we will list known issues with MFPS. The focus here is on issues that we can't fix or workaround at the moment but not just bugs or errors, but also problems that affect the development workflow with MFPS.
OTHER NETWORK SOLUTIONS
Currently, MFPS only supports Photon PUN 2 as the network solution, and it's deeply integrated into the game code. Supporting other network solutions is not feasible at the moment because it would require rewriting the entire game code. Additionally, PUN has a unique implementation, so using a different network solution would involve a completely different approach.
There are no plans to support other network solutions in MFPS 2.0. However, MFPS 3.0 is planned to be a major upgrade, not just an update. The goal for MFPS 3.0 is to be more network-agnostic or, at the very least, make it easier to integrate different network solutions. The new version will likely use a more open-source network solution rather than relying on PUN.
SUPPORT FOR BOTS IN ALL GAME MODES
A common question from MFPS users is: Why aren't bots supported in all game modes?
While this might not be the answer you're hoping for, the reason is simple: it's a huge amount of work. Developing AI, even for basic bots like the ones in MFPS, is a challenging task—especially when integrated into a multiplayer environment. However, MFPS does include a multiplayer AI shooter system that supports two of the most popular game modes.
The challenge lies in the fact that each game mode requires custom bot behaviors to fit its specific rules. This makes things much more complex and time-consuming. As much as I'd love to add bot support to all modes, balancing development time and income is important for the continued progress of MFPS. Since AI development is one of the more time-intensive areas, additional bot support for other game modes will likely be available as a paid addon in the future.
Does this mean bots will never be supported in other game modes? Not at all—it’s just not planned at the moment. My focus right now is on features that are more impactful for the community, but additional bot support is something I’m keeping in mind for later.
UPDATING MFPS
Due to the nature of this asset, updating MFPS when a new version is released can be a bit tricky. As a game template, it's meant to serve as the foundation for your own game, which means you'll likely need to make modifications, integrations, or removals to suit your specific game plan. These changes often involve editing the core code or content of the base template, which complicates the update process.
Once you've made core modifications, automatic updates are no longer possible. Instead, you'll need to manually merge the new changes into your project, which can be time-consuming and, if done incorrectly, may cause issues in your game. For more information and detailed instructions on how to manually merge updates, check the "Update MFPS" section.
GRAMMAR
I hope you can bear with me! D:
It's pretty clear from the documentation, code, and comments that English grammar isn't my strongest skill. The reason is simple: I'm not a native English speaker. But that's not an excuse—many people aren't, and they do just fine! I know there are mistakes, but just for context: I’m from El Salvador, a small country in Central America that you probably won’t notice unless you zoom in on Google Maps. Unfortunately, there aren’t many opportunities here to refine language skills, but I do my best—so please don’t be too hard on me! :[
In the meantime, if you spot any grammar errors, feel free to let me know! Your feedback is always appreciated.